Setup / How to install licensed edition
Setup / How to install licensed edition
Congratulations on your recent purchase of a licensed edition of Chocolatey! If you are trialing, please pay particular attention to that section:
Internal / Organizational Chocolatey Deployments
Refer to How To Set Up Chocolatey For Organizational/Internal Use in tandem with this article.
Some Administrative Actions
- The email the license is sent to will automatically be subscribed to the customer advisory list. If there are other folks who need to be on that list for important notifications, please have them sign up at Chocolatey Customers.
- Please sign up for software announcements at Chocolatey Announce. Direct others to sign up for the list as well.
- For support, remember to use the support email address (below).
- Learn how to install below.
How Do I Know When the License is Installed?
Installing a licensed edition requires two parts
- The properly placed license file
- Installing/upgrading the licensed package - Chocolatey Licensed Extension (
chocolatey.extension)
When you have performed all parts correctly, running choco will produce a message like one of the following:
Chocolatey v0.10.8 ProfessionalChocolatey v0.10.8 Business
Additionally:
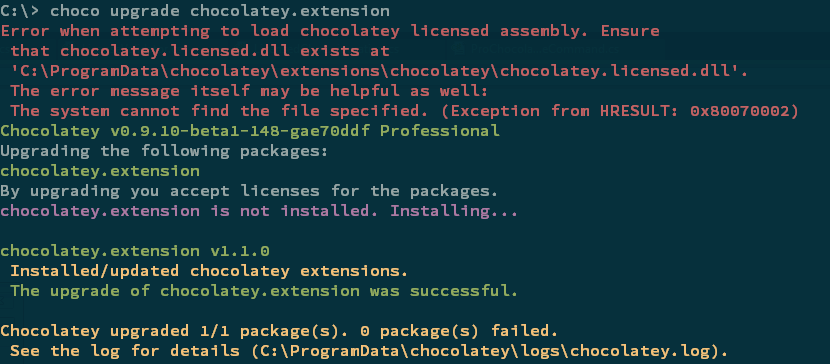
- You will not see “Error when attempting to load chocolatey licensed assembly” warning message.
If you do not see the edition next to the name and version without an error, you need to check over your installation procedure again to ensure you’ve completed it properly. See below.
See It In Action
Here’s the whole process for installing your license and installing the licensed code.
How Do I Install The Licensed Edition?
NOTE
Prior to install, see if there are any parameters (like turning off context menus) that you may want to set. See install options.
WARNING
Order is VERY important here. You need license file placed, then
chocolatey.extension, then any other licensed components. Expect issues if you don’t follow this order exactly.
- Install a recent version of Chocolatey (0.10.8+) -
choco upgrade chocolatey(due to a tight integration,chocolatey.extensionmay need a newer version than what is listed here). - You received a license file in email.
- Open PowerShell.exe as an administrative shell. You can type Windows Key + X + A (Windows 8+ - when that comes up if it is cmd.exe, simply type
powershellto get into it). - In PowerShell, run
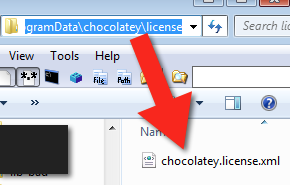
New-Item $env:ChocolateyInstall\license -Type Directory -Force- this creates the license directory. Alternatively, you can put the license in your user profile directory, e.g."C:\Users\YourUserName\chocolatey.license.xml", however we only recommend you do this for Professional licenses as for other licensing you may need it to be recognized by multiple users. - Now place that license file in that license folder. You can do this manually, or you can adapt this PowerShell command -
Copy-Item <c:\path\>chocolatey.license.xml $env:ChocolateyInstall\license\chocolatey.license.xml -Force. (See image below) - Verify the license file is set properly. In PowerShell, run
type $env:ChocolateyInstall\license\chocolatey.license.xml.If that returns something, it means you are good to go. If not, something is misspelled or misplaced somewhere. - Run this command:
choco upgrade chocolatey.extension(or you can callinstallinstead ofupgrade). You will see an error you can safely ignore. - Run this command:
choco. You should not see any error message logged anymore (like you saw in the previous run asking you to install the licensed extension). If you do see an error message still, you may need to revisit these steps and determine what might have been missed or mistyped. - That’s it! You are good to go.
NOTE
Organization?
If you are an organization deploying the licensed edition, you may want to review the organizational deployment guide in addition to this for options to deploy to more than one machine.
When deploying the license file out to many machines it is recommended to wrap the license placement logic into a Chocolatey package, embedding the license into the package. This is super helpful when you upgrade the license files later when renewing or purchasing the full edition.
Refer to How To Set Up Chocolatey For Organizational/Internal Use where we have a script you can run that will create the license package automagically.
How Do I Install a Local nupkg File?
Here is an example of installing the licensed extension nupkg from a local file directory. choco install chocolatey.extension --pre --source C:\folder\where\downloaded\nupkg\resides
NOTE
Please refrence the choco install command documentation for more information regarding the
--pre&--sourceswitches used in this command.
How Do I Install The Trial Edition?
Trial licenses can be installed in the same way as full Business or Professional licenses. See How do I install the Licensed Edition? above.
Notes on the Trial Version
Very little functionality if any is held back. With the movement forward on things like Central Management and GUI branding, those are now available with a trial as well.
Install Options
Install Without Context Menus
You can install to client machines without the context menus (the “Right Click” menu). Add the following to your installation : --params="'/NoContextMenu'". You can pass --params="'/NoContextMenu'" during upgrade as well to remove context menus if you have previously already deployed them. Example: choco install chocolatey.extension -y --params="'/NoContextMenu'".
Upgrading
Upgrade the Extension
To upgrade the licensed edition just run the following code:
choco upgrade chocolatey.extension(plus options like-yfor scripts)
Your license automatically adds the licensed source.
WARNING
If your license expires or you remove licensing and then run choco, it may remove all of your licensed configuration settings, so be prepared to add those settings again once you have a valid license.
How Do I Upgrade the License File?
You would simply place the new license file on top of the existing license file, overwriting it. This can be done in many ways, the recommended way is to create a package for the license itself. See Create a license for the package as part of the organizational deployment guide.
How Do I Upgrade the Trial Edition?
You can upgrade your licensed components as long as your Trial license is still valid. Please reach back out to your Chocolatey Software contact to request an extension if necessary.
How Do I Upgrade the Trial License File?
The same way you upgrade for the full edition. See How Do I Upgrade the License File?
Installing / Upgrading In Secure Environments / Without Internet Access
Once you have the license down and the licensed edition extension installed the first time, you will have access to choco download. This will allow you to download the licensed edition and put it on your internally hosted repository.
From a machine that will have access to do this you simply run:
choco download chocolatey.extension --source https://licensedpackages.chocolatey.org/api/v2/ --ignore-dependencies- Whatever followup command you need to push that downloaded package to your internal package repository.
You can even script this or add it to a CI job that would automatically make the newer edition available.
WARNING
The licensed source that is automatically added can be disabled, but it cannot be removed. So just run
choco source disable --name chocolatey.licensedto disable it or set that up in your configuration management solution scripts. Some of them, like Puppet, have a resource dedicated strictly to this.
## Disable the licensed source, it can't be removed
## Disabled sources still need all other attributes until
## https://tickets.puppetlabs.com/browse/MODULES-4449 is resolved.
## Password is necessary with user, but not ensurable, so it should not
## matter what it is set to here. If you ever do get into trouble here,
## the password is your license GUID.
chocolateysource {'chocolatey.licensed':
  ensure   => disabled,
  priority => '10',
  user     => 'customer',
  password => '1234',
  require  => File['C:/ProgramData/chocolatey/license/chocolatey.license.xml'],
}
Set Up Licensed Edition With Puppet
Most organizations using Chocolatey and Puppet are going to do so with zero internet access.
- Set up a local licensed edition of Chocolatey and run the following commands:
choco download chocolatey --source https://community.chocolatey.org/api/v2/choco download chocolatey.server --source https://community.chocolatey.org/api/v2/choco download chocolatey.extension --source https://licensedpackages.chocolatey.org/api/v2/ --ignore-dependencieschoco download chocolatey-agent --source https://licensedpackages.chocolatey.org/api/v2/ --ignore-dependencies- Use
choco pushto push those items to your internal package repository (e.g.choco push chocolatey.0.10.7.nupkg --source http://internal_repo/ --api-key abc123) - Determine how to get the bare url to download the Chocolatey.Nupkg directly. You will need that for the internal url for installing Chocolatey offline. For the community repository, it is https://community.chocolatey.org/api/v2/package/chocolatey
Here is what a completely offline use of Chocolatey looks like (complete with a Chocolatey.Server instance):
# Requires puppetlabs/chocolatey module
# See https://forge.puppet.com/puppetlabs/chocolatey

## - Ensure Chocolatey Install -
## Download chocolatey.nupkg to your internal repository (see above
##  about getting the package for offline use)
## Note: `chocolatey_download_url is completely different than normal
##  source locations. This is directly to the bare download url for the
##  chocolatey.nupkg, similar to what you see when you browse to
##  https://community.chocolatey.org/api/v2/package/chocolatey
class {'chocolatey':
  chocolatey_download_url => 'https://<internalurl/to>/chocolatey.nupkg',
  use_7zip                => false,
}


## If you need FIPS compliance
## make this the first thing you configure before you do any additional
## configuration or package installations
#chocolateyfeature {'useFipsCompliantChecksums':
#  ensure => enabled,
#}

## Keep chocolatey up to date based on your internal source
## You control the upgrades based on when you push an updated version
##  to your internal repository.
## Note the source here is to the OData feed, similar to what you see
##  when you browse to https://chocolatey.org/api/v2
package {'chocolatey':
  ensure   => latest,
  provider => chocolatey,
  source   => 'https://<internal_repo>/',
}

## - Configure Chocolatey -
### Config Settings

## Move cache location so Chocolatey is very deterministic about
## cleaning up temporary data
chocolateyconfig {'cacheLocation':
  value => 'c:\ProgramData\chocolatey\choco-cache',
}

## Increase timeout to 4 hours
chocolateyconfig {'commandExecutionTimeoutSeconds':
  value => '14400',
}

### Sources
## Remove the default community package repository source
chocolateysource {'chocolatey':
  ensure   => absent,
  location => 'https://community.chocolatey.org/api/v2/',
}

## Disable the licensed source, it can't be removed
## Disabled sources still need all other attributes until
## https://tickets.puppetlabs.com/browse/MODULES-4449 is resolved.
## Password is necessary with user, but not ensurable, so it should not
## matter what it is set to here. If you ever do get into trouble here,
## the password is your license GUID.
chocolateysource {'chocolatey.licensed':
  ensure   => disabled,
  priority => '10',
  user     => 'customer',
  password => '1234',
  require  => File['C:/ProgramData/chocolatey/license/chocolatey.license.xml'],
}

## Add default sources for your internal repositories
chocolateysource {'internal_chocolatey':
  ensure             => present,
  location           => 'http://internal_location/OData/endpoint',
  priority           => 1,
  username           => 'optional',
  password           => 'optional,not ensured',
  bypass_proxy       => true,
  admin_only         => false,
  allow_self_service => false,
}

### Features
chocolateyfeature {'checksumFiles':
  ensure => enabled,
}

## When using Puppet for installs
chocolateyfeature {'showDownloadProgress':
  ensure => disabled,
}

chocolateyfeature {'useRememberedArgumentsForUpgrades':
  ensure => enabled,
}

## - LICENSED OPTIONS -
### See https://docs.chocolatey.org/en-us/licensed-extension/setup

file { ['C:/ProgramData/chocolatey','C:/ProgramData/chocolatey/license']:
  ensure => directory,
}

### Ensure the license file is in the module
### `puppet:///modules/module_name` == files directory of the module
### `<module_name>\files\chocolatey.license.xml` is where the example
###  be found, where <module_name> is the name of the module (e.g. `choco_internal`)
file {'C:/ProgramData/chocolatey/license/chocolatey.license.xml':
  ensure              => file,
  source              => 'puppet:///modules/<module_name>/chocolatey.license.xml',
  source_permissions  => ignore,
}

## Ensure the chocolatey.extension package
package {'chocolatey.extension':
  ensure          => latest,
  source          => 'internal_chocolatey',
  install_options => ['-pre'],
  require         => File['C:/ProgramData/chocolatey/license/chocolatey.license.xml'],
  provider        => chocolatey,
}

### Licensed Config Settings
chocolateyconfig {'virusScannerType':
  value   => 'Generic',
  require => Package['chocolatey.extension'],
}

## McAfee options
## https://kc.mcafee.com/corporate/index?page=content&id=KB75478
#chocolateyconfig {'genericVirusScannerPath':
#  value   => 'C:\full\path\to\scan.exe',
#  require => Package['chocolatey.extension'],
#}

## https://community.mcafee.com/thread/70968?start=0&tstart=0
## You could try cleaning as well /CLEAN /NORENAME (instead of /DEL)
#chocolateyconfig {'genericVirusScannerArgs':
#  value   => '[[File]] /ANALYZE /NC /NOEXPIRE /DEL /NOEXPIRE /SILENT /REPORT=c:\ProgramData\choco-cache\lastscan.log',
#  require => Package['chocolatey.extension'],
#}

## 0 for no issues, 19 for success on cleaning any infected files
#chocolateyconfig {'genericVirusScannerValidExitCodes':
#  value   => '0, 19',
#  require => Package['chocolatey.extension'],
#}

### Licensed Feature Settings
chocolateyfeature {'virusCheck':
  ensure  => enabled,
  require => Package['chocolatey.extension'],
}

## Package Internalizer enhancement
## See https://docs.chocolatey.org/en-us/guides/create/recompile-packages
chocolateyfeature {'internalizeAppendUseOriginalLocation':
  ensure  => enabled,
  require => Package['chocolatey.extension'],
}

## Package Reducer - keep space down
chocolateyfeature {'reduceInstalledPackageSpaceUsage':
  ensure  => enabled,
  require => Package['chocolatey.extension'],
}

## Unlock preview features - check before you do this, may not be
##  production ready
#chocolateyfeature {'allowPreviewFeatures':
#  ensure  => enabled,
#  require => Package['chocolatey.extension'],
#}


## - Chocolatey Simple Server Package Repository -
## Requires chocolatey/chocolatey_server module  - see
##  https://forge.puppet.com/chocolatey/chocolatey_server
## this contains the bits to install the custom server
## - Ensures IIS and Ensure ASP.NET
## - Installs and configures the Chocolatey.Server website and app pool
## - Sets permissions appropriately

## `server_package_source` is to the OData feed, similar to what you see
##  when you browse to https://chocolatey.org/api/v2
class {'chocolatey_server':
  server_package_source => 'https://internalurl/odata/server',
}

chocolateysource {'local_chocolatey_server':
  ensure   => present,
  location => 'http://localhost/chocolatey',
  priority => 2,
}
Install the Chocolatey Agent Service
For C4B (Chocolatey for Business) customers, there is an optional agent service you can install. The agent service allows for things like background mode, setting up maintenance windows (future), and hooking up to Chocolatey Central Management (future).
To be able to install it, you must first have the licensed edition properly installed. Once you have verified your install, you can run the following:
choco install chocolatey-agent <options>
For more on the agent service, please see Agent Service.
Ensure the Chocolatey Agent Service with Puppet
This is used in conjunction with the script in Set Up Licensed Edition With Puppet. Here are some additional commands and scripts you will need for that setup:
choco download chocolatey-agent --source https://licensedpackages.chocolatey.org/api/v2/ --ignore-dependencies- Use
choco pushto push packages to your internal package repository (e.g.choco push chocolatey-agent.0.8.0.nupkg --source http://internal_repo/ --api-key abc123)
## - Chocolatey Agent (Additional optional Chocolatey for Business install) -
## See https://docs.chocolatey.org/en-us/agent/setup

## ensure we set the user up properly
chocolateyfeature {'useLocalSystemForServiceInstalls':
  ensure  => disabled,
  require => Package['chocolatey.extension'],
}

## this is the default setting
chocolateyconfig {'serviceInstallsDefaultUserName':
  value   => 'ChocolateyLocalAdmin',
  require => Package['chocolatey.extension'],
}

## if you are passing through a password, set that here
## otherwise Chocolatey will manage a password that is secured
## and different per machine
#chocolateyconfig {'serviceInstallsDefaultUserPassword':
#  value   => '<inject_from_hiera>',
#  require => Package['chocolatey.extension'],
#}

package {'chocolatey-agent':
  ensure          => latest,
  install_options => ['-pre'],
  require         => Chocolateyfeature['useLocalSystemForServiceInstalls'],
  provider        => chocolatey,
}
For setting up Self-Service / Background Mode, add the following elements:
choco download chocolateygui --pre --source="'https://www.myget.org/F/chocolateygui/;https://chocolatey.org/api/v2'" --ignore-dependencieschoco download dotnet4.5.2 --internalize --source https://chocolatey.org/api/v2- Use
choco pushto push those items to your internal package repository (e.g.choco push chocolatey.0.10.7.nupkg --source http://internal_repo/ -api-key abc123)
## You don't want a non-admin to get a warning when using self-service
chocolateyfeature {'showNonElevatedWarnings':
  ensure => disabled,
  require => Package['chocolatey-agent'],
}

## Ensure Admins (and Puppet) do not use the background service
chocolateyfeature {'useBackgroundServiceWithNonAdministratorsOnly':
  ensure  => enabled,
  require => Package['chocolatey-agent'],
}

## We don't recommend disabling this unless you've removed all sources
##  except for your internal and they are fine for self-service
#chocolateyfeature {'useBackgroundServiceWithSelfServiceSourcesOnly':
#  ensure  => disabled,
#  require => Package['chocolatey-agent'],
#}

## Set Chocolatey into background mode
chocolateyfeature {'useBackgroundService':
  ensure  => enabled,
  require => Chocolateyfeature['useBackgroundServiceWithNonAdministratorsOnly'],
}

## Allow Non-Admins to Uninstall Packages
chocolateyconfig {'backgroundServiceAllowedCommands':
  value   => 'install,upgrade,uninstall',
  require => Package['chocolatey.extension'],
}

chocolateyfeature {'allowBackgroundServiceUninstallsFromUserInstallsOnly':
  ensure  => enabled,
  require => Package['chocolatey.extension'],
}


## Add repositories allowed for self-service - Requires at least v3.20
# https://forge.puppet.com/puppetlabs/chocolatey/changelog#320---2019-02-19
chocolateysource {'repo_for_self_service':
  ensure             => present,
  location           => 'http://internal_location/OData/endpoint',
  priority           => 1,
  username           => 'optional',
  password           => 'optional,not ensured',
  bypass_proxy       => true,
  allow_self_service => true,
}

package {'dotnet4.5.2':
  ensure   => latest,
  notify   => Reboot['pending_dot_net_install'],
  provider => chocolatey,
}

reboot { 'pending_dot_net_install':
  when => pending,
}

package {'chocolateygui':
  ensure          => latest,
  install_options => ['-pre'],
  require         => Package['dotnet4.5.2'],
  provider        => chocolatey,
}
Common Errors and Resolutions
When you are attempting to install the licensed edition, you may run into some errors depending on your configuration. Here are some common ones we’ve seen.
Chocolatey doesn’t recognize the license file
When you run choco, it doesn’t show a commercial edition next to the name. Like ‘Chocolatey v0.10.7 Professional’. This means that Chocolatey is not detecting a license file. This could be an incorrectly placed or incorrectly named file. For troubleshooting, please perform the following:
- Open PowerShell and run the following command (verbatim):
Get-Content $env:ChocolateyInstall\license\chocolatey.license.xml
You should see the output of the license file. If you do not see this, the license file is not placed correctly or misnamed. Please go back and set the license correctly to see if that fixes the issue.
If you do see the expected output but Chocolatey is still not recognizing the file, please do the following:
- Run
cacls.exe C:\ProgramData\chocolatey\license - Run
cacls.exe C:\ProgramData\chocolatey\license\chocolatey.license.xml - Run
where.exe choco - Please zip up
C:\ProgramData\chocolatey\logs\chocolatey.log - Open a support ticket and send us the log and the output of the commands in this step.
Exception of type ‘Rhino.Licensing.LicenseNotFoundException’ was thrown.
If you run into this error, it means you are on an older version of Chocolatey and you need to upgrade.
- Remove the license file.
- Upgrade the
chocolateypackage -choco upgrade chocolatey <options> - Set the license file back and proceed with the install or upgrade process as above.
ERROR: The term ‘Install-ChocolateyWindowsService’ is not recognized as the name of a cmdlet, function, script file, or operable program.
You can get this if you are attempting to install the chocolatey-agent package, but you don’t have a verified installation of a licensed edition of Chocolatey. You must resolve that prior to attempting to install the chocolatey-agent package. See How Do I Know When the License is Installed?.
Unable to load licensed version extensions and commands.
You may see a message like this: Unable to load licensed version extensions and commands. Please make sure the version of Chocolatey you are on is up to date and meets the minimum requirements of the licensed version. If that version is in beta, that means the latest avaialble version. followed by the actual error that may look something like this: Could not load type 'chocolatey.infrastructure.app.services.Isomething' from assembly 'choco, Version=0.10.7.0, Culture=neutral, PublicKeyToken=79d02ea9cad655eb'. 0.10.7.
If you see this, it is typically due to an incompatibility between Chocolatey and the licensed extension (Chocolatey.Extension). As these two are tightly integrated to each other, sometimes there are incompatibilities introduced. Chocolatey Software will inform customers of these issues and ways to get around that, typically ahead of releases on the customer advisory list (the link for this is sent with the email that contained the license).
First steps:
- Try
choco upgrade chocolatey.extension -y
If that is successful, you are good to go. If not, check for other processes locking files/folders in your Chocolatey installation. Please see Access to the path is denied.
If neither of these have resolved the issue, the following steps should remedy the situation:
WARNING
Running choco in an unlicensed sense will reset/remove all licensed configuration.
- Make a backup of the
chocolatey.config(typically at “C:\ProgramData\chocolatey\config\chocolatey.config”). - Remove the license file - rename the
licensefolder tolicensed(typically at “C:\ProgramData\chocolatey\license”). - In the
extensionsfolder, delete thechocolateyfolder (typically at “C:\ProgramData\chocolatey\extensions\chocolatey”). - Run
choco uninstall chocolatey.extension. - Add the license file again - rename the
licensedfolder back tolicense. - Run
choco upgrade chocolatey.extension. - Compare the current
chocolatey.configto your backed upchocolatey.configand set anything that was reset in this process.
Error when registering components
You may see Error when registering components for 'chocolatey.licensed.infrastructure.app.registration.ContainerBinding': Exception has been thrown by the target of an invocation. This falls into the incompatibility or locking aspect. Please see Unable to load licensed version extensions and commands.
Access to the path is denied.
You may be attempting to upgrade chocolatey.extension and see that the access to the path c:\programdata\chocolatey\lib\chocolatey.extension is denied. If you’ve verified you are an administrator and can not get into that folder, it’s likely the folder was attempted to be deleted, but another process was accessing that folder and is holding a lock on it. You can use Handles (SysInternals) or something like LockHunter to attempt to find out if there is a lock on the folder. If there is, you normally would just need to close the process in question so the folder can be deleted.
Unfortunately, this is likely to cause your install to be unusable until you fix the locking issue.
No longer able to double click a nuspec to create a package
In the Windows 10 1803, it may remove the file association. You can simply choco install chocolatey.extension -y --force to add it back in.