Azure Environment
Azure Environment
Summary
This is an overview of the Chocolatey for Business Azure Environment.
It is a deployable resource in the Microsoft Azure Marketplace, allowing for the speedy creation of an opinionated, pre-configured environment containing Chocolatey Central Management (CCM), a package repository (Nexus OSS), and an automation engine (Jenkins).
NOTE
A Chocolatey for Business Azure Environment is a fully functional Chocolatey for Business environment; as such, it will require a business or trial license.
Prerequisites
Currently, to deploy the Chocolatey for Business Azure Environment you will need:
- A Chocolatey for Business License, or Trial License
- An account with Contributor access to an Azure subscription
- The ability to create a CNAME DNS record for your chosen FQDN
- A valid certificate for your chosen FQDN, in PFX format, with exportable private key
For portions of this document using PowerShell, we assume you have installed a recent version of the Az modules (easily available by running choco install az.powershell in an elevated prompt), and have logged in to your account using Connect-AzAccount. You can also set a variable, $ResourceGroupName, to the name of the resource group you deployed the Chocolatey for Business Azure Environment to as we will use this with the PowerShell code snippets below.
Deploying the Chocolatey for Business Azure Environment
The Chocolatey for Business Azure Environment is available as a deployable resource in the Microsoft Azure Marketplace.
Find the Chocolatey for Business Azure Environment resource, and click Create. You will be taken to the Create Chocolatey for Business Azure Environment page.
Basics
Select the subscription, resource group, and region you intend to deploy to. As you need to deploy this to an empty resource group, you may need to create a new one by clicking the Create new button below the selector.
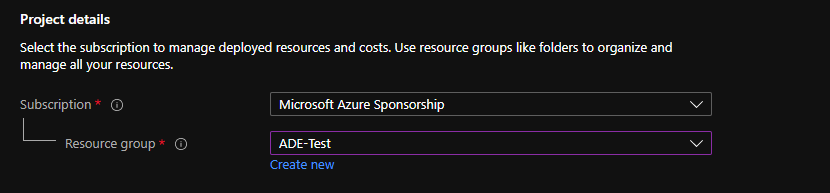
By default, all resources in the resource group are deployed with ‘choco’ prefixing the resource name. If you’d prefer to use something else for identification you can change it here.
NOTE
Due to constraints in naming some resources, the prefix must be 8 characters or less and contain only alphanumeric characters.

For the environment to deploy successfully, you must have a valid Chocolatey for Business license. Select and upload your license here.

Domain Configuration
In order to connect to your new Chocolatey for Business Azure Environment, you will need to select a DNS name. Though you can connect to the Microsoft provided FQDN, there would be additional work involved in trusting the self-signed certificate used (i.e. adding the Public IP addresses’ FQDN to a self-signed certificate, and ensuring this certificate was in the Trusted Root Certification Authorities store).
Fill your intended domain name in, select and upload your PFX certificate, and enter the password for the certificate.
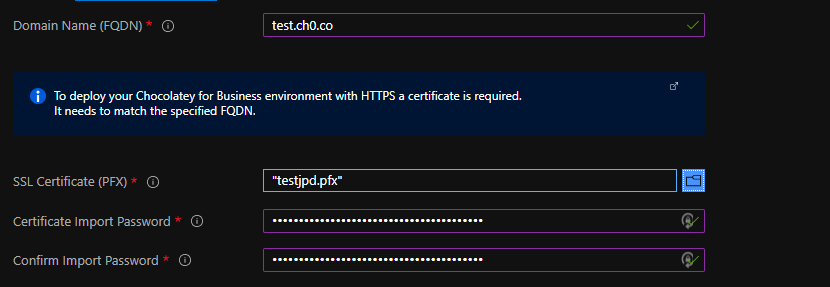
NOTE
The PFX certificate must contain the exportable private key, and should be protected with a password. Suggestions for creating a PFX certificate can be found here.
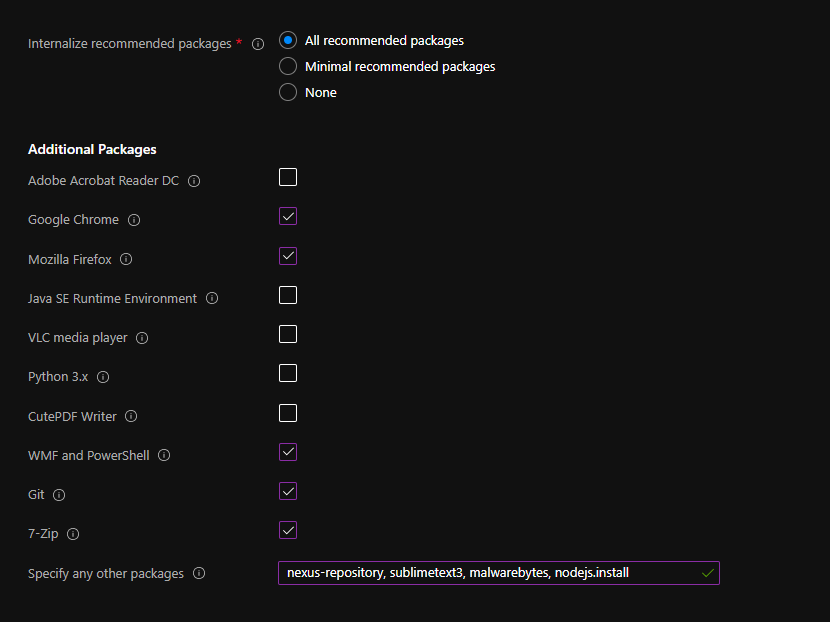
Internalize Packages
You can select packages to directly internalize from the Chocolatey Community Repository.
We offer bundles of recommended packages (see recommendations for the exact content of each bundle).
You can then select any of the Additional Packages, which will be added to the bundle you choose.
Finally, you can specify any other package from the Chocolatey Community Repository in the Specify any other packages textbox.
Please provide a list of Package IDs, separated with commas.
Review + create
At this point, Azure will validate your inputs and allow you to deploy the resource.
If there are any validation errors (e.g. missing fields), Azure will highlight the tab the issue is on.
When validation succeeds, click Create. The specified environment will be deployed. This can take around half an hour, depending on how many packages are being internalized.
DNS Configuration
You should create a CNAME DNS record for the domain you specified on the earlier Domain Configuration page.
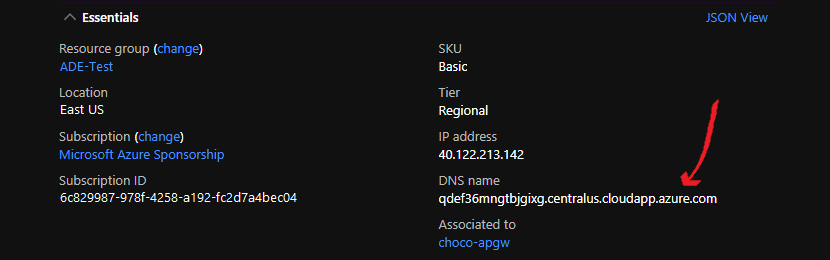
You can get the FQDN using the Azure Portal, or via PowerShell:
Portal:
- Navigate to the Resource Group
- Select the resource with type
Public IP Address - Copy the
DNS namefrom theEssentialspanel at the top of the blade
PowerShell:
- Run the following PowerShell:
if (-not $ResourceGroupName) {$ResourceGroupName = Read-Host 'Enter the ResourceGroupName'}
Get-AzPublicIpAddress -ResourceGroupName $ResourceGroupName | Select-Object -ExpandProperty DnsSettings | Select-Object -ExpandProperty Fqdn
Creating a CNAME record
You should now create a CNAME record for this FQDN. The exact method for this will vary depending on your domain registrar. Please see the table below for links to help from some popular registrars:
| Registrar | Documentation |
|---|---|
| GoDaddy | Add a CNAME record |
| NameCheap | How to Create a CNAME Record For Your Domain |
| Cloudflare | Managing DNS records in Cloudflare |
| Bluehost | How To Create & Edit CNAME |
| 123-reg | Creating a CNAME record |
If you need help with another registrar, we recommend searching for their documentation, or reaching out to their support.
Configuring Chocolatey Central Management
WARNING
You cannot create users in Chocolatey Central Management until you have configured an SMTP server. To do this, please see how to configure SMTP. You can log in to Chocolatey Central Management using the credentials provided in the KeyVault (see Accessing Services, below).
Accessing Services
At this point, your environment should be deployed. You should be able to access the following services:
| Service | Address | Initial Username |
|---|---|---|
| Chocolatey Central Management | https://<FQDN>/ | ccmadmin |
| Sonatype Nexus | https://<FQDN>/nexus | admin |
| Jenkins | https://<FQDN>/jenkins | admin |
Passwords to log in to the services have been stored in the KeyVault deployed to your Resource Group.
You can access these passwords either via the Azure Portal, or with PowerShell.
Portal:
-
Navigate to the Resource Group
-
Select the KeyVault
-
Under
Settingson the left of the blade, selectAccess Policies -
Click
+ Add Access Policy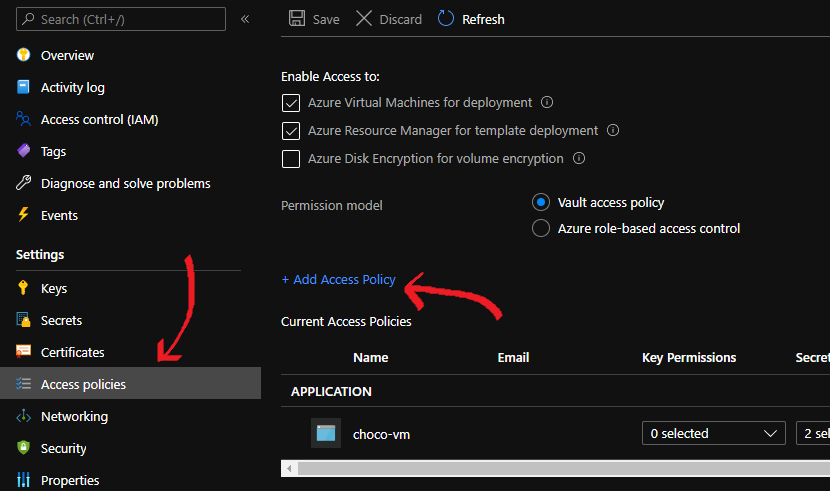
-
Select, at a minimum,
Secret Permissions:GetandList(You can use a Template such asSecret Management)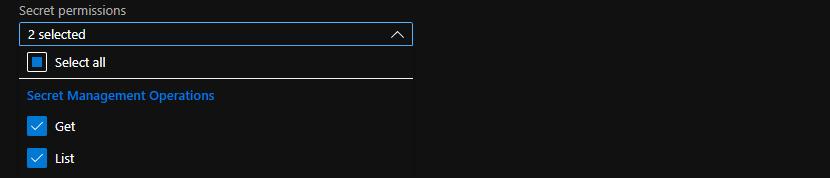
-
Under
Select Principal, clickNone Selectedand find your current user, and select it -
Click
Add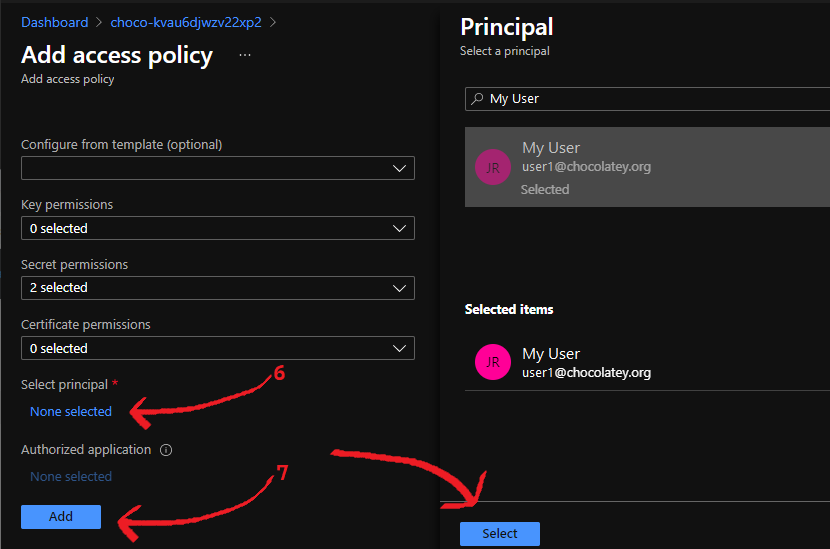
-
Back on the
Access Policiesblade, hitSaveand wait for the operation to complete
You can now view and access the secrets in this KeyVault.
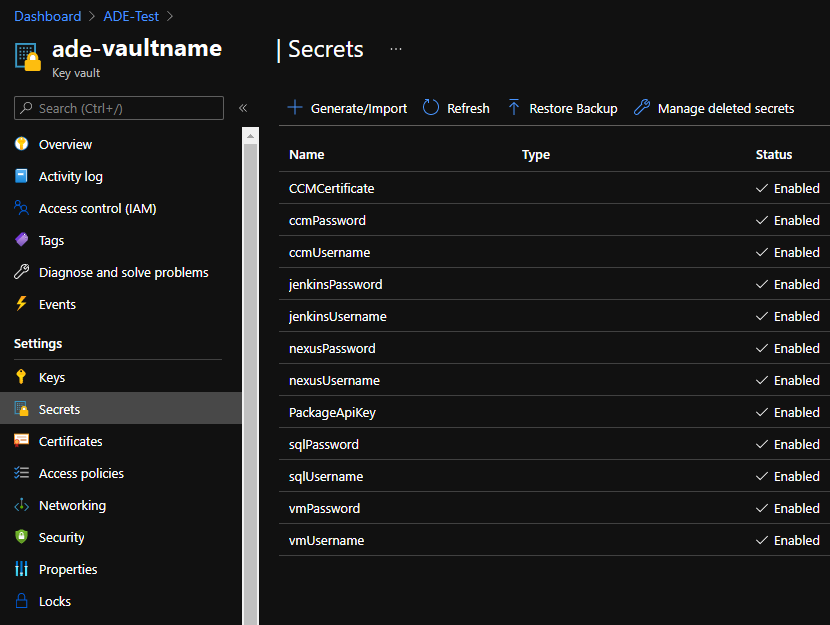
- Under
Settingson the left of the blade, selectSecrets - For each Password you want to retrieve (e.g. nexusPassword)
- Select the secret
- Select the current version
- Either click
Show Secret Valueor use theCopy to Clipboardbutton to retrieve the secret
PowerShell:
- Run PowerShell similar to the following:
if (-not $ResourceGroupName) {$ResourceGroupName = Read-Host 'Enter the ResourceGroupName'}
$CurrentUser = (Get-AzContext).Account.Id

# Grant access to the KeyVault, if missing
$KeyVault = Get-AzKeyVault -ResourceGroupName $ResourceGroupName | ForEach-Object {Get-AzKeyVault -VaultName $_.VaultName}
if ($KeyVault.AccessPolicies.Where{$_.DisplayName -like "*$CurrentUser*"}.PermissionsToSecrets -notcontains 'get') {
    Set-AzKeyVaultAccessPolicy -VaultName $KeyVault.VaultName -UserPrincipalName $CurrentUser -PermissionsToSecrets @('get')
}

Write-Host "Chocolatey for Business Azure Environment Passwords for '$($KeyVault.ResourceGroupName)':"
@{
    CCM     = Get-AzKeyVaultSecret -VaultName $KeyVault.VaultName -Name ccmPassword -AsPlainText
    Nexus   = Get-AzKeyVaultSecret -VaultName $KeyVault.VaultName -Name nexusPassword -AsPlainText
    Jenkins = Get-AzKeyVaultSecret -VaultName $KeyVault.VaultName -Name jenkinsPassword -AsPlainText
}
or Download and use Get-AzLabCredential.ps1 (which automatically handles permissions), as follows:
if (-not $ResourceGroupName) {$ResourceGroupName = Read-Host 'Enter the ResourceGroupName'}
$CcmCredential     = .\Get-AzLabCredential.ps1 -ResourceGroupName $ResourceGroupName -SecretPrefix ccm
$NexusCredential   = .\Get-AzLabCredential.ps1 -ResourceGroupName $ResourceGroupName -SecretPrefix nexus
$JenkinsCredential = .\Get-AzLabCredential.ps1 -ResourceGroupName $ResourceGroupName -SecretPrefix jenkins
FAQ
SSL Certificate
You will need an SSL certificate for the domain you intend to use. This certificate:
- Needs to be in the PFX format
- Needs to include an exportable Private Key
- Must have a password
You can either provide a self-signed SSL certificate, or a purchased or acquired certificate from a Certificate Authority (CA).
Self-Signed SSL Certificates
You can quickly generate a self-signed certificate on any recent Windows computer, using PowerShell.
PowerShell:
- Open an elevated PowerShell console
- Run code similar to the following, modifying the filepath if necessary:
$Domain   = Read-Host "Enter the FQDN you plan to use to access the Chocolatey for Business Azure Environment sites"
$Password = Read-Host "Enter a password to use for the PFX" -AsSecureString

$Cert = New-SelfSignedCertificate -DnsName $Domain -CertStoreLocation cert:\LocalMachine\My
$Cert | Export-PfxCertificate -FilePath ~\Desktop\$($Domain).pfx -Password $Password
You can then use this generated file and the password you set to deploy your Chocolatey for Business Azure Environment.
You can also use a Microsoft Azure KeyVault to create a self-signed certificate by following the steps in Microsoft’s documentation using the Portal or Azure PowerShell.
NOTE
Your browser will display warnings when accessing the Chocolatey for Business Azure Environment sites with a self-signed certificate. To stop these warnings, you need to import this certificate to the
Trusted Root Certification Authoritiesstore on machines used to access the management sites.
Purchased/Acquired Certificates from CA
Organizations can also opt to purchase or acquire a certificate from an external Certificate Authority (e.g. LetsEncrypt). As mentioned before, you will need to ensure that the “Subject/Common Name” attribute on the SSL certificates matches the FQDN you are using. If you have a preferred vendor for certificates, you should refer to their documentation for best practices in acquiring a certificate.
You can also use a Microsoft Azure KeyVault and one of the partnered CA Providers to create and fulfil a certificate request, though this may require additional configuration for your environment.
How much does it cost?
A ballpark estimate comes to around $350 per month for the deployed infrastructure, after the 0.20.0 release.
| Version | Estimated Cost | Date |
|---|---|---|
| ≤ 0.19.0 | $170 | 2021-07-29 -> 2023-07-17 |
| ≥ 0.20.0 | $350 | 2023-08-17 -> |
This is due to the deprecation of the Application Gateway v1, which cost significantly less than the v2.
Using methods such as Azure Reservations, Hybrid Benefit, or Dev-Test Subscriptions can cut the overall cost significantly.
This is based on:
- Using a
Standard B4msVM size - Deploying to a standard Pay-As-You-Go subscription
- Deploying to the
East USlocation
Can I change my public IP address in the Application Gateway from Dynamic to Static?
The only way to accomplish this is by setting the public IP address statically from the start. Once the public IP address is created, the application gateway does not support changing it. More information can be found in the Microsoft documentation here.
What can be done is creating a CNAME record pointing at the existing DNS record of the Application Gateway. For assistance in setting this CNAME DNS record, please see our supporting documentation.
Common Errors and Resolutions
Jenkins jobs fail to run after upgrade to Chocolatey CLI v2.0.0
As of version 2.0.0 of Chocolatey CLI, the choco list command only lists local packages. The Jenkins scripts included in the C4B Azure Environment prior to version 0.19.0 used this command when interrogating the environment’s Nexus repositories. This results in the Jenkins jobs that use these scripts failing to run after updating Chocolatey CLI on ChocoServer itself to version 2.0.0 or above.
To fix these scripts, you need to install a package called chocolatey-licensed-jenkins-scripts on ChocoServer. Start by internalizing it:
-
Ensure you have your login credentials for Jenkins and Chocolatey Central Management, as described in the Accessing Services section.
-
Log into Jenkins at
https://<FQDN>/jenkins -
Click the green “play” triangle to the right of the
Internalize packages from the Chocolatey Community and Licensed Repositoriesjob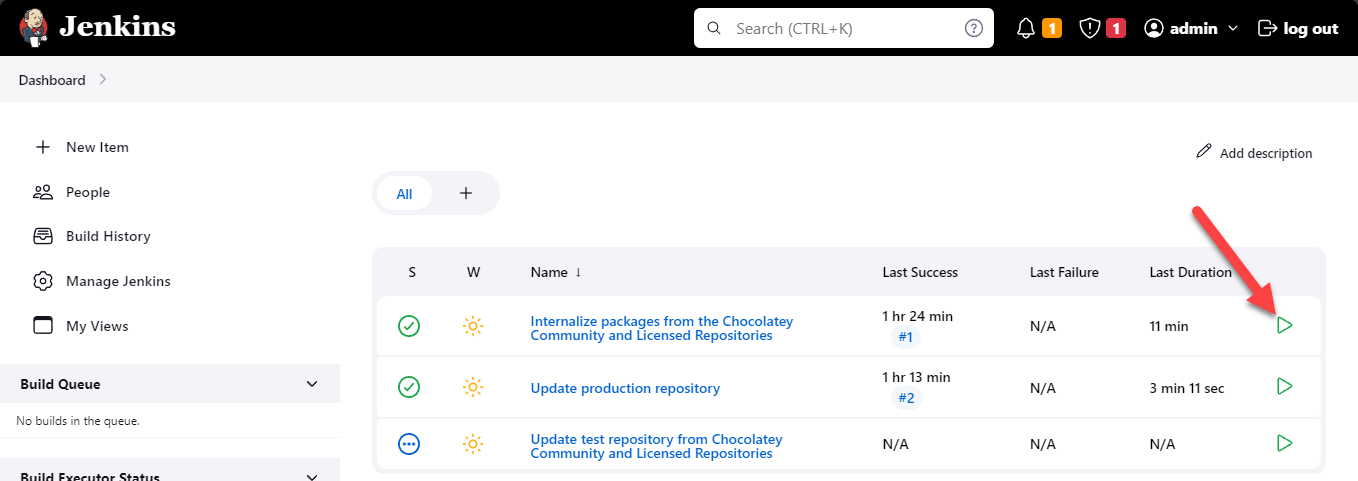
-
Enter
chocolatey-licensed-jenkins-scriptsunder theP_PKG_LISTparameter -
Change the
P_DST_URLparameter so that it ends withChocolateyInternalrather thanChocolateyTest, this is being changed because the job that promotes packages between these repositories will not work if you have already upgraded to Chocolatey CLI v2.0.0 or above -
Click
Build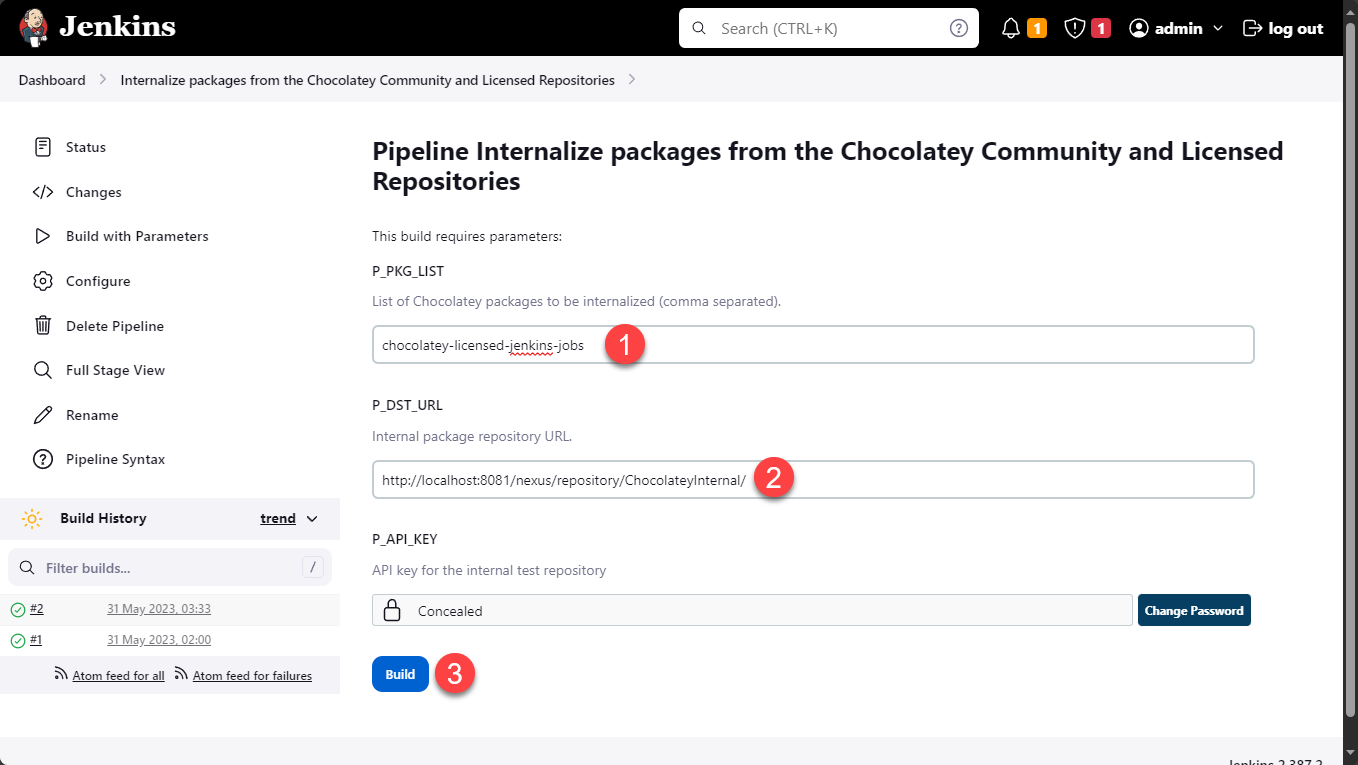
NOTE
You may wish to run this job a second time, leaving the
P_DST_URLas its default value. This will allow future updates to thechocolatey-licensed-jenkins-scriptspackage to be automatically internalized.
Now you need to deploy the chocolatey-licensed-jenkins-scripts package to ChocoServer:
- Log into Chocolatey Central Management at
https://<FQDN>/ - Navigate to
Groupsand create a group the contains only ChocoServer if that does not already exist - Create a Deployment Plan that targets the group containing ChocoServer
- Add a basic step, selecting the
choco installcommand and specifying the package namechocolatey-licensed-jenkins-scripts - Move this Deployment Plan to the Ready state and then run it
Status Message: Exist soft deleted vault with the same name. (Code:ConflictError)
This can happen when you’ve deployed a Chocolatey for Business Azure Environment, deleted the Resource Group, and then redeployed it with the same name.
You can either purge the KeyVault in the GUI, or use the PowerShell Az modules as follows:
PowerShell:
if (-not $ResourceGroupName) {$ResourceGroupName = Read-Host 'Enter the ResourceGroupName'}
Get-AzKeyVault -InRemovedState | Where-Object {
    $_.ResourceId -match "/resourceGroups/$($ResourceGroupName)/"
} | ForEach-Object {
    Remove-AzKeyVault -Name $_.VaultName -Location $_.Location -InRemovedState -Force
}
Portal:
- Open the Azure Portal in a browser, and navigate to the KeyVault resource view.
- Click
Manage Deleted Vaults - Select the Subscription the KeyVault was contained in
- Select the KeyVault to purge, and click
Purge, then confirm by clickingDelete
Wait-CCM: ‘http://ChocoServer/’ was not accessible
We have seen an occasional issue with IISReset that cannot be replicated. This results in CCM setup stalling.
Restart attempt failed. Access denied, you must be an administrator of the remote computer to use this command. Either have your account added to the administrator local group of the remote computer or to the domain administrator global group.
If you see this error, you should redeploy the resource.
Environment VM unable to start due to missing secret (Error: KeyVaultSecretDoesNotExist)
During the deployment of the Chocolatey for Business Azure Environment your supplied certificate is converted from a secret object to a certificate object within the environment’s KeyVault
The Chocolatey for Business Azure Environment’s Virtual Machine may retain a reference to the certificate from prior to the conversion, and if it is shut down then it will not be able to start again due to the referenced secret no longer existing.
To fix this, use the PowerShell Az modules as follows:
if (-not $ResourceGroupName) {
    $ResourceGroupName = Read-Host 'Enter the ResourceGroupName'
}
Get-AzVM -ResourceGroupName $ResourceGroupName | Remove-AzVMSecret | Update-AzVM
Release Notes for the Chocolatey for Business Azure Environment
A summary of the package offerings for the Chocolatey for Business Azure Environment
How to setup a client machine to use Chocolatey for Business Azure Environment
A guide to accessing RDP in the Chocolatey for Business Azure Environment
A guide to updating the certificate used in the Chocolatey for Business Azure Environment
How to update the license in use on your Chocolatey for Business Azure Environment
A guide to upgrading Sonatype Nexus in the Chocolatey for Business Azure Environment