Automate Package Internalizer (MSP/C4B)
Automate Package Internalizer (MSP/C4B)
Summary
When running within an organization it is beneficial to use your own, internally controlled, package repository. But that doesn’t mean you have to create all packages from scratch. Chocolatey allows you to create packages easily using the package builder but it also allows you to take packages from the Chocolatey Community Repository and recompile them for internal use - this is a process known as package internalization. This guide shows you how to use that within your organization.
Organizational Requirements
When distributing software across your organization you need confidence and control of your package source. We do not recommend an organization use the Chocolatey Community Repository for the following reasons:
- Trust. When using packages within your organization you need to be sure that you can trust the creators and maintainers of those packages. While every package going through the Chocolatey Community Repository undergoes a moderation process, the creators and maintainers are strangers to your organization.
- Stability. You need a stable and reliable connection to wherever your packages are stored and it needs to be always available during your business hours.
- Control. To ensure the packages work in your environment you need to be in control of the testing, approval and release process.
For these reasons, we do not recommend that organizations use the Chocolatey Community Repository as a package source and encourage replacing it with your own internal package source.
Architecture
Chocolatey recommends you use an architecture that meets the organizational requirements as we have shown below.
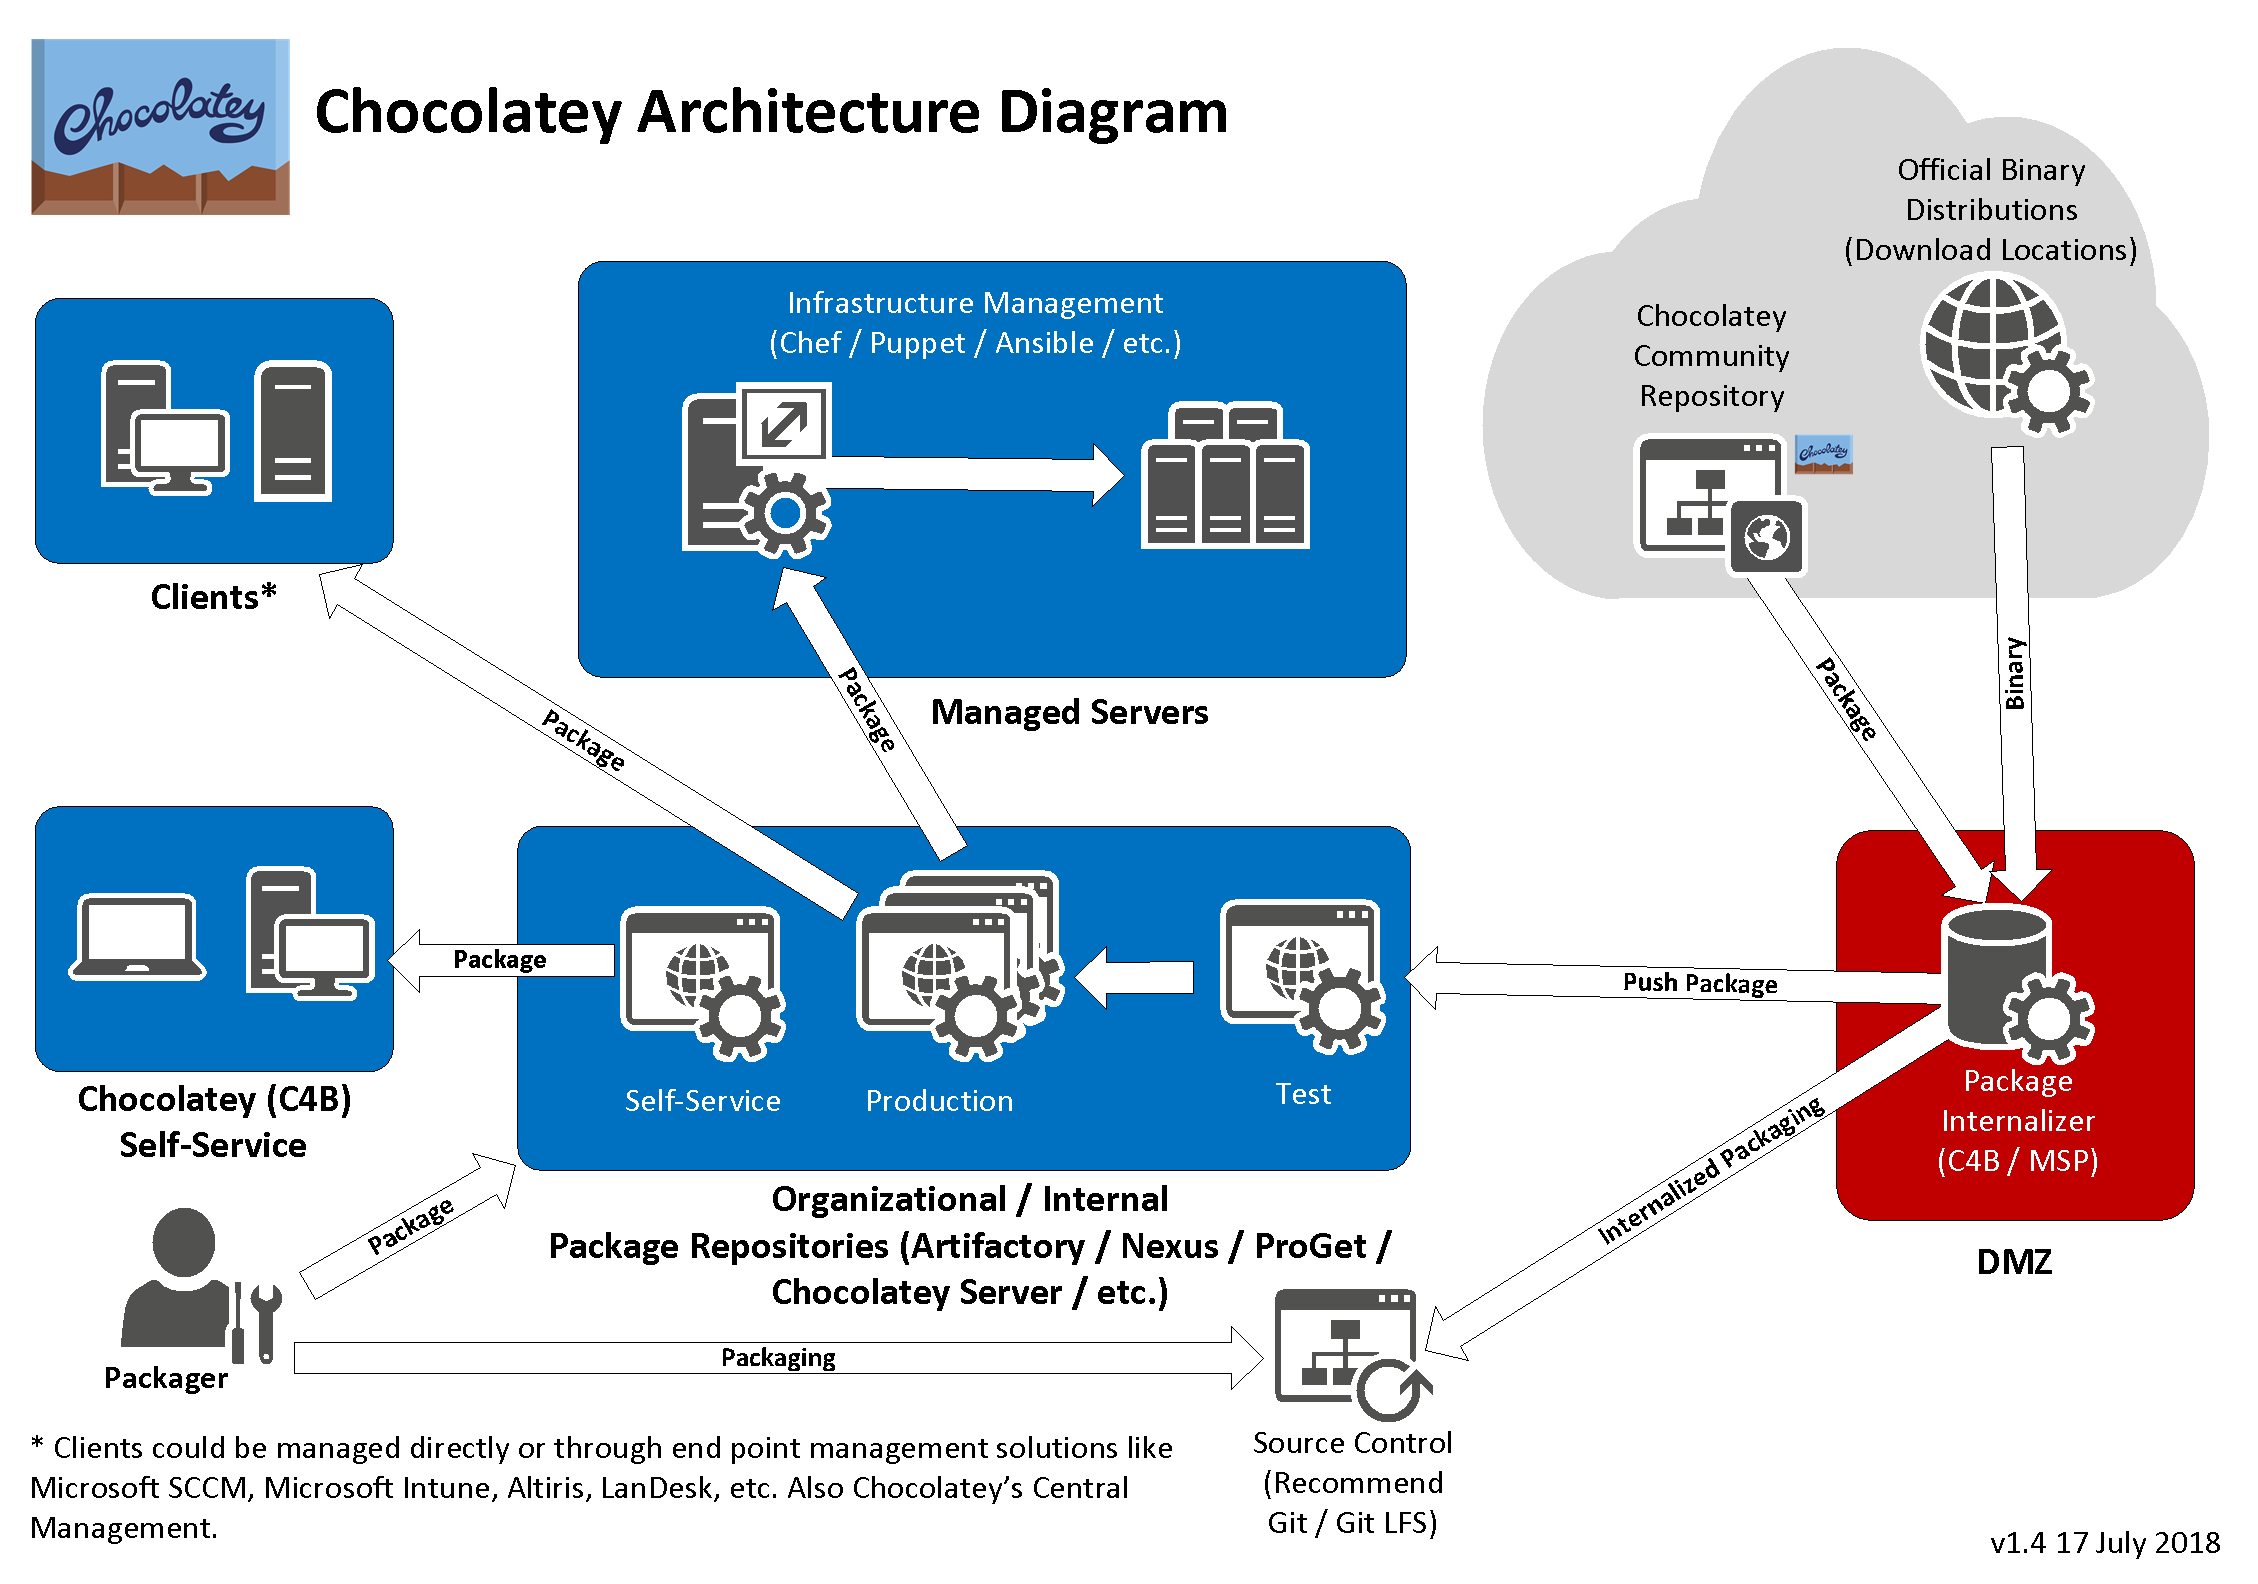
Let’s break down the diagram:
- Package Internalizer - The package internalizer downloads approved packages from the Chocolatey Community Repository and software binaries from their source locations.
- Source Control - once packages have been internalized we recommend they are stored in source control.
- Test ‘Internal Package Repository’ - once internalized by the Package Internalizer, packages are pushed to here for further processing such as being put through automated testing.
- Production ‘Internal Package Repository’ - after the package has been processing in the Test ‘Internal Package Repository’ it will be pushed to your production package source for release to your organization.
While it’s not explicitly specified the glue that holds all of this together is automation using a self-hosted CI / CD tool such as Jenkins, GoCD, TeamCity etc. While it may be possible to do this with externally hosted solutions using local build agents (such as Azure DevOps or GitHub Actions) your mileage may vary.
NOTE
The Chocolatey Architecture Diagram shows the services separated. But don’t mistake the services for servers. All of these services, package internalizer, source control and package repositories can all be run on one server. There is a caveat however. Chocolatey Server can only run one package source per server, so if you use this with a test and production repository source, as we recommend, you will need to run each on separate servers. This limitation does not apply to Sonatype Nexus, Artifactory, ProGet, Cloudsmith and others.
Building Your Internal Infrastructure
Lets build the internal infrastructure to support this process.
Server Pre-Requisites
When creating each server follow these steps:
- Create a server with Windows Server 2022 - Details on how to create a server are beyond the scope of this guide - don’t forget to rename your server to something other than the default name
- Install Chocolatey
- Install
baretail,notepadplusplus.installand7zipwith Chocolatey:choco install baretail notepadplusplus.install 7zip -y
Internal Package Repositories
For this guide we have chosen to use Chocolatey Server to host our internal package repository. However as we noted earlier this has the limitation of hosting only one repository per server. For anything more than a simple environment, we recommend you use Sonatype Nexus, Artifactory Pro or ProGet.
The repositories to setup are for test and production which we will call testrepo-srv and prodrepo-srv. There are full instructions for setting up Chocolatey server but to make sure we end up with the same result we list specific instructions here. Follow these instructions for each server, testrepo-srv and prodrepo-srv.
Install and Configure Chocolatey Server
Before starting, make sure you install Chocolatey Server on separate servers.
-
Create a server and ensure you have the pre-requisites before continuing.
-
To install and configure Chocolatey Server, run the following PowerShell code (see the comments in the code for more information) in an elevated Administrator session:
$siteName = 'ChocolateyServer' $appPoolName = 'ChocolateyServerAppPool' $sitePath = 'c:\tools\chocolatey.server' function Add-Acl { [CmdletBinding()] Param ( [string]$Path, [System.Security.AccessControl.FileSystemAccessRule]$AceObject ) Write-Verbose "Retrieving existing ACL from $Path" $objACL = Get-ACL -Path $Path $objACL.AddAccessRule($AceObject) Write-Verbose "Setting ACL on $Path" Set-ACL -Path $Path -AclObject $objACL } function New-AclObject { [CmdletBinding()] Param ( [string]$SamAccountName, [System.Security.AccessControl.FileSystemRights]$Permission, [System.Security.AccessControl.AccessControlType]$AccessControl = 'Allow', [System.Security.AccessControl.InheritanceFlags]$Inheritance = 'None', [System.Security.AccessControl.PropagationFlags]$Propagation = 'None' ) New-Object -TypeName System.Security.AccessControl.FileSystemAccessRule($SamAccountName, $Permission, $Inheritance, $Propagation, $AccessControl) } if ($null -eq (Get-Command -Name 'choco.exe' -ErrorAction SilentlyContinue)) { Write-Warning "Chocolatey not installed. Cannot install standard packages." Exit 1 } # Install Chocolatey.Server prereqs choco install IIS-WebServer --source=windowsfeatures choco install IIS-ASPNET45 --source=windowsfeatures # Install Chocolatey.Server choco upgrade chocolatey.server -y # Step by step instructions here https://docs.chocolatey.org/en-us/guides/organizations/set-up-chocolatey-server#setup-normally # Import the right modules Import-Module WebAdministration # Disable or remove the Default website Get-Website -Name 'Default Web Site' | Stop-Website Set-ItemProperty "IIS:\Sites\Default Web Site" serverAutoStart False # disables website # Set up an app pool for Chocolatey.Server. Ensure 32-bit is enabled and the managed runtime version is v4.0 (or some version of 4). Ensure it is "Integrated" and not "Classic". New-WebAppPool -Name $appPoolName -Force Set-ItemProperty IIS:\AppPools\$appPoolName enable32BitAppOnWin64 True # Ensure 32-bit is enabled Set-ItemProperty IIS:\AppPools\$appPoolName managedRuntimeVersion v4.0 # managed runtime version is v4.0 Set-ItemProperty IIS:\AppPools\$appPoolName managedPipelineMode Integrated # Ensure it is "Integrated" and not "Classic" Restart-WebAppPool -Name $appPoolName # likely not needed ... but just in case # Set up an IIS website pointed to the install location and set it to use the app pool. New-Website -Name $siteName -ApplicationPool $appPoolName -PhysicalPath $sitePath # Add permissions to c:\tools\chocolatey.server: 'IIS_IUSRS', 'IUSR', "IIS APPPOOL\$appPoolName" | ForEach-Object { $obj = New-AclObject -SamAccountName $_ -Permission 'ReadAndExecute' -Inheritance 'ContainerInherit','ObjectInherit' Add-Acl -Path $sitePath -AceObject $obj } # Add the permissions to the App_Data subfolder: $appdataPath = Join-Path -Path $sitePath -ChildPath 'App_Data' 'IIS_IUSRS', "IIS APPPOOL\$appPoolName" | ForEach-Object { $obj = New-AclObject -SamAccountName $_ -Permission 'Modify' -Inheritance 'ContainerInherit', 'ObjectInherit' Add-Acl -Path $appdataPath -AceObject $obj } -
We shouldn’t need to reboot the server but let’s do it so we know everything is ready to go.
-
From the server, open the browser and visit
https://localhost- you will see some instructions but you need to note the password near the bottom. As this is a test environment we don’t need to change this however for a production environment follow the instructions to change the password. -
Finally test the Chocolatey Server is working. From the server use the command
choco search --source="'http://localhost/chocolatey'";
Once this is done for both servers, you will have two repositories:
- Test Repository:
- Name:
testrepo-srv - push URL:
https://testrepo-srv/chocolatey
- Name:
- Production Repository:
- Name:
prodrepo-srv - Push URL:
https://prodrepo-srv/chocolatey
- Name:
Install and Configure Jenkins Server
Jenkins is a Continuous Integration / Continuous Delivery (often called CI/CD) tool that does the automation required to automatically manage the packages between the test and production repositories.
To install and configure Jenkins:
-
Create a server and ensure you have the pre-requisites before continuing.
-
Install Jenkins using Chocolatey:
choco install jenkins -y -
Once Jenkins is installed it will open a web browser and take you to the configuration web page (if it does not open for any reason, open the web browser and browse to
http://localhost:8080.- The first page will refresh once Jenkins is installed. If it does not click
ENABLE AUTO REFRESHin the top left-hand corner. - Unlock Jenkins by following the instructions on the page (you need to open the file it specifies, with Notepad), finding the password and pasting it into the box and click Continue.
- For this guide, click Install Suggested Plugins and wait for them to install.
- On the Create First Admin page, click Continue as admin
- On the Instance Configuration page, click Save and Finish
- On the Jenkins is ready! page, click Start using Jenkins
- The first page will refresh once Jenkins is installed. If it does not click
-
As the code we will be running in the Jenkins jobs is PowerShell, we need to add the PowerShell plugin.
- On the home page, click Manage Jenkins
- Click Manage Plugins
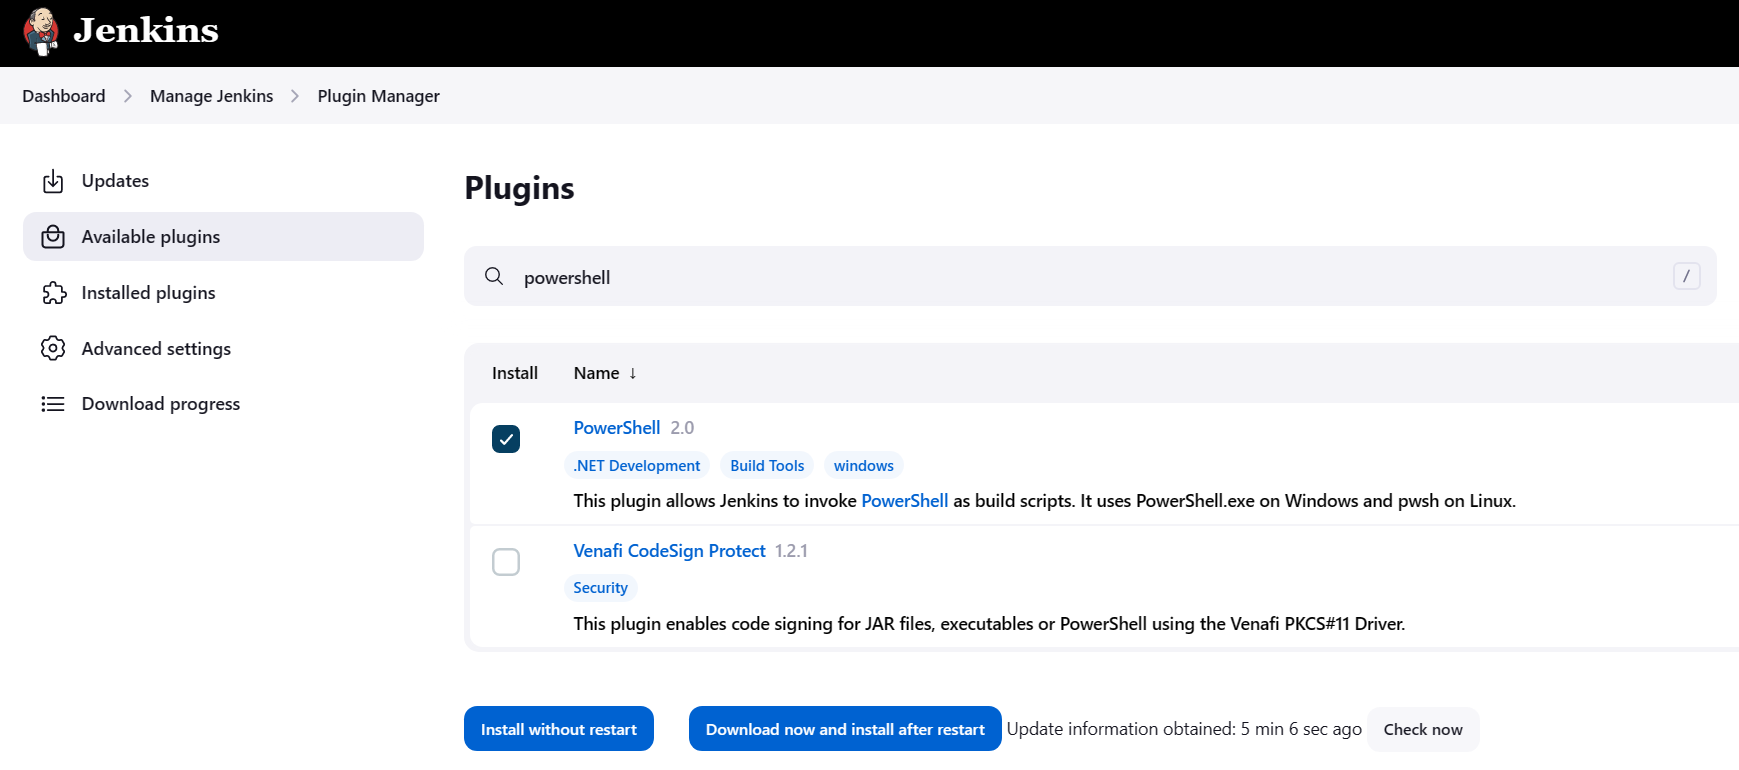
- Click the Available plugins tab
- In the Filter box type
PowerShell - Tick the PowerShell plugin and click Install without Restart
- Click Go back to the top page
-
Copy your Chocolatey Business license to
ProgramData\chocolatey\licensein the root of the system drive. -
Run the command
choco install chocolatey.extension -y
Jenkins requires several PowerShell scripts to automate the processes. Create a directory on the root of your System Drive (normally C:\) called scripts and create each script file there.
Script: Get-UpdatedPackage.ps1
[CmdletBinding()]
  Param (
      [Parameter(Mandatory)]
      [string]
      $LocalRepo,

      [Parameter(Mandatory)]
      [string]
      $LocalRepoApiKey,

      [Parameter(Mandatory)]
      [string]
      $RemoteRepo

  )

  . .\ConvertTo-ChocoObject.ps1

  Write-Verbose "Getting list of local packages from '$LocalRepo'."
  $localPkgs = choco search --source=$LocalRepo --limit-output | ConvertTo-ChocoObject
  Write-Verbose "Retrieved list of $(($localPkgs).count) packages from '$Localrepo'."

  $localPkgs | ForEach-Object {
      Write-Verbose "Getting remote package information for '$($_.name)'."
      $remotePkg = choco search $_.name --source=$RemoteRepo --exact --limit-output | ConvertTo-ChocoObject
      if ([version]($remotePkg.version) -gt ([version]$_.version)) {
          Write-Verbose "Package '$($_.name)' has a remote version of '$($remotePkg.version)' which is later than the local version '$($_.version)'."
          Write-Verbose "Internalizing package '$($_.name)' with version '$($remotePkg.version)'."
          $tempPath = Join-Path -Path $env:TEMP -ChildPath ([GUID]::NewGuid()).GUID
          choco download $_.name --no-progress --internalize --force --internalize-all-urls --append-use-original-location --output-directory=$tempPath --source=$RemoteRepo

          if ($LASTEXITCODE -eq 0) {
              Write-Verbose "Pushing package '$($_.name)' to local repository '$LocalRepo'."
              (Get-Item -Path (Join-Path -Path $tempPath -ChildPath "*.nupkg")).fullname | ForEach-Object {
                  choco push $_ --source=$LocalRepo --api-key $LocalRepoApiKey --force
                  if ($LASTEXITCODE -eq 0) {
                      Write-Verbose "Package '$_' pushed to '$LocalRepo'."
                  }
                  else {
                      Write-Verbose "Package '$_' could not be pushed to '$LocalRepo'.`nThis could be because it already exists in the repository at a higher version and can be mostly ignored. Check error logs."
                  }
              }
          }
          else {
              Write-Verbose "Failed to download package '$($_.name)'"
          }
          Remove-Item -$tempPath -Recurse -Force
      }
      else {
          Write-Verbose "Package '$($_.name)' has a remote version of '$($remotePkg.version)' which is not later than the local version '$($_.version)'."
      }
}
Script: Update-ProdRepoFromTest.ps1
  [CmdletBinding()]

  Param (
      [Parameter(Mandatory)]
      [string]
      $ProdRepo,

      [Parameter(Mandatory)]
      [string]
      $ProdRepoApiKey,

      [Parameter(Mandatory)]
      [string]
      $TestRepo
  )

  . .\ConvertTo-ChocoObject.ps1

  # get all of the packages from the test repo
  $testPkgs = choco search --source=$TestRepo --all-versions --limit-output | ConvertTo-ChocoObject
  $prodPkgs = choco search --source=$ProdRepo --all-versions --limit-output | ConvertTo-ChocoObject
  $tempPath = Join-Path -Path $env:TEMP -ChildPath ([GUID]::NewGuid()).GUID

  if ($null -eq $testPkgs) {
      Write-Verbose "Test repository appears to be empty. Nothing to push to production."
  }
  elseif ($null -eq $prodPkgs) {
      $pkgs = $testPkgs
  }
  else {
      $pkgs = Compare-Object -ReferenceObject $testpkgs -DifferenceObject $prodpkgs -Property name, version | Where-object SideIndicator -eq '<='
  }

  $pkgs | ForEach-Object {
      Write-Verbose "Downloading package '$($_.name)' to '$tempPath'."
      choco download $_.name --no-progress --output-directory=$tempPath --source=$TestRepo --force --ignore-dependencies
      if ($LASTEXITCODE -eq 0) {
          $pkgPath = (Get-Item -Path (Join-Path -Path $tempPath -ChildPath '*.nupkg')).FullName

          # #######################
          # INSERT CODE HERE TO TEST YOUR PACKAGE
          # #######################

          # If package testing is successful ...
          if ($LASTEXITCODE -eq 0) {
              Write-Verbose "Pushing downloaded package '$(Split-Path -Path $pkgPath -Leaf)' to production repository '$ProdRepo'."
              choco push $pkgPath --source=$ProdRepo --api-key=$ProdRepoApiKey --force
              if ($LASTEXITCODE -eq 0) {
                  Write-Verbose "Pushed package successfully."
              }
              else {
                  Write-Verbose "Could not push package."
              }
          }
          else {
              Write-Verbose "Package testing failed."
          }
          Remove-Item -Path $tempPath -Force
      }
      else {
          Write-Verbose "Could not download package."
      }
  }
Note the section above where you should insert the code to test your packages before being pushed to the production repository. This testing should be on an image that is typical for your environment, often called a ‘Gold Image’.
Script: ConvertTo-ChocoObject.ps1
  function ConvertTo-ChocoObject {
      [CmdletBinding()]
      Param (
          [Parameter(ValueFromPipeline)]
          [string]$InputObject
      )

      Process {
          # format of the 'choco list --limit-output' output is:
          # <PACKAGE NAME> <VERSION> (ie. adobereader|2015.6.7)
          if (-not [string]::IsNullOrEmpty($InputObject)) {
              $props = $_.split('|')
              New-Object -TypeName psobject -Property @{ name = $props[0]; version = $props[1] }
          }
      }
  }
We’re now ready to create the jobs to work with the repository.
Create Jenkins Jobs
To allow us to automatically manage the test and production repository we will create three Jenkins jobs to:
- Automatically update any out-of-date packages in the test repository from the Chocolatey Community Repository.
- Allow us to download a package from the Chocolatey Community Repository and submit it to our test repository.
- To automatically determine which packages are new or updated on the test repository, test them and submit them to the production repository.
Each job is detailed below. Use these details to create a new job:
- From the Jenkins home page, click New Item
- Enter the item name, click Pipeline and click OK
- Complete the details page for each job and click OK
Jenkins Job Details: Update Test Repository
Below are the details for the Jenkins job to update the test repository from the Chocolatey Community Repository. This job will check the test repository against the Chocolatey Community Repository and download any updated packages, internalize them and submit them to the test repository. If successful it will then trigger the job named Update Production Repository.
-
General Tab
- Item Name: Update test repository from Chocolatey Community Repository
- Project Type: Pipeline
- Description: Automatically update any out of date packages in the test repository from the Community Repository.
- Ticked Options: This project is parameterized and Do not allow concurrent builds;
- Parameters:
-
Parameter Type: String parameter
-
Name: P_LOCAL_REPO_URL
-
Default Value: http://testrepo-srv/chocolatey
-
Description: Internal test repository.
-
Options: Tick Trim the string
-
Parameter Type: String parameter
-
Name: P_REMOTE_REPO_URL
-
Default Value: https://community.chocolatey.org/api/v2/
-
Description: Remote repository containing updated package versions.
-
Options: Tick Trim the string
-
Parameter Type: Password parameter
-
Name: P_LOCAL_REPO_API_KEY
-
Default Value: The test repository API Key - if you have not changed this it will be the default;
-
Description: API key for the internal test repository where updated packages will be pushed.
-
-
Pipeline Tab
- Definition: Pipeline script
- Script:
  node {
      powershell '''
          Set-Location (Join-Path -Path $env:SystemDrive -ChildPath 'scripts')
          .\\Get-UpdatedPackage.ps1 -LocalRepo $env:P_LOCAL_REPO_URL `
              -LocalRepoApiKey $env:P_LOCAL_REPO_API_KEY `
              -RemoteRepo $env:P_REMOTE_REPO_URL `
              -Verbose
      '''
  }
For this guide we will trigger each job manually, however in production you will want to add the Build Trigger option Build periodically and complete the Schedule field.
Click Save once complete and then click Back to Dashboard.
Jenkins Job Details: Internalize Package
Below are the details for the Jenkins job to update the test repository from the Chocolatey Community Repository. This job will take a list of packages that you submit to the job, download and internalize those packages and push them to the test repository. Once this has been done it will trigger the job named Update Production Repository to test and push them to the production repository.
-
General Tab
- Item Name: Internalize packages from the Community Repository
- Project Type: Pipeline
- Description: Add new packages for internalizing from the Community Repository.
- Ticked Options: This project is parameterized and Do not allow concurrent builds
- Parameters:
-
Parameter Type: String parameter
-
Name: P_PKG_LIST
-
Default Value: <leave blank>
-
Description: List of Chocolatey packages to be internalized (semicolon separated).
-
Options: Tick Trim the string
-
Parameter Type: String parameter
-
Name: P_DST_URL
-
Default Value: http://testrepo-srv/chocolatey
-
Description: Internal package repository URL.
-
Options: Tick Trim the string
-
Parameter Type: Password parameter
-
Name: P_API_KEY
-
Default Value: The test repository API Key - if you have not changed this it will be the default;
-
Description: API key for the internal test repository.
-
-
Pipeline Tab
- Definition: Pipeline script
- Script:
node {
    powershell '''
        $temp = Join-Path -Path $env:TEMP -ChildPath ([GUID]::NewGuid()).Guid
        $null = New-Item -Path $temp -ItemType Directory
        Write-Output "Created temporary directory '$temp'."
        ($env:P_PKG_LIST).split(';') | ForEach-Object {
            choco download $_ --no-progress --internalize --force --internalize-all-urls --append-use-original-location --output-directory=$temp --source='https://community.chocolatey.org/api/v2/'
            if ($LASTEXITCODE -eq 0) {
                (Get-Item -Path (Join-Path -Path $temp -ChildPath "*.nupkg")).fullname | ForEach-Object {
                    choco push $_ --source="$($env:P_DST_URL)" --api-key="$($env:P_API_KEY)" --force
                    if ($LASTEXITCODE -eq 0) {
                        Write-Verbose "Package '$_' pushed to '$($env:P_DST_URL)'.";
                    }
                    else {
                        Write-Verbose "Package '$_' could not be pushed to '$($env:P_DST_URL)'.`nThis could be because it already exists in the repository at a higher version and can be mostly ignored. Check error logs."
                    }
                }
            }
            else {
                Write-Output "Failed to download package '$_'"
            }

            # Clean up, ready for next execution
            Remove-Item -Path (Join-Path -Path $temp -ChildPath "*.nupkg") -Force
        }

        Remove-Item -Path $temp -Force -Recurse
    '''
}
Click Save once complete and then click Back to Dashboard.
Jenkins Job Details: Update Production Repository
Below are the details for the Jenkins job to update the production repository. This job will take any packages that are new or updated in the test repository, test them and, if successful, submit them to the production repository.
-
General Tab
- Item Name: Update production repository
- Project Type: Pipeline
- Description: Determine new packages on the Test repository, test and submit them to the Production repository.
- Ticked Options: This project is parameterized and Do not allow concurrent builds;
- Parameters:
-
Parameter Type: String parameter
-
Name: P_PROD_REPO_URL
-
Default Value: http://prodrepo-srv/chocolatey
-
Description: URL to the production repository.
-
Options: Tick Trim the string
-
Parameter Type: Password parameter
-
Name: P_PROD_REPO_API_KEY
-
Default Value: The test repository API Key - if you have not changed this it will be the default;
-
Description: API key for the production repository.
-
Parameter Type: String parameter
-
Name: P_TEST_REPO_URL
-
Default Value: http://testrepo-srv/chocolatey
-
Description: URL for the test repository.
-
Options: Tick Trim the string
-
-
Build Triggers
- Options: Build after other projects are built
- Projects to watch: Internalize packages from the Community Repository and Update test repository from Chocolatey Community Repository
- Project Options: Trigger only if build is stable
-
Pipeline Tab
- Definition: Pipeline script
- Script:
  node {
      powershell '''
          Set-Location (Join-Path -Path $env:SystemDrive -ChildPath 'scripts')
          .\\Update-ProdRepoFromTest.ps1 `
              -ProdRepo $env:P_PROD_REPO_URL `
              -ProdRepoApiKey $env:P_PROD_REPO_API_KEY `
              -TestRepo $env:P_TEST_REPO_URL `
              -Verbose
      '''
  }
Optional Configuration
For this guide we will trigger each job manually, however in production you will want to add the Build Trigger option Build periodically and complete the Schedule field.
Click Save once complete and then click Back to Dashboard.
Test the Jenkins Automation (Exercises)
To ensure our automation pipeline works, lets conduct tests.
Submit a new package
Before submitting a new package lets make sure we have no packages in our test or production repositories (all of these commands are run on the Jenkins server):
-
To check the test repository, enter this at the command line
choco search --source="'http://testrepo-srv/chocolatey'". You should get this returned (note that the actual version of Chocolatey you see may be different):PS> choco search --source="'http://testrepo-srv/chocolatey'" Chocolatey v2.0.0 Business 0 packages found. -
To check the production repository, enter this at the command line
choco search --source="'http://prodrepo-srv/chocolatey'". You should get this returned (note that the actual version of Chocolatey you see may be different):PS> choco search --source="'http://prodrepo-srv/chocolatey'" Chocolatey v2.0.0 Business 0 packages found.Follow these steps to add a new package:
-
On the Jenkins homepage, click the little drop down arrow to the right of the Internalize packages from the Community Repository job and click Build with Parameters.
-
In the parameters page enter
adobereaderin the P_PKG_LIST and click the Build button.You can check the progress of the job by click on the Last build (#.. link under Permalinks on that page and see the output by clicking on Console Output on the right hand side of that page.
This Jenkins job will run and then, if it is successful will trigger the job named Update production repository which will update the production repository with any new or updated packages in the test repository, in this case the
adobereaderpackage we just added. To see this: -
To check the test repository, enter this at the command line
choco search --source="'http://testrepo-srv/chocolatey'". You should get this returned (note that the actual version ofadobereaderand Chocolatey you see may be different):PS> choco search --source="'http://testrepo-srv/chocolatey'" Chocolatey v2.0.0 Business adobereader 2015.007.20033.02 1 packages found. -
To check the production repository, enter this at the command line
choco search --source="'http://prodrepo-srv/chocolatey'". You should get this returned (note that the actual version ofadobereaderand Chocolatey you see may be different):PS> choco search --source="'http://prodrepo-srv/chocolatey'" Chocolatey v2.0.0 Business adobereader 2015.007.20033.02 1 packages found.
Updating a package from the Chocolatey Community Repository
As packages get out of date in your test repository you need to update them from the Chocolatey Community Repository. Before we start let’s add an older version of a package.
-
Download and internalize the
putty.installpackage to the current directory by entering this on the command line:choco download putty.install --version 0.70 --internalize --force --internalize-all-urls --append-use-original-location --output-directory . --source="'https://community.chocolatey.org/api/v2/'"; -
Submit the internalized package to the test repository by entering this on the command line:
choco push putty.install.0.70.nupkg --source="'http://testrepo-srv/chocolatey'" --api-key="'chocolateyrocks'" -force -
Go back to Jenkins and run the job Update production repository with default parameters. This will test the
putty.installpackage and push it to the production repository. -
Go to the command line and run
choco search --source="'http://prodrepo-srv/chocolatey'"and you should see these results (note that if you didn’t follow the exercise above thenadobereaderwill not be in the list):PS> choco search --source="'http://prodrepo-srv/chocolatey'" Chocolatey v2.0.0 Business adobereader 2015.007.20033.02 putty.install 0.70 2 packages found. -
Go back to Jenkins and run the job Update test repository from Chocolatey Community Repository with default parameters. This will check the test repository against the Chocolatey Community Repository and update the
putty.installpackage; -
Go to the command line and run
choco search --source="'http://testrepo-srv/chocolatey'" --all-versionsand you should see these results (note that if you didn’t follow the exercise above thenadobereaderwill not be in the list and the latest version ofputty.installmay be different):PS> choco search --source="'http://testrepo-srv/chocolatey'" Chocolatey v2.0.0 Business adobereader 2015.007.20033.02 putty.install 0.70.0.20171219 putty.install 0.70 3 packages found. -
As the Jenkins job Update test repository from Chocolatey Community Repository we ran earlier triggers the job Update production repository, the
putty.installpackage will be automatically tested and pushed to the production repository. To check this, run the following on the command linechoco search --source="'http://prodrepo-srv/chocolatey'" --all-versionsand you should see these results (note that if you didn’t follow the exercise above thenadobereaderwill not be in the list and the latest version ofputty.installmay be different)PS> choco search --source="'http://prodrepo-srv/chocolatey'" Chocolatey v2.0.0 Business adobereader 2015.007.20033.02 putty.install 0.70.0.20171219 putty.install 0.70 3 packages found.