Create Custom Package Templates
Create Custom Package Templates
As of choco 0.9.9.9, you can create your own custom package templates when the built-in template is not enough.
Overview
A template is used for creating packages. Chocolatey (choco) has a built-in template that it uses when generating a new package from the command `choco new`.
Where do Templates go?
If you drop a template into $env:ChocolateyInstall\templates folder, you can use -t name_of_template to generate a choco template based on that. So for:
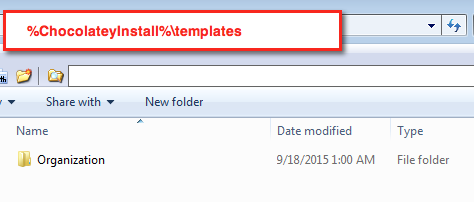
You would call choco new pkgname -t organization and choco will use the template folder instead of the built-in template.
Can I replace the built-in template?
If you are using a version of Chocolatey CLI earlier than 0.12.0, you can replace the built-in template by copying the template to a folder called default. The choco new command will then use that by default.
Chocolatey CLI version 0.12.0 or later introduced the `choco template` command. You can use it to list the installed templates and set the `defaultTemplateName` to set the template to be used by default when running the choco new command. You can also still copy the template files that worked with previous versions.
What values can I template?
You can get the names by running choco new -h:
Possible properties to pass:
    packageversion
    maintainername
    maintainerrepo
    installertype
    url
    url64
    silentargs
However PackageName and PackageNameLower also show up as they are based on the name of the package that you pass e.g. “bob” in choco new bob
Then you surround those templated values with [[]] to make them templated for choco to use.
NOTE
You can set and pass arbitrary values through as well. This is shown in the example with
CustomValue.
Template Example
This is a template for embedding an MSI into a package. This removes almost everything that is unnecessary for embedding software into packages. And because the autoUninstaller handles MSIs without an issue, we don’t need a chocolateyUninstall.ps1.
A file with the extension .nuspec:
<?xml version="1.0" encoding="utf-8"?>
<package xmlns="http://schemas.microsoft.com/packaging/2015/06/nuspec.xsd">
  <metadata>
    <id>[[PackageNameLower]]</id>
    <title>[[PackageName]] (Install)</title>
    <version>[[PackageVersion]]</version>
    <authors>Original authors</authors>
    <owners>[[MaintainerName]]</owners>
    <description>__REPLACE__MarkDown_Okay [[AutomaticPackageNotesNuspec]]
    </description>
    <tags>[[PackageNameLower]] admin</tags>
    <!--<dependencies>
      <dependency id="" version="__VERSION__" />
      <dependency id="" />
    </dependencies>-->
  </metadata>
  <files>
    <file src="tools\**" target="tools" />
  </files>
</package>
NOTE
Ensure that the template nuspec is encoded as UTF8 with BOM to avoid issues with non-ascii characters. The final package source generated by the template will contain the correct nuspec without a BOM.
tools\chocolateyInstall.ps1:
# Custom value: [[CustomValue]]
$ErrorActionPreference = 'Stop'; # stop on all errors

[[AutomaticPackageNotesInstaller]]
$packageName  = '[[PackageName]]'
$toolsDir     = "$(Split-Path -parent $MyInvocation.MyCommand.Definition)"
$fileLocation = Join-Path $toolsDir 'NAME_OF_EMBEDDED_INSTALLER_FILE'

$packageArgs = @{
  packageName   = $packageName
  file          = $fileLocation
  fileType      = '[[InstallerType]]' #only one of these: exe, msi, msu

  #MSI
  silentArgs    = "/qn /norestart /l*v `"$env:TEMP\chocolatey\$($packageName)\$($packageName).MsiInstall.log`""
  validExitCodes= @(0, 3010, 1641)
  #OTHERS
  #silentArgs   ='[[SilentArgs]]' # /s /S /q /Q /quiet /silent /SILENT /VERYSILENT -s - try any of these to get the silent installer
  #validExitCodes= @(0) #please insert other valid exit codes here
}

Install-ChocolateyInstallPackage @packageArgs
Once installed, call this with choco new test -t <TEMPLATE NAME> CustomValue=Yes
Manage Templates as packages
If you have Chocolatey v0.9.10+, you can manage templates as packages allowing you to upgrade a template when a new version is available. When it comes to packaging templates, Chocolatey takes a conventional approach. You must create a package with the suffix “.template” and have a templates folder.
To manage a template as a package, create a new package with the name <TEMPLATE NAME>.template. The name of the package minus the “.template” will be the name of the template.
Then create a templates folder next to the <TEMPLATE NAME>.template.nuspec. This folder is where the template goes. The only thing to remember is that the nuspec file created here must end in “.template” (e.g. <TEMPLATE NAME>.nuspec.template) as a Chocolatey package allows only one nuspec file.
For examples of template packages see the templates available on the Chocolatey Community Repository and the repository for community maintained templates.
Yes, it is really that easy. Enjoy!
Extending Templates
Walmart has a really good post on extending package templates. You can read that at https://blog.chocolatey.org/2016/10/extending-chocolatey-packaging-at-walmart/