Automatic Packaging
Automatic Packaging
Automatic packaging is a process that package maintainers can run on their own to keep the packages they maintain up to date. It is not a required step for maintaining packages on the community feed (https://community.chocolatey.org/packages), but it is recommended you find a way to automate the delivery of packages to the community feed when there are updates if you are going to maintain more than 5 packages and you are not the software vendor for the packages you maintain.
NOTE
Not to be confused with the automatic package creation feature in Chocolatey for Business - that feature creates packages directly from software installer files. This feature is for package maintenance of existing packages on the community feed.
Automatic update methods
There are currently two methods that can be used to maintain automatic packages:
- RECOMMENDED - Using only PowerShell via Chocolatey Automatic Package Updater Module.
- DEPRECATED - Using Chocolatey Package Updater with 3rd party tool Ketarin.
Automatic Updater (AU)
The Chocolatey Automatic Package Updater Module is a PowerShell module which implements functions that can be used to automate Chocolatey package updates.
Credits
AU was created by Chocolatey community member Miodrag Milic. The original repository has been archived and is no longer receiving updates.
Due to its widespread usage for many Chocolatey packages, we have forked the module into the chocolatey-au repository in the Chocolatey Community organisation where it will be maintained going forward.
Setup
Follow the instructions at the AU Wiki.
When creating packages, do not use --auto as AU doesn’t use token replacement for updating packages, it replaces the xml elements and code directly.
Chocolatey Package Updater aka chocopkgup [DEPRECATED]
http://community.chocolatey.org/packages/ChocolateyPackageUpdater
The tool that accomplishes this process is known as chocopkgup (Chocolatey Package Updater). It is a free tool (unless you want to use it for uploads to somewhere other than community.chocolatey.org).
Licensing
Check the license at http://realdimensions.net/licenses/chocolateypackageupdater/license.txt to be sure that it applies to you.
Basically it boils down to this: if you want to use chocopkgup privately, you will need to pay for it. As long as you are publishing to community.chocolatey.org, the tool is completely free! The license does expire every once in awhile, but if you are keeping up on your chocolatey updates locally, you won’t even notice (cup all, remember?).
Credits
This tool makes use of Ketarin. Ketarin is an awesome tool that helps chocopkgup accomplish its tasks.
Requirements
- A Windows box somewhere - to run the updater on
- Ketarin
- Chocolatey Package Updater
Setup
-
Fork
chocolatey-packages-templateand rename it to something likechocolatey-packages(on GitHub - go into Settings, Repository name and rename). -
Clone the repo locally.
-
Install chocopkgup (which will install ketarin and nuget.commandline).
choco install chocolateypackageupdater. -
Check the config in
$env:ChocolateyInstall\lib\ChocolateyPackageUpdater\tools\chocopkgup\chocopkgup.exe.config. ThePackagesFolderkey should point to where your repository is located. -
Create a scheduled task (in Windows). This is the command (edit the path to
cmd.exeaccordingly):C:\Windows\System32\cmd.exe /c c:\tools\chocolateypackageupdater\ketarinupdate.cmd -
Alternatively to stop the command window from opening on Windows, you can create a VBS script as well and put the path to the
.vbsfile instead ofketarinupdate.cmdas the command to run. The file should have the following:Set objShell = WScript.CreateObject("WScript.Shell") objShell.Run("C:\tools\ChocolateyPackageUpdater\ketarinupdate.cmd"), 0, True -
Choose a schedule for the task. Some folks run the task about once an hour to catch updates as quickly as they happen.
-
Open Ketarin. Choose
File–>Settings. -
Now Click Import…
-
Choose setup/KetarinSettings.xml from the repo folder. This is going to add everything in that you will need for settings.
-
Click on Global Variables. Ensure all of the variables are set appropriately.
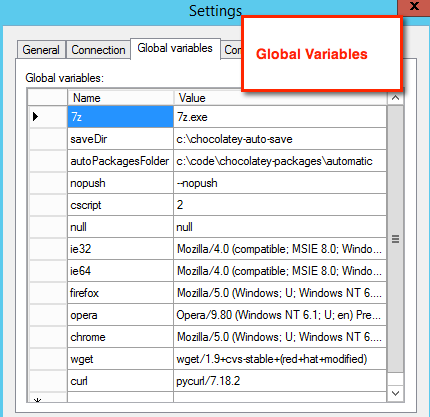
This gets Ketarin all set up with a global command for all packages we create.
NOTE: This has set up global commands for “Before updating an application” and “After updating an application”. Those should not need adjusting, however if you do, please be sure to export the settings again.
Create an Automatic Package
Preferably you are taking an existing package that you have tested and converting it to an automatic package.
Create a package for automatic packaging
When you are creating packages, you should ensure you are on the latest version of Chocolatey. This means you have the latest fixes to packaging templates and latest and greatest in the way of automation.
- Ensuring you are on the latest version of Chocolatey -
choco upgrade chocolatey. - Open PowerShell (or cmd.exe) and head to the automatic package folder you are using. This should be “repolocation\automatic”.
- Run
choco new <name> --auto <Xref title="options]. You can use a different package template if you have those installed - see [new command” value=“choco-command-new” /> for all options or runchoco new -?. For package templates, see how to create custom package templates. - Inspect the output. Merge in your existing package logic if you have an existing package you are converting.
- Ensure that
checksumTypeandchecksumType64issha256as this is the type the updater will generate. - Make any adjustments you need to the package to prepare for packaging.
Ketarin
- Open Ketarin. Choose
File–>Import… - Choose ketarin/_KetarinChocolateyTemplate.xml from the repo folder.
- Answer the questions. This will create a new job for Ketarin to check.
- One important thing to keep in mind is that the name of the job needs to match the name of the package folder and nuspec exactly.
- Right click on that new job and select
Edit. Take a look at the following:

- Click on
Variableson the right of URL

- On the left side you should see a variable for version and one for url64. Click on version.
- Choose the appropriate method for you. Here I’ve chosen Content from URL (start/end).
- Enter the URL for versioning information.

- In the contents itself, highlight enough good information before a version to be able to select it uniquely during updates (but not so much it doesn’t work every time as the page changes). Click on Use selection as start.
- Now observe that it didn’t jump back too far.
- Do the same with the ending part, keeping in mind that this side doesn’t need to be too much because it is found AFTER the start. Once selected click on Use selection as end.
- It should look somewhat similar to have is presented in the picture above.
- If you have a 64bit url you want to get, do the same for the url64 variable.
- When all of this is good, click OK.
- Click OK again.
Notes about tri-packages (meta/virtual aka *, *.install, and *.portable)
UPDATE AUG 2016: This may no longer be true. Just set up three jobs.
When you have the three packages, you should set up only two jobs, one for *.install and one for *.portable.
In whichever job the meta package points to, you should add a command to that like you did for the settings for all jobs in ketarin.
- Click on the Commands Tab and set Edit command for event to “Before updating an application”.

-
Add the following text (replace
namewith the actual name of the meta package folder):chocopkgup /p name /v {version} /u "{preupdate-url}" /u64 "{url64}" /pp "{file}" /c "{Checksum}" /c64 "{Checksumx64}" REM /disablepush -
Check the bottom of this section to be sure it set to Command.

Testing Ketarin/ChocoPkgUp:
- We need to get a good idea of whether this will work or not.
- Open a command line and type
ketarin. - Once Ketarin opens, open global options (steps 8 and 11), go to Global Variables and set
cscriptto1instead of2so that it only goes as far as creating packages. - Find your job, and right click -> Update. If everything is set good, in moments you will have a Chocolatey package in the folder you set under
{PackagesFolder}\_output, where{PackagesFolder}is the path you set in the course of the Setup section of this article. - Inspect the resulting Chocolatey package(s) for any issues.
- You should also test the scheduled task works appropriately.
Troubleshooting/Notes
- Ketarin comes with a logging facility so you can see what it is doing. It’s under View –> Show Log.
- In the top level folder for chocopkgup (in program data), we log what we receive from Ketarin as well and the process of putting together a package.
- The name of the application in ketarin matches exactly that of the folder that is in the automatic packages folder.
- Every once in awhile you want to look in Ketarin to see what jobs might be failing. Then figure out why.
- Every once in awhile you will want to inspect the chocopkgupfolder to see if there are any packages that did not make it up for some reason or another and then upload them.
- If the downloaded application/installer has not changed, the package will not be generated. Delete the files in the download location specified in Ketarin and try again.
Important notes for files hosted on SourceForge
Try this first:
-
In advanced settings, ensure the user agent is
chocolatey command line. This will allow ketarin to behave similarly to how Chocolatey does.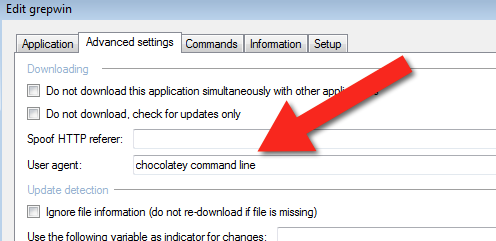
It isn’t uncommon that certain SorceForge mirrors go offline or are extremely slow because of overload. Thus it is not recommended to use direct mirror links (e. g.
http://heanet.dl.sourceforge.net/project/…) in yourchocolateyInstall.ps1file, because this will frequently break your package and makes it unreliable. To avoid this, use the following convention for files hosted on SourceForge: -
Don’t use
{{DownloadUrl}}and{{DownloadUrlx64}}in yourchocolateyInstall.ps1file, but use this instead (example of the app nomacs):$url = 'http://sourceforge.net/projects/nomacs/files/nomacs-{{PackageVersion}}/nomacs-setup-{{PackageVersion}}-x86.exe/download'and$url64 = 'http://sourceforge.net/projects/nomacs/files/nomacs-{{PackageVersion}}/nomacs-setup-{{PackageVersion}}-x64.exe/download'For other applications obviously you have to use the actual application/file names. Important is that you use{{PackageVersion}}and don’t use any direct links which include SourceForge mirrors.