Setup / Install
Setup / Install
Requirements
Chocolatey CLI v2.0+
- .NET Framework 4.8
- The installation script will attempt to install .NET 4.8 if it is not installed.
Chocolatey CLI v1.x
- .NET Framework 4+
- The installation will attempt to install .NET 4.0 if you do not have it installed
- .NET Framework 4.5+ is required for installing directly from the Chocolatey Community Repository, due to the TLS 1.2 requirement
Installing Chocolatey CLI
- First, ensure that you are using an administrative shell.
- Refer to Non-Administrative Installation for information on installing without administrative rights.
- Copy the text specific to your command shell - cmd.exe or powershell.exe.
- Paste the copied text into your shell and press Enter.
- Wait a few seconds for the command to complete.
- If you don’t see any errors, you are ready to use Chocolatey CLI!
- Type
chocoorchoco -?now, or see Getting Started for usage instructions.
NOTE
- If you are behind a proxy, please see Installing behind a proxy.
- Need completely offline solution? See Completely Offline Install.
- Installing the licensed edition? See install licensed edition.
- More Options / Troubleshooting
Install with cmd.exe
Run the following command:
@"%SystemRoot%\System32\WindowsPowerShell\v1.0\powershell.exe" -NoProfile -InputFormat None -ExecutionPolicy Bypass -Command "[System.Net.ServicePointManager]::SecurityProtocol = 3072; iex ((New-Object System.Net.WebClient).DownloadString('https://community.chocolatey.org/install.ps1'))" && SET "PATH=%PATH%;%ALLUSERSPROFILE%\chocolatey\bin"
Install with PowerShell.exe
With PowerShell, there is an additional step. You must ensure Get-ExecutionPolicy is not Restricted. We suggest using Bypass to bypass the policy to get things installed or AllSigned for quite a bit more security.
- Run
Get-ExecutionPolicy. If it returnsRestricted, then runSet-ExecutionPolicy AllSignedorSet-ExecutionPolicy Bypass -Scope Process. - Now run the following command:
Set-ExecutionPolicy Bypass -Scope Process -Force; [System.Net.ServicePointManager]::SecurityProtocol = [System.Net.ServicePointManager]::SecurityProtocol -bor 3072; iex ((New-Object System.Net.WebClient).DownloadString('https://community.chocolatey.org/install.ps1'))
Additional considerations
NOTE
Please inspect https://community.chocolatey.org/install.ps1 prior to running any of these scripts to ensure safety. We already know it’s safe, but you should verify the security and contents of any script from the internet you are not familiar with. All of these scripts download a remote PowerShell script and execute it on your machine.
We take security very seriously. Learn more.
“Why do I need to enable TLS 1.2 in PowerShell? Shouldn’t it be on by default when I load PowerShell?”
Unfortunately it’s not always a default, and more of the time it is not. The low level is that it depends on .NET Framework and Windows.
- Explicitly set - Basically you need .NET Fx 4.5 at a minimum to be able to explicitly set TLS 1.2.
- Load by default - To have it load by default when you run PowerShell, you need at least .NET Fx 4.7 AND the Operating System’s SystemDefault to have TLS 1.2 enabled.
The load by default is really hard to see, so you should check to ensure it is there. Assume it doesn’t and set explicitly.
More Install Options
Troubleshooting? Proxy? Need more options?
- Install from PowerShell v3+
- Install using the MSI
- Install using WinGet
- Completely offline/internal install
- Install with Puppet
- Install using PowerShell from cmd.exe
- Install using NuGet Package Manager
- Install using NuGet.exe from PowerShell
- Install downloaded NuGet package from PowerShell
- Install licensed edition
- Installing behind a proxy
- Installing behind an explicit proxy
- Installing to a different location
- Installing a particular version of Chocolatey
- Use Windows built-in compression instead of downloading 7zip
- Installing with restricted TLS
- Non-Administrative install
Install from PowerShell v3+
NOTE
The command for installing with PowerShell at the top of the page works for all versions of PowerShell from v2 on. This is provided as an additional note for folks who want a more terse command that is easier to remember.
With PowerShell, there is an additional step or two. You must ensure Get-ExecutionPolicy is not Restricted. We suggest using Bypass to bypass the policy to get things installed or AllSigned for quite a bit more security.
- Run
Get-ExecutionPolicy. If it returnsRestricted, then runSet-ExecutionPolicy AllSignedorSet-ExecutionPolicy Bypass. - Now run the following command:
Set-ExecutionPolicy Bypass -Scope Process -Force; [System.Net.ServicePointManager]::SecurityProtocol = [System.Net.ServicePointManager]::SecurityProtocol -bor 3072; iwr https://community.chocolatey.org/install.ps1 -UseBasicParsing | iex
Install using the MSI?
NOTE
The MSI is intended to bootstrap Chocolatey CLI onto a computer and will only install. It cannot upgrade, or uninstall Chocolatey CLI.
From version 2.0.0 of Chocolatey CLI we provide an MSI for installation, allowing you to deploy using your existing tools. Once installed, use Chocolatey CLI as normal to upgrade.
The MSI is provided as an asset on each GitHub release of Chocolatey CLI 2.0.0 onwards. See the assets section on the Chocolatey GitHub repository release page.
Install using WinGet
You can install Chocolatey CLI version 2.0.0 and later through WinGet by running winget install --id chocolatey.chocolatey --source winget. Once installed, use Chocolatey CLI as normal to upgrade.
Completely offline install
With completely offline use of Chocolatey, you want to ensure you remove the default community package source (choco source list followed by choco source remove --name chocolatey, or however you would do that with a configuration manager like Puppet).
- The first step with offline is to obtain a copy of the Chocolatey Nupkg (nupkg files are just fancy zip files). Go to https://community.chocolatey.org/packages/chocolatey and find a version you want.
- Click on Download to download that version’s nupkg file.
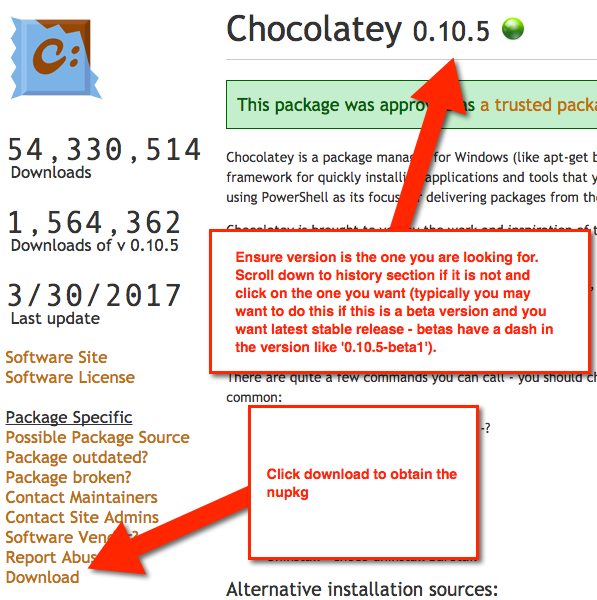
- You can also download the latest version directly.
- You can put the chocolatey.nupkg on an internal package repository and then address that full path, similar to how you see in the Puppet provider - https://forge.puppet.com/modules/puppetlabs/chocolatey/readme#manage-chocolatey-installation
- Then you would run a script similar to the below to address that local install. If it is on a repository somewhere, you will need to enhance the below script to get that file (the Chocolatey Puppet provider install script shows that).
# Download and install Chocolatey nupkg from an OData (HTTP/HTTPS) url such as Artifactory, Nexus, ProGet (all of these are recommended for organizational use), or Chocolatey.Server (great for smaller organizations and POCs)
# This is where you see the top level API - with xml to Packages - should look nearly the same as https://community.chocolatey.org/api/v2/
# If you are using Nexus, always add the trailing slash or it won't work
# === EDIT HERE ===
$packageRepo = '<INSERT ODATA REPO URL>'

# If the above $packageRepo repository requires authentication, add the username and password here. Otherwise these leave these as empty strings.
$repoUsername = ''    # this must be empty is NOT using authentication
$repoPassword = ''    # this must be empty if NOT using authentication

# Determine unzipping method
# 7zip is the most compatible, but you need an internally hosted 7za.exe.
# Make sure the version matches for the arguments as well.
# Built-in does not work with Server Core, but if you have PowerShell 5
# it uses Expand-Archive instead of COM
$unzipMethod = 'builtin'
#$unzipMethod = '7zip'
#$7zipUrl = 'https://chocolatey.org/7za.exe' (download this file, host internally, and update this to internal)

# === ENVIRONMENT VARIABLES YOU CAN SET ===
# Prior to running this script, in a PowerShell session, you can set the
# following environment variables and it will affect the output

# - $env:ChocolateyEnvironmentDebug = 'true' # see output
# - $env:chocolateyIgnoreProxy = 'true' # ignore proxy
# - $env:chocolateyProxyLocation = '' # explicit proxy
# - $env:chocolateyProxyUser = '' # explicit proxy user name (optional)
# - $env:chocolateyProxyPassword = '' # explicit proxy password (optional)

# === NO NEED TO EDIT ANYTHING BELOW THIS LINE ===
# Ensure we can run everything
Set-ExecutionPolicy Bypass -Scope Process -Force;

# If the repository requires authentication, create the Credential object
if ((-not [string]::IsNullOrEmpty($repoUsername)) -and (-not [string]::IsNullOrEmpty($repoPassword))) {
    $securePassword = ConvertTo-SecureString $repoPassword -AsPlainText -Force
    $repoCreds = New-Object System.Management.Automation.PSCredential ($repoUsername, $securePassword)
}

$searchUrl = ($packageRepo.Trim('/'), 'Packages()?$filter=(Id%20eq%20%27chocolatey%27)%20and%20IsLatestVersion') -join '/'

# Reroute TEMP to a local location
New-Item $env:ALLUSERSPROFILE\choco-cache -ItemType Directory -Force
$env:TEMP = "$env:ALLUSERSPROFILE\choco-cache"

$localChocolateyPackageFilePath = Join-Path $env:TEMP 'chocolatey.nupkg'
$ChocoInstallPath = "$($env:SystemDrive)\ProgramData\Chocolatey\bin"
$env:ChocolateyInstall = "$($env:SystemDrive)\ProgramData\Chocolatey"
$env:Path += ";$ChocoInstallPath"
$DebugPreference = 'Continue';

# PowerShell v2/3 caches the output stream. Then it throws errors due
# to the FileStream not being what is expected. Fixes "The OS handle's
# position is not what FileStream expected. Do not use a handle
# simultaneously in one FileStream and in Win32 code or another
# FileStream."
function Fix-PowerShellOutputRedirectionBug {
  $poshMajorVerion = $PSVersionTable.PSVersion.Major

  if ($poshMajorVerion -lt 4) {
    try{
      # http://www.leeholmes.com/blog/2008/07/30/workaround-the-os-handles-position-is-not-what-filestream-expected/ plus comments
      $bindingFlags = [Reflection.BindingFlags] "Instance,NonPublic,GetField"
      $objectRef = $host.GetType().GetField("externalHostRef", $bindingFlags).GetValue($host)
      $bindingFlags = [Reflection.BindingFlags] "Instance,NonPublic,GetProperty"
      $consoleHost = $objectRef.GetType().GetProperty("Value", $bindingFlags).GetValue($objectRef, @())
      [void] $consoleHost.GetType().GetProperty("IsStandardOutputRedirected", $bindingFlags).GetValue($consoleHost, @())
      $bindingFlags = [Reflection.BindingFlags] "Instance,NonPublic,GetField"
      $field = $consoleHost.GetType().GetField("standardOutputWriter", $bindingFlags)
      $field.SetValue($consoleHost, [Console]::Out)
      [void] $consoleHost.GetType().GetProperty("IsStandardErrorRedirected", $bindingFlags).GetValue($consoleHost, @())
      $field2 = $consoleHost.GetType().GetField("standardErrorWriter", $bindingFlags)
      $field2.SetValue($consoleHost, [Console]::Error)
    } catch {
      Write-Output 'Unable to apply redirection fix.'
    }
  }
}

Fix-PowerShellOutputRedirectionBug

# Attempt to set highest encryption available for SecurityProtocol.
# PowerShell will not set this by default (until maybe .NET 4.6.x). This
# will typically produce a message for PowerShell v2 (just an info
# message though)
try {
  # Set TLS 1.2 (3072), then TLS 1.1 (768), then TLS 1.0 (192), finally SSL 3.0 (48)
  # Use integers because the enumeration values for TLS 1.2 and TLS 1.1 won't
  # exist in .NET 4.0, even though they are addressable if .NET 4.5+ is
  # installed (.NET 4.5 is an in-place upgrade).
  [System.Net.ServicePointManager]::SecurityProtocol = 3072 -bor 768 -bor 192 -bor 48
} catch {
  Write-Output 'Unable to set PowerShell to use TLS 1.2 and TLS 1.1 due to old .NET Framework installed. If you see underlying connection closed or trust errors, you may need to upgrade to .NET Framework 4.5+ and PowerShell v3+.'
}

function Get-Downloader {
param (
  [string]$url
 )
  $downloader = new-object System.Net.WebClient

  $defaultCreds = [System.Net.CredentialCache]::DefaultCredentials
  if (Test-Path -Path variable:repoCreds) {
    Write-Debug "Using provided repository authentication credentials."
    $downloader.Credentials = $repoCreds
  } elseif ($defaultCreds -ne $null) {
    Write-Debug "Using default repository authentication credentials."
    $downloader.Credentials = $defaultCreds
  }

  $ignoreProxy = $env:chocolateyIgnoreProxy
  if ($ignoreProxy -ne $null -and $ignoreProxy -eq 'true') {
    Write-Debug 'Explicitly bypassing proxy due to user environment variable.'
    $downloader.Proxy = [System.Net.GlobalProxySelection]::GetEmptyWebProxy()
  } else {
    # check if a proxy is required
    $explicitProxy = $env:chocolateyProxyLocation
    $explicitProxyUser = $env:chocolateyProxyUser
    $explicitProxyPassword = $env:chocolateyProxyPassword
    if ($explicitProxy -ne $null -and $explicitProxy -ne '') {
      # explicit proxy
      $proxy = New-Object System.Net.WebProxy($explicitProxy, $true)
      if ($explicitProxyPassword -ne $null -and $explicitProxyPassword -ne '') {
        $passwd = ConvertTo-SecureString $explicitProxyPassword -AsPlainText -Force
        $proxy.Credentials = New-Object System.Management.Automation.PSCredential ($explicitProxyUser, $passwd)
      }

      Write-Debug "Using explicit proxy server '$explicitProxy'."
      $downloader.Proxy = $proxy

    } elseif (!$downloader.Proxy.IsBypassed($url)) {
      # system proxy (pass through)
      $creds = $defaultCreds
      if ($creds -eq $null) {
        Write-Debug 'Default credentials were null. Attempting backup method'
        $cred = get-credential
        $creds = $cred.GetNetworkCredential();
      }

      $proxyaddress = $downloader.Proxy.GetProxy($url).Authority
      Write-Debug "Using system proxy server '$proxyaddress'."
      $proxy = New-Object System.Net.WebProxy($proxyaddress)
      $proxy.Credentials = $creds
      $downloader.Proxy = $proxy
    }
  }

  return $downloader
}

function Download-File {
param (
  [string]$url,
  [string]$file
 )
  $downloader = Get-Downloader $url
  $downloader.DownloadFile($url, $file)
}

function Download-Package {
param (
  [string]$packageODataSearchUrl,
  [string]$file
 )
  $downloader = Get-Downloader $packageODataSearchUrl

  Write-Output "Querying latest package from $packageODataSearchUrl"
  [xml]$pkg = $downloader.DownloadString($packageODataSearchUrl)
  $packageDownloadUrl = $pkg.feed.entry.content.src

  Write-Output "Downloading $packageDownloadUrl to $file"
  $downloader.DownloadFile($packageDownloadUrl, $file)
}

function Install-ChocolateyFromPackage {
param (
  [string]$chocolateyPackageFilePath = ''
)

  if ($chocolateyPackageFilePath -eq $null -or $chocolateyPackageFilePath -eq '') {
    throw "You must specify a local package to run the local install."
  }

  if (!(Test-Path($chocolateyPackageFilePath))) {
    throw "No file exists at $chocolateyPackageFilePath"
  }

  $chocTempDir = Join-Path $env:TEMP "chocolatey"
  $tempDir = Join-Path $chocTempDir "chocInstall"
  if (![System.IO.Directory]::Exists($tempDir)) {[System.IO.Directory]::CreateDirectory($tempDir)}
  $file = Join-Path $tempDir "chocolatey.zip"
  Copy-Item $chocolateyPackageFilePath $file -Force

  # unzip the package
  Write-Output "Extracting $file to $tempDir..."
  if ($unzipMethod -eq '7zip') {
    $7zaExe = Join-Path $tempDir '7za.exe'
    if (-Not (Test-Path ($7zaExe))) {
      Write-Output 'Downloading 7-Zip commandline tool prior to extraction.'
      # download 7zip
      Download-File $7zipUrl "$7zaExe"
    }

    $params = "x -o`"$tempDir`" -bd -y `"$file`""
    # use more robust Process as compared to Start-Process -Wait (which doesn't
    # wait for the process to finish in PowerShell v3)
    $process = New-Object System.Diagnostics.Process
    $process.StartInfo = New-Object System.Diagnostics.ProcessStartInfo($7zaExe, $params)
    $process.StartInfo.RedirectStandardOutput = $true
    $process.StartInfo.UseShellExecute = $false
    $process.StartInfo.WindowStyle = [System.Diagnostics.ProcessWindowStyle]::Hidden
    $process.Start() | Out-Null
    $process.BeginOutputReadLine()
    $process.WaitForExit()
    $exitCode = $process.ExitCode
    $process.Dispose()

    $errorMessage = "Unable to unzip package using 7zip. Perhaps try setting `$env:chocolateyUseWindowsCompression = 'true' and call install again. Error:"
    switch ($exitCode) {
      0 { break }
      1 { throw "$errorMessage Some files could not be extracted" }
      2 { throw "$errorMessage 7-Zip encountered a fatal error while extracting the files" }
      7 { throw "$errorMessage 7-Zip command line error" }
      8 { throw "$errorMessage 7-Zip out of memory" }
      255 { throw "$errorMessage Extraction cancelled by the user" }
      default { throw "$errorMessage 7-Zip signalled an unknown error (code $exitCode)" }
    }
  } else {
    if ($PSVersionTable.PSVersion.Major -lt 5) {
      try {
        $shellApplication = new-object -com shell.application
        $zipPackage = $shellApplication.NameSpace($file)
        $destinationFolder = $shellApplication.NameSpace($tempDir)
        $destinationFolder.CopyHere($zipPackage.Items(),0x10)
      } catch {
        throw "Unable to unzip package using built-in compression. Set `$env:chocolateyUseWindowsCompression = 'false' and call install again to use 7zip to unzip. Error: `n $_"
      }
    } else {
      Expand-Archive -Path "$file" -DestinationPath "$tempDir" -Force
    }
  }

  # Call Chocolatey install
  Write-Output 'Installing chocolatey on this machine'
  $toolsFolder = Join-Path $tempDir "tools"
  $chocInstallPS1 = Join-Path $toolsFolder "chocolateyInstall.ps1"

  & $chocInstallPS1

  Write-Output 'Ensuring chocolatey commands are on the path'
  $chocInstallVariableName = 'ChocolateyInstall'
  $chocoPath = [Environment]::GetEnvironmentVariable($chocInstallVariableName)
  if ($chocoPath -eq $null -or $chocoPath -eq '') {
    $chocoPath = 'C:\ProgramData\Chocolatey'
  }

  $chocoExePath = Join-Path $chocoPath 'bin'

  if ($($env:Path).ToLower().Contains($($chocoExePath).ToLower()) -eq $false) {
    $env:Path = [Environment]::GetEnvironmentVariable('Path',[System.EnvironmentVariableTarget]::Machine);
  }

  Write-Output 'Ensuring chocolatey.nupkg is in the lib folder'
  $chocoPkgDir = Join-Path $chocoPath 'lib\chocolatey'
  $nupkg = Join-Path $chocoPkgDir 'chocolatey.nupkg'
  if (!(Test-Path $nupkg)) {
    Write-Output 'Copying chocolatey.nupkg is in the lib folder'
    if (![System.IO.Directory]::Exists($chocoPkgDir)) { [System.IO.Directory]::CreateDirectory($chocoPkgDir); }
    Copy-Item "$file" "$nupkg" -Force -ErrorAction SilentlyContinue
  }
}

# Idempotence - do not install Chocolatey if it is already installed
if (!(Test-Path $ChocoInstallPath)) {
  # download the package to the local path
  if (!(Test-Path $localChocolateyPackageFilePath)) {
    Download-Package $searchUrl $localChocolateyPackageFilePath
  }

  # Install Chocolatey
  Install-ChocolateyFromPackage $localChocolateyPackageFilePath
}
Install with Puppet
NOTE
If you have the licensed edition, see Setting up Licensed Edition with Puppet instead. This only additionally contains some package examples and setting up tab completion.
Here’s an example of setting Chocolatey up with Puppet that sets up and configures Chocolatey, sets up an internal package repository, and shows setting up the licensed edition and ensuring some packages.
- Download the chocolatey.nupkg from the community repository - download the latest chocolatey nupkg or see Completely offline install to get an older version.
- Optionally download the chocolatey.server package from the community repository - download the latest chocolatey.server nupkg.
- Use
choco pushto push those items to your internal package repository (e.g.choco push chocolatey.0.10.7.nupkg --source http://internal_repo/ --api-key abc123) - Determine how to get the bare url to download the Chocolatey.Nupkg directly. You will need that for the internal url for installing Chocolatey offline. For the community repository, it is https://community.chocolatey.org/api/v2/package/chocolatey
# Requires puppetlabs/chocolatey module
# See https://forge.puppet.com/puppetlabs/chocolatey

## Set resource defaults for `package` resources on Windows to use the Chocolatey provider
case $operatingsystem {
  'windows':    {
    Package {
      provider => chocolatey,
    }
  }
}

## - Ensure Chocolatey Install -
#include chocolatey
## OR
## Download chocolatey.nupkg to your internal repository (see above
##  about getting the package for offline use)
## Note: `chocolatey_download_url is completely different than normal
##  source locations. This is directly to the bare download url for the
##  chocolatey.nupkg, similar to what you see when you browse to
##  https://community.chocolatey.org/api/v2/package/chocolatey
class {'chocolatey':
  chocolatey_download_url => 'https://<internalurl/to>/chocolatey.nupkg',
  use_7zip                => false,
}

## If you need FIPS compliance
## make this the first thing you configure before you do any additional
## configuration or package installations
#chocolateyfeature {'useFipsCompliantChecksums':
#  ensure => enabled,
#}

## Keep chocolatey up to date based on your internal source
## You control the upgrades based on when you push an updated version
##  to your internal repository.
## Note the source here is to the OData feed, similar to what you see
##  when you browse to https://chocolatey.org/api/v2
package {'chocolatey':
  ensure   => latest,
  provider => chocolatey,
  source   => 'https://<internal_repo>/chocolatey',
}


## - Configure Chocolatey -
### Config Settings

## Move cache location so Chocolatey is very deterministic about
## cleaning up temporary data
chocolateyconfig {'cacheLocation':
  value => 'c:\ProgramData\chocolatey\choco-cache',
}

## Increase timeout to 4 hours
chocolateyconfig {'commandExecutionTimeoutSeconds':
  value => '14400',
}

### Sources
## Remove the default community package repository source
chocolateysource {'chocolatey':
  ensure   => absent,
  location => 'https://community.chocolatey.org/api/v2/',
}

## Add default sources for your internal repositories
chocolateysource {'internal_chocolatey':
  ensure   => present,
  location => 'http://internal_location/OData/endpoint',
  priority => 1,
  username => 'optional',
  password => 'optional,not ensured',
}

### Features
chocolateyfeature {'checksumFiles':
  ensure => enabled,
}

## When using Puppet for installs
chocolateyfeature {'showDownloadProgress':
  ensure => disabled,
}

chocolateyfeature {'useRememberedArgumentsForUpgrades':
  ensure => enabled,
}


## - Chocolatey Simple Server Package Repository -
## Requires chocolatey/chocolatey_server module  - see
##  https://forge.puppet.com/chocolatey/chocolatey_server
## this contains the bits to install the custom server
## - Ensures IIS and Ensure ASP.NET
## - Installs and configures the Chocolatey.Server website and app pool
## - Sets permissions appropriately

#include chocolatey_server
## OR
## `server_package_source` is to the OData feed, similar to what you see
##  when you browse to https://chocolatey.org/api/v2
class {'chocolatey_server':
  server_package_source => 'https://internalurl/odata/server',
}

chocolateysource {'local_chocolatey_server':
  ensure   => present,
  location => 'http://localhost/chocolatey',
  priority => 2,
}


## - Tab Completion -
## Ensure that when someone uses choco from powershell.exe, they have tab completion
file {'C:/Users/Administrator/Documents/WindowsPowerShell':
  ensure => directory,
}

file {'C:/Users/Administrator/Documents/WindowsPowerShell/Microsoft.PowerShell_profile.ps1':
  ensure => file,
  content => '$ChocolateyProfile = "$env:ChocolateyInstall\helpers\chocolateyProfile.psm1"
if (Test-Path($ChocolateyProfile)) {
  Import-Module "$ChocolateyProfile"
}',
}


## - Package Examples -
package {'roundhouse':
  ensure   => '0.8.5.0',
}

package {'git':
  ensure => latest,
}

## see https://forge.puppet.com/puppetlabs/chocolatey#install-options-with-spaces
package {'launchy':
  ensure          => installed,
  install_options => ['--override', '--installArgs','"', '/VERYSILENT','/NORESTART','"'],
}

package {['virustotaluploader',
          'googlechrome',
          'notepadplusplus',
          '7zip',
          'ruby',
          'charles',
          'grepwin',
          'stexbar',
          'inkscape',
          'gitextensions',
          'pandoc',
          'snagit',
          'nodejs',
          ]:
  ensure => latest,
  source => 'https://community.chocolatey.org/api/v2/',
}

package {'screentogif':
  ensure => '2.2.160907',
  source => 'https://community.chocolatey.org/api/v2/',
}

package {'dotnet4.5.2':
  ensure => latest,
}
Install using PowerShell from cmd.exe
This is the best method if you want to repeat it or include it in source control. It requires no change to your existing PowerShell to allow for remote unsigned scripts.
Create a file named installChocolatey.cmd with the following:
@echo off

SET DIR=%~dp0%

::download install.ps1
%systemroot%\System32\WindowsPowerShell\v1.0\powershell.exe -NoProfile -ExecutionPolicy Bypass -Command "((new-object net.webclient).DownloadFile('https://community.chocolatey.org/install.ps1','%DIR%install.ps1'))"
::run installer
%systemroot%\System32\WindowsPowerShell\v1.0\powershell.exe -NoProfile -ExecutionPolicy Bypass -Command "& '%DIR%install.ps1' %*"
You can also get to this file by going to https://community.chocolatey.org/installChocolatey.cmd.
If you prefer to have the install.ps1 file already, comment out the download line in the batch file and download the install.ps1 from community.chocolatey.org and save it as install.ps1 next to the installChocolatey.cmd file.
Run installChocolatey.cmd from an elevated cmd.exe command prompt and it will install the latest version of Chocolatey. You can not run this from powershell.exe without making changes to your execution policy.
NOTE
To create and save a
.cmdfile, please use a text editor and nothing fancy like Microsoft Word or OneNote.
Install using NuGet Package Manager
When you have Visual Studio 2010+ and the NuGet extension installed (pre-installed on any newer versions of Visual Studio), you can simply type the following three commands and you will have Chocolatey installed on your machine.
Install-Package chocolateyInitialize-ChocolateyUninstall-Package chocolatey
Install using NuGet.exe from PowerShell
You can also use NuGet command line to download Chocolatey:
nuget install chocolatey or nuget install chocolatey -pre
Once you download it, open PowerShell (remote unsigned), navigate to the tools folder and run:
& .\chocolateyInstall.ps1
Install downloaded NuGet package from PowerShell
You can also just download and unzip the Chocolatey package (.nupkg is a fancy zip file):
- Download the Chocolatey package.
- Ensure the downloaded nupkg is not blocked.
- Unzip it using any application that supports
zipformat. - Open a PowerShell command shell and navigate into the unzipped package’s tools folder.
NOTE
Ensure PowerShell execution policy is set to at least bypass or remote signed (if you have issues, you may need to set it to Unrestricted).
- Call
& .\chocolateyInstall.ps1to allow Chocolatey to install.NOTE
This will not set Chocolatey as an installed package, so it may be a good idea to also call
choco upgrade chocolatey -yand let it reinstall the same version, but at least it will be available for upgrades then.
Install licensed edition
Please see installation of licensed edition.
Installing behind a proxy
Have a proxy? Try
- Cmd.exe:
@powershell -NoProfile -ExecutionPolicy Bypass -Command "[System.Net.WebRequest]::DefaultWebProxy.Credentials = [System.Net.CredentialCache]::DefaultCredentials; iex ((New-Object System.Net.WebClient).DownloadString('https://community.chocolatey.org/install.ps1'))" && SET PATH="%PATH%;%ALLUSERSPROFILE%\chocolatey\bin"
- PowerShell.exe (Ensure Get-ExecutionPolicy is at least RemoteSigned):
[System.Net.WebRequest]::DefaultWebProxy.Credentials = [System.Net.CredentialCache]::DefaultCredentials; iex ((New-Object System.Net.WebClient).DownloadString('https://community.chocolatey.org/install.ps1'))
Installing behind an explicit proxy
See Installing Chocolatey Behind a Proxy Server
Installing to a different location
The Chocolatey installation script looks for the ChocolateyInstall environment variable in order to identify where it should install to. If this environment variable does not exist, it will install Chocolatey to the default location. In order to install to a non-default location, you should set this variable in a way that it is available in the process that will be running the install script. For example you could set the environment variable through the Windows GUI, or you could use setx](https://learn.microsoft.com/en-us/windows-server/administration/windows-commands/setx).
You can validate that PowerShell has the environment variable by running: Write-Host $env:ChocolateyInstall
- Create an environment variable named
ChocolateyInstalland set it to the folder you want Chocolatey to install to prior to installation. - Don’t use
"C:\Chocolatey"unless necessary. - If you have already installed (and want to change the location after the fact):
- Follow the above steps.
- Install Chocolatey again.
- Copy/Move over the items from the old lib/bin directory.
- Delete your old install directory.
NOTE
There is one really important consideration when installing Chocolatey to a non-default location: Chocolatey only locks down the permissions to Admins when installed to the default location
%PROGRAMDATA%\Chocolatey, which means the same thing as%SystemDrive%\ProgramData\Chocolatey.If you are installing to another location, you will need to handle this yourself, i.e. restrict write access to Admins in case you so desire. This is due to alternative locations could have a range of permissions that should not be changed. See Why does Chocolatey install where it does and GitHub Issue 398 for more details.
Installing a particular version of Chocolatey
Set the following environment variable prior to install:
chocolateyVersion- controls what version of Chocolatey is installed
In PowerShell, it looks like this:
$env:chocolateyVersion = '0.9.9.12'
# install script
NOTE
This will only work with the installation methods that call https://community.chocolatey.org/install.ps1 as part of the install.
Use Windows built-in compression instead of downloading 7zip
Set the following environment variable prior to install:
chocolateyUseWindowsCompression- this will bypass the download and use of 7zip.
In PowerShell, it looks like this:
$env:chocolateyUseWindowsCompression = 'true'
# install script
NOTE
This will only work with the installation methods that call https://community.chocolatey.org/install.ps1 as part of the install.
Installing with restricted TLS
NOTE
community.chocolatey.org now requires TLS 1.2 at a minimum. Please see https://blog.chocolatey.org/2020/01/remove-support-for-old-tls-versions/.
NOTE
If your server is restricted to TLS 1.1+, you need to add additional logic to be able to download and install Chocolatey (this is not necessary when running Chocolatey normally as it does this automatically).
NOTE
If this is for organizational use, you should consider hosting the Chocolatey package internally and installing from there.
If you see an error that looks similar to the following:
Exception calling "DownloadString" with "1" argument(s): "The underlying connection was closed: An unexpected error
occurred on a receive."
At line:1 char:1
+ iex ((New-Object System.Net.WebClient).DownloadString('https://chocolatey.org/in ...
+ ~~~~~~~~~~~~~~~~~~~~~~~~~~~~~~~~~~~~~~~~~~~~~~~~~~~~~~~~~~~~~~~~~~~~~~~~~~~~~~~~
    + CategoryInfo          : NotSpecified: (:) [], MethodInvocationException
    + FullyQualifiedErrorId : WebException
OR:
Exception calling "DownloadString" with "1" argument(s): "The request was aborted: Could not create SSL/TLS secure
channel."
At line:1 char:51
+ ... ess -Force; iex ((New-Object System.Net.WebClient).DownloadString('ht ...
+                 ~~~~~~~~~~~~~~~~~~~~~~~~~~~~~~~~~~~~~~~~~~~~~~~~~~~~~~~~~
    + CategoryInfo          : NotSpecified: (:) [], MethodInvocationException
    + FullyQualifiedErrorId : WebException
It’s possible that you are attempting to install from a server that needs to use TLS 1.1 or TLS 1.2 (has restricted the use of TLS 1.0 and SSL v3), you have some options. community.chocolatey.org now requires TLS 1.2 at a minimum.
Option 1 - Host Internally
If you are an organization, this is your best option and it reduces issues with rate limiting that could occur later.
See https://chocolatey.org/install#organization for details.
Option 2 - Updated PowerShell and .NET
Upgrade to the following:
- A supported PowerShell version
- .NET Framework 4.5
try {
  # Set TLS 1.2 (3072) as that is the minimum required by Chocolatey.org
  # Use integers because the enumeration value for TLS 1.2 won't exist
  # in .NET 4.0, even though they are addressable if .NET 4.5+ is
  # installed (.NET 4.5 is an in-place upgrade).
  [System.Net.ServicePointManager]::SecurityProtocol = [System.Net.ServicePointManager]::SecurityProtocol -bor 3072
} catch {
  Write-Warning 'Unable to set PowerShell to use TLS 1.2. This is required for contacting Chocolatey as of 03 FEB 2020. https://blog.chocolatey.org/2020/01/remove-support-for-old-tls-versions/. If you see underlying connection closed or trust errors, you may need to do one or more of the following: (1) upgrade to .NET Framework 4.5+ and PowerShell v3+, (2) Call [System.Net.ServicePointManager]::SecurityProtocol = 3072; in PowerShell prior to attempting installation, (3) specify internal Chocolatey package location (set $env:chocolateyDownloadUrl prior to install or host the package internally), (4) use the Download + PowerShell method of install. See https://docs.chocolatey.org/en-us/choco/setup for all install options.'
}

iex ((New-Object System.Net.WebClient).DownloadString('https://community.chocolatey.org/install.ps1'))
Option 3 - Manual
You need to download and unzip the Chocolatey package, then call the PowerShell install script from there. See the Install downloaded NuGet package from PowerShell section below.
Non-Administrative install
NOTE
This option should be a last resort and is considered to be a more advanced scenario - most things you do on Windows require administrative rights, especially surrounding software management, so you are going to be limited even in packages you attempt to install. If you are using the community package repository, there are over 200 packages you can install from the community repository without administrative permission - see https://community.chocolatey.org/packages?q=id%3Aportable+tag%3Aportable.
You must choose a different location than the default (see Installing to a different location above). The default is a more secure location that only administrators can update.
- Save the script below as
ChocolateyInstallNonAdmin.ps1. - Use the script below, determine where you might want Chocolatey installed if it is not to
C:\ProgramData\chocoportable. - Open PowerShell.exe.
- Run the following
Set-ExecutionPolicy Bypass -Scope Process -Force; - Run
.\ChocolateyInstallNonAdmin.ps1.
ChocolateyInstallNonAdmin.ps1:
# Set directory for installation - Chocolatey does not lock
# down the directory if not the default
$InstallDir='C:\ProgramData\chocoportable'
$env:ChocolateyInstall="$InstallDir"

# If your PowerShell Execution policy is restrictive, you may
# not be able to get around that. Try setting your session to
# Bypass.
Set-ExecutionPolicy Bypass -Scope Process -Force;

# All install options - offline, proxy, etc at
# https://chocolatey.org/install
iex ((New-Object System.Net.WebClient).DownloadString('https://community.chocolatey.org/install.ps1'))
Examples of packages you can install:
choco install puppet-agent.portable -y
choco install ruby.portable -y
choco install git.commandline -y

# pick an editor
#choco install visualstudiocode.portable -y # not yet available
choco install notepadplusplus.commandline -y
#choco install nano -y
#choco install vim-tux.portable

# What else can I install without admin rights?
# https://community.chocolatey.org/packages?q=id%3Aportable
If you prefer or need cmd.exe example, please see https://gist.github.com/ferventcoder/78fa6b6f4d6e2b12c89680cbc0daec78
Upgrading Chocolatey
Once installed, Chocolatey can be upgraded in exactly the same way as any other package that has been installed using Chocolatey. Simply use the command to upgrade to the latest stable release of Chocolatey:
choco upgrade chocolatey
Uninstalling Chocolatey
See uninstall.
FAQs
I’m having trouble installing Chocolatey
Make sure you’ve reviewed More Install Options and looked over Troubleshooting. If you’ve done those things, reach out over the mailing list or over chat. The links to those can be found in the open source section of https://chocolatey.org/support.
I’m getting a 403 attempting to install
This is addressed in Troubleshooting.