Groups
Groups
Groups are the basis on which a given Deployment Plan operates. A Group may contain one or more Computers, and/or other Groups. Currently, Groups are entirely self-contained, and cannot be directly mapped from Active Directory Groups.
The Groups page can be accessed from the left-hand navigation menu by selecting the Groups menu item.
If you do not see this menu entry, verify with your administrator whether your group has the View Groups role assigned.

The All Computers (Automatic Group)
NOTE
This feature is available in Chocolatey Central Management starting with version 0.11.0.
All Computers present in Chocolatey Central Management are automatically added to a System Managed Group named All Computers (Automatic Group). This Group can not be edited or deleted. It will have a System managed button next to the name in the table. Clicking this button will display a tooltip with more information.
![]()
Temporary Groups
NOTE
This feature is available in Chocolatey Central Management starting with version 0.12.0.
A Temporary Group is a Group that has been created for one or more specific circumstance, for instance as part of creating an Automatic Deployment Plan. These Groups are normally not viewable from anywhere, other than the Deployment Plans where they are being used, and will be cleaned up on an interval when they are no longer needed.
A Temporary Group can also not be Edited, Deleted, or Duplicated manually by a user. As well, no other Group can have such a Group as a Sub-Group.
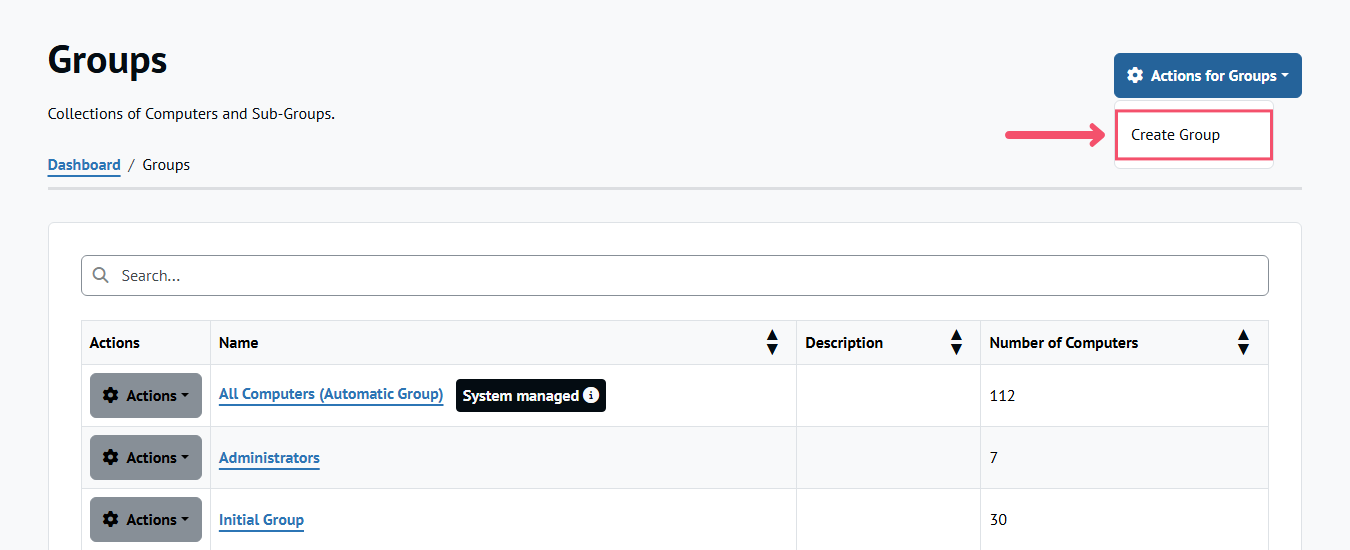
Creating a Group
On the main Groups page, select the Actions for Groups button and selecting the Create Group menu option.
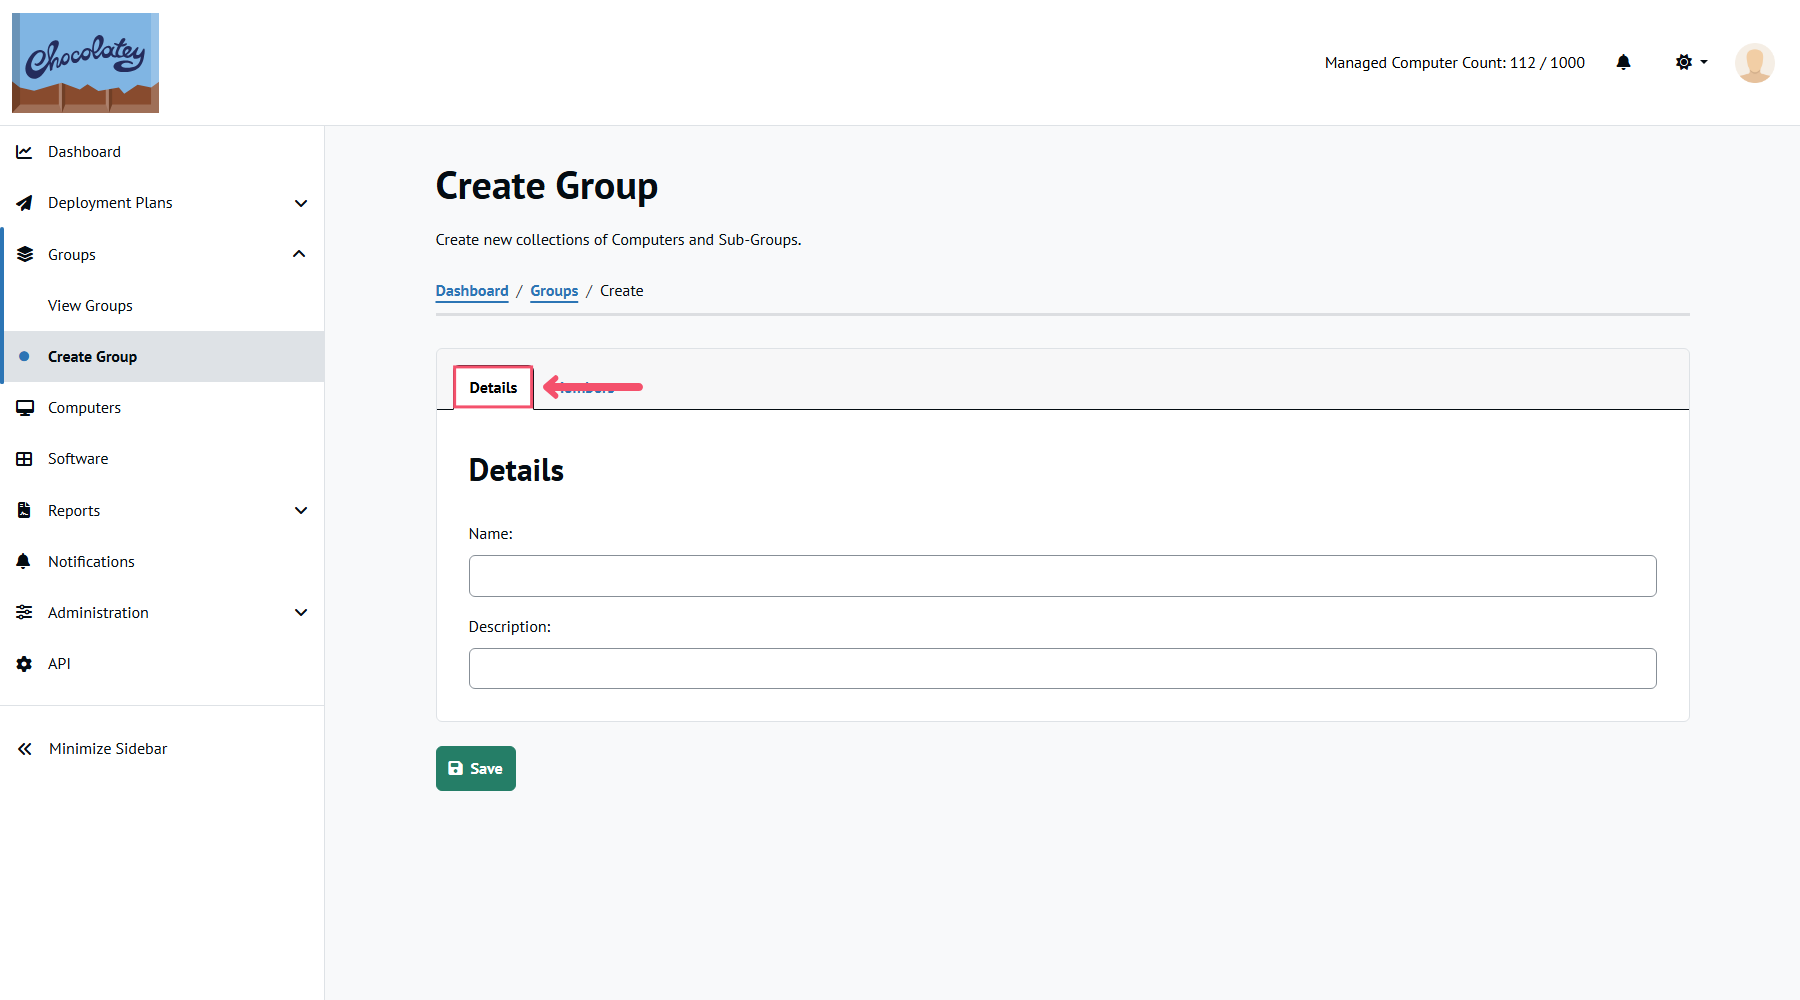
Fill in a Name for the Group and (optionally) a Description in the appropriate fields in the Create Group page.
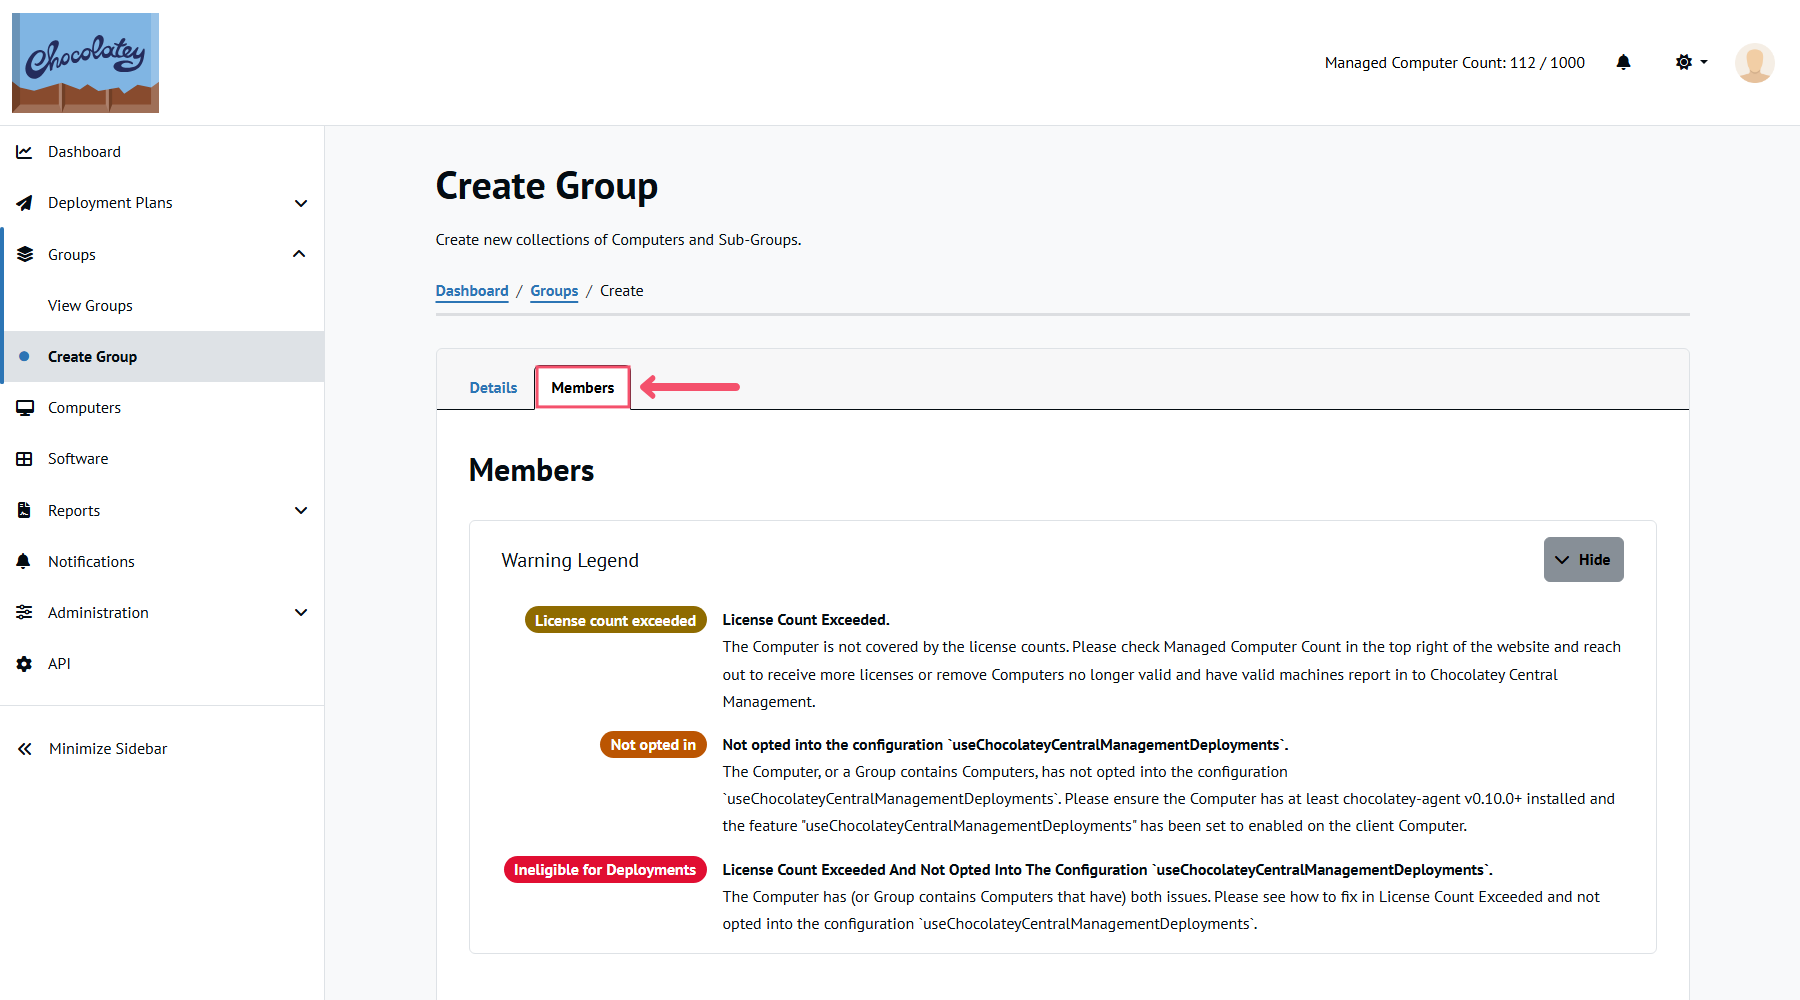
Select preferred Groups or Computers by checking each checkbox in the table. You can also select the top left checkbox in the table head to immediately add all Groups and Computers.
Click Save to create the new Group.
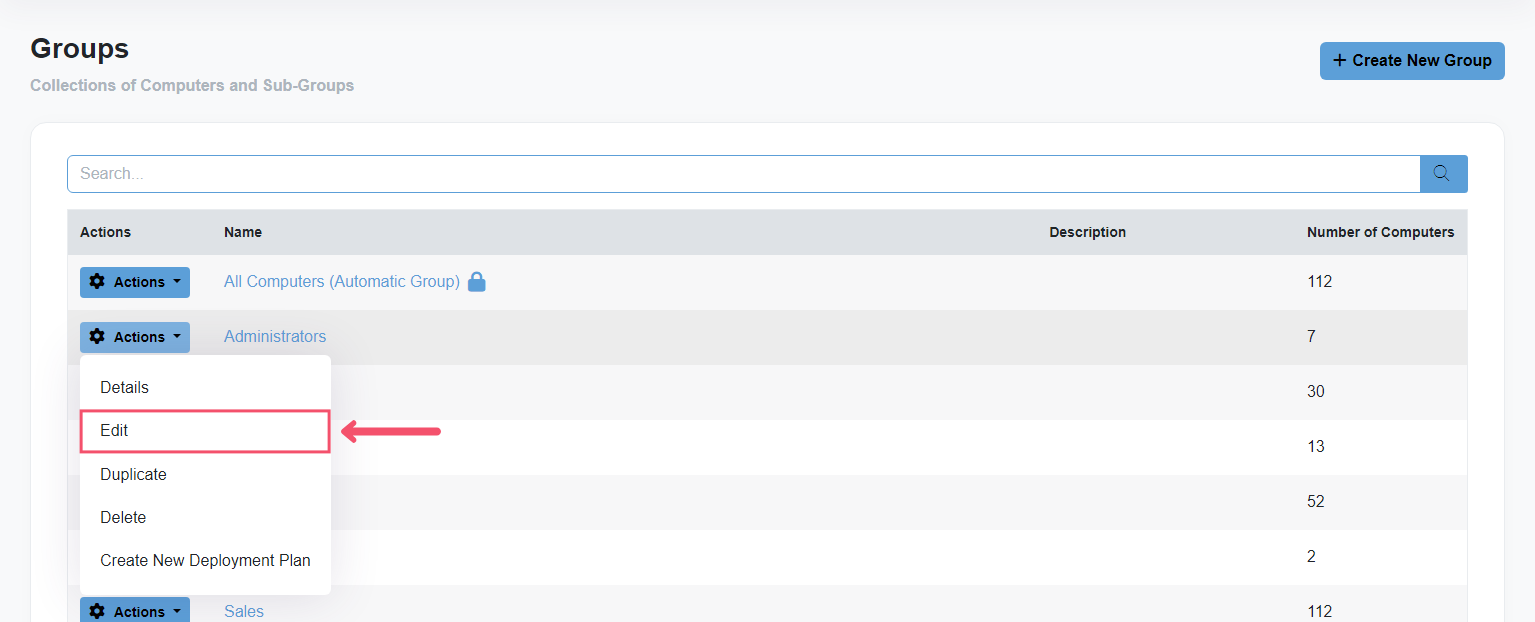
Editing a Group
NOTE
If you do not see the Edit menu entry or the Actions buttons, consult your administrator to determine if you have the Edit Groups role assigned.
On the main Groups page, find the Group you want to edit. You can enter a search term in the text field to filter results by typing in part of their Name or Description. Select the Actions button on the left-hand side of the Group, and then select Edit to navigate to the Group Edit page.
From the Edit Group page, you can modify the Group name and description, and modify members by adding or removing Groups and/or Computers.
Deleting a Group
NOTE
If you do not see the Delete menu entry or the Actions buttons, consult your administrator to determine if you have the appropriate role assigned to your account.
On the main Groups page, find the Group you want to edit. You can enter a search term in the text field to filter results by typing in part of their Name or Description. Similar to the Edit Group action, select the Actions button on the left-hand side of the Group, and instead select Delete. You will be prompted to confirm the deletion.
Duplicating a Group
NOTE
If you do not see the Duplicate menu entry or the Actions buttons, consult your administrator to determine if you have the appropriate role assigned to your account.
On the main Groups page, find the Group you want to duplicate. You can enter a search term in the text field to filter results by typing in part of their Name or Description. Similar to the Edit Group action, select the Actions button on the left-hand side of the Group, and instead select Duplicate. If the Group being duplicated is a system managed Group, a confirmation message will be shown indicating that the duplicated Group will not be system managed. A success message will be shown that mentions that the Group was duplicated, and if you have permissions to Edit a Group a dialog to edit this duplicated Group will be shown.
Viewing a Group’s Details
On the main Groups page, find the group you want to view. You can enter a search term in the text field to filter results by typing in part of their Name or Description. Select the Actions button on the left-hand side of the group, and select Details.
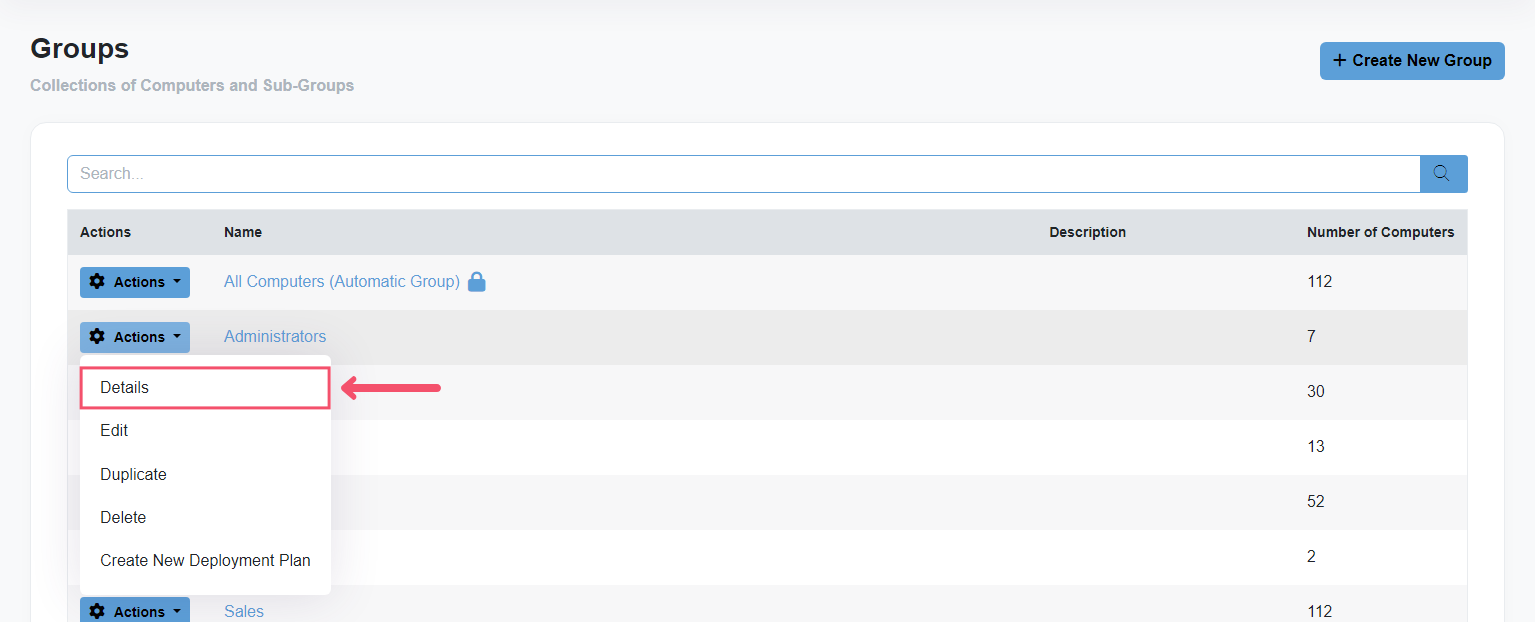
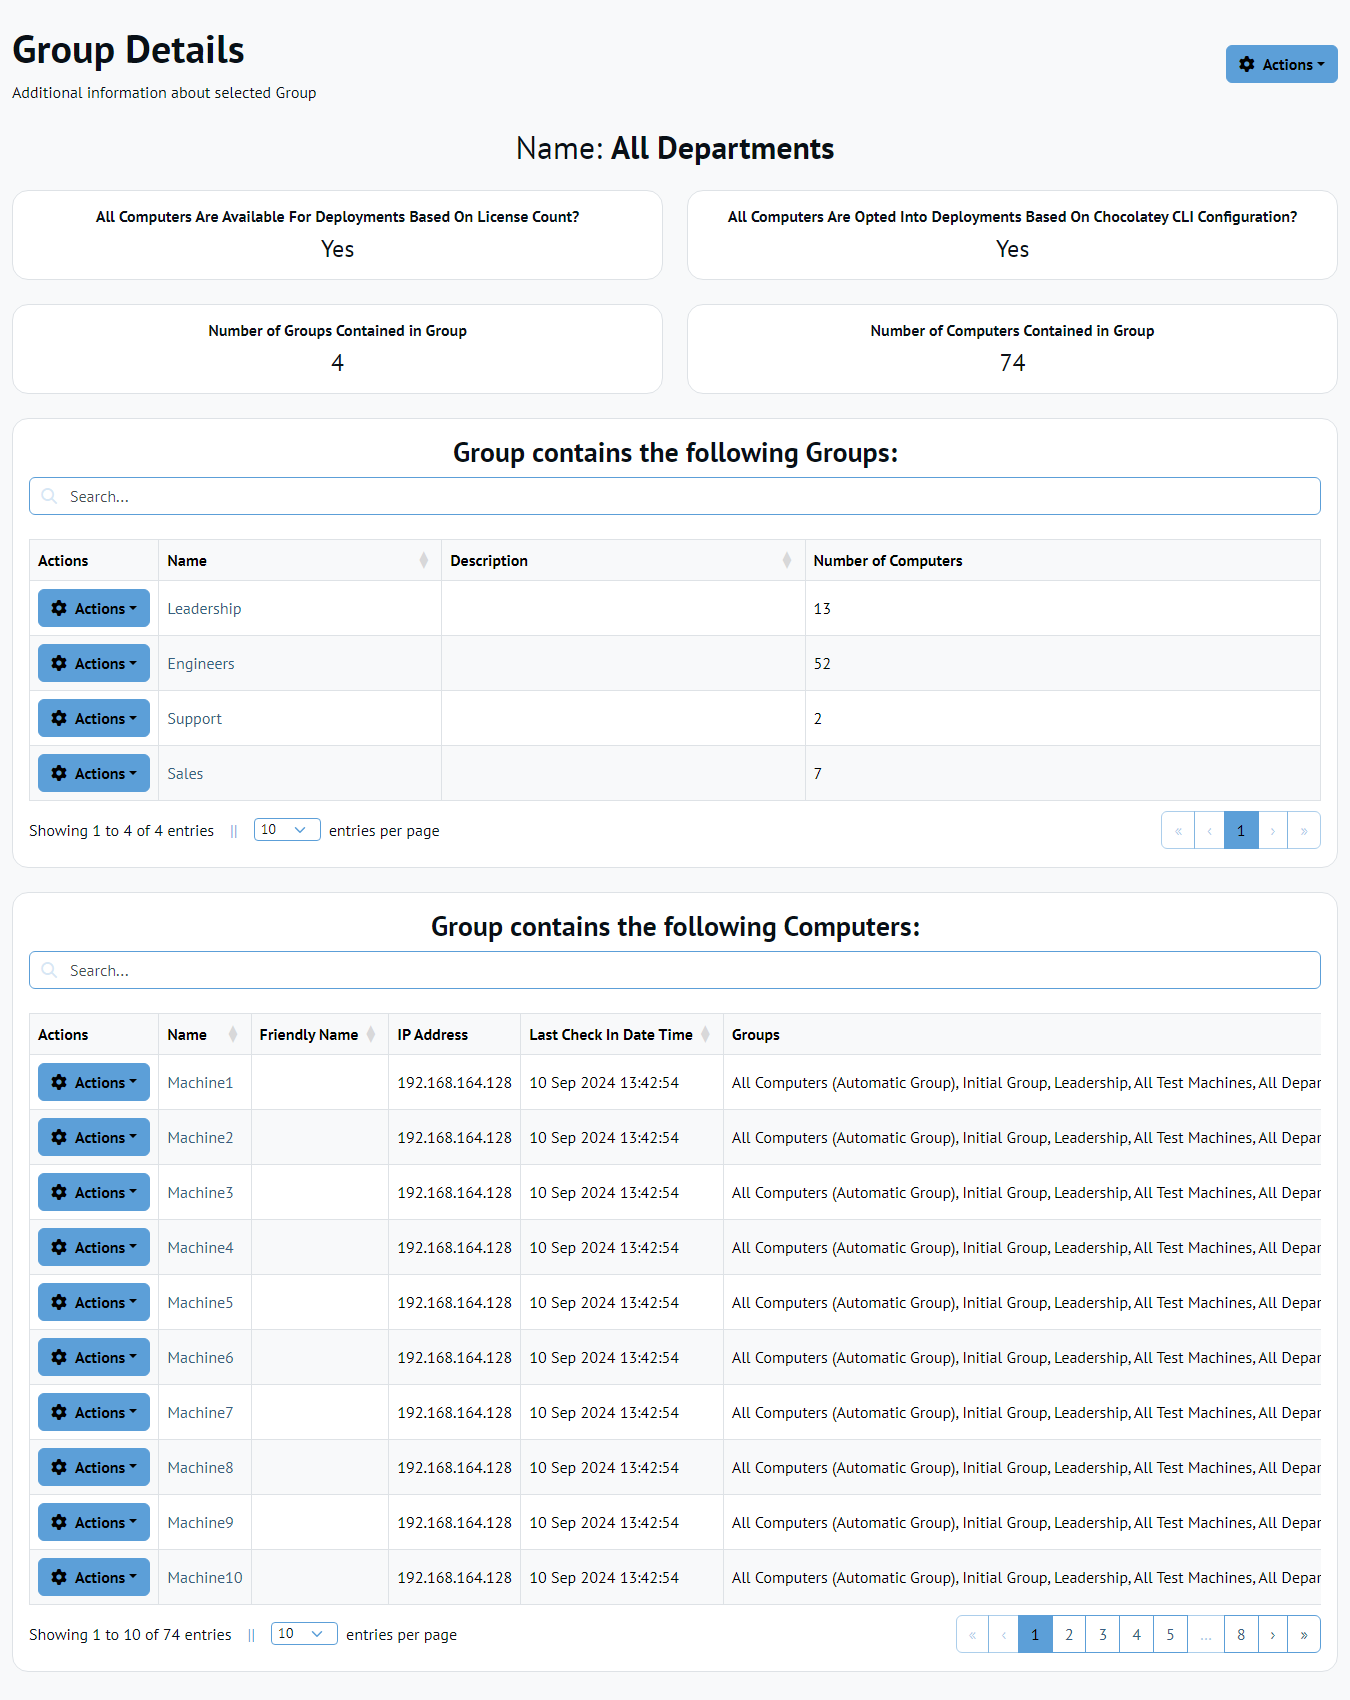
On the Group Details page, you’ll find a searchable list of all Computers and Groups that are in the Group, as well as a more detailed view of the Group information.
Creating a Deployment Plan from a Group
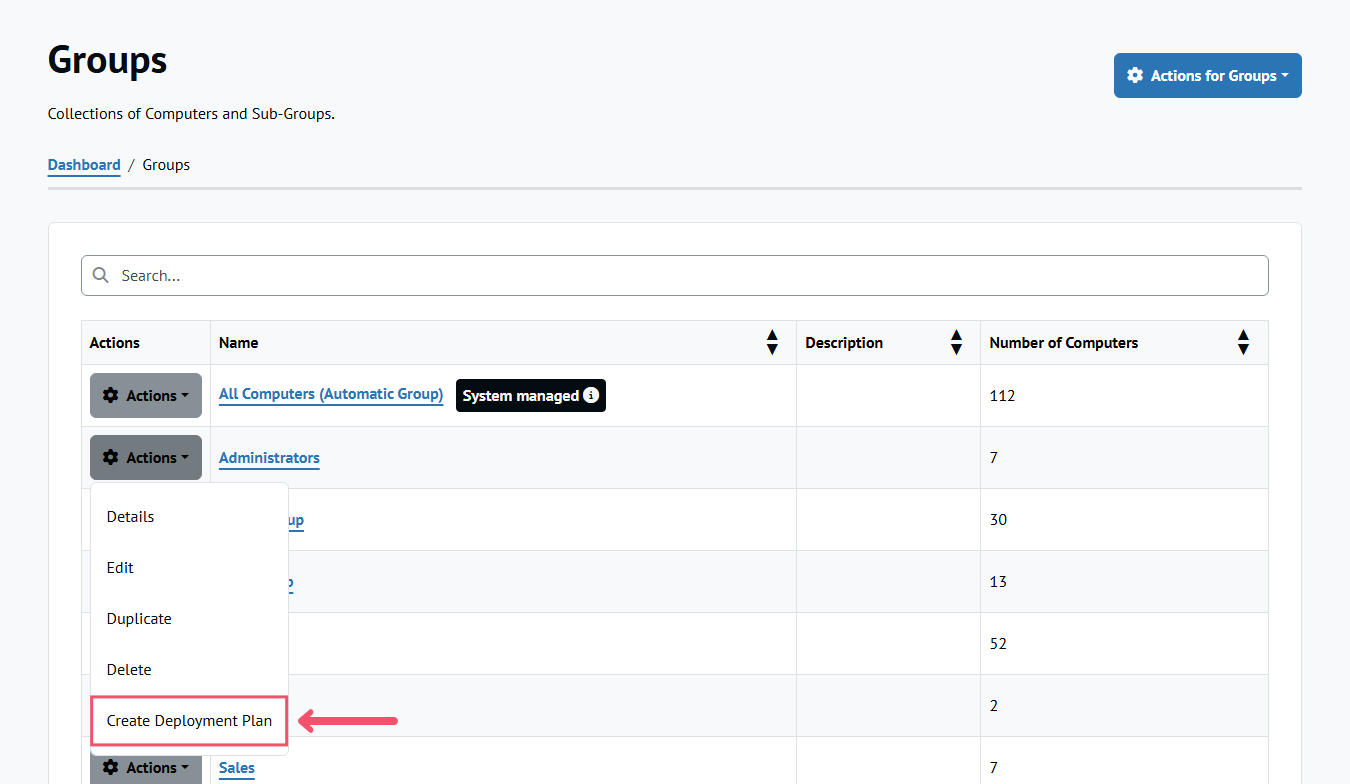
Creating a Deployment Plan for a Group can be done from two pages:
-
In the leftmost column of the Groups table you will find an Actions button which will display a Create Deployment Plan option.
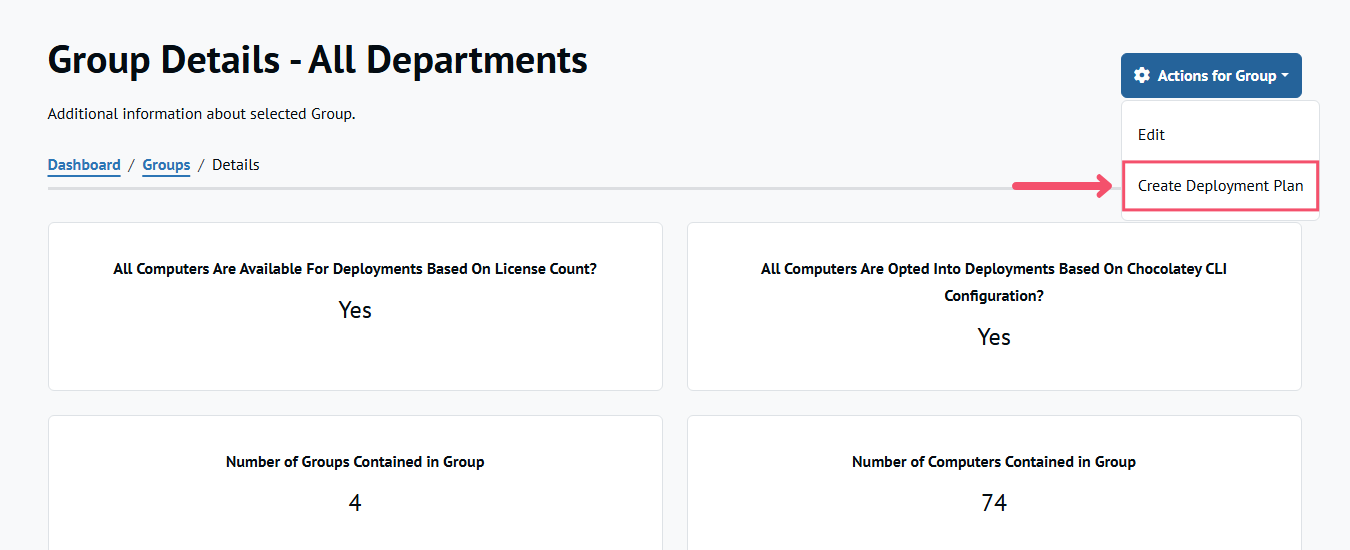
-
From the Group Details page, click the Actions for Group button and select the Create Deployment Plan option.
Clicking this option will create a New Deployment Plan. This Deployment Plan will create one Deployment Step with the chosen Target Group selected. Upon arriving on the Edit Deployment Plan screen, this Deployment Step will be opened and ready to add a script command.
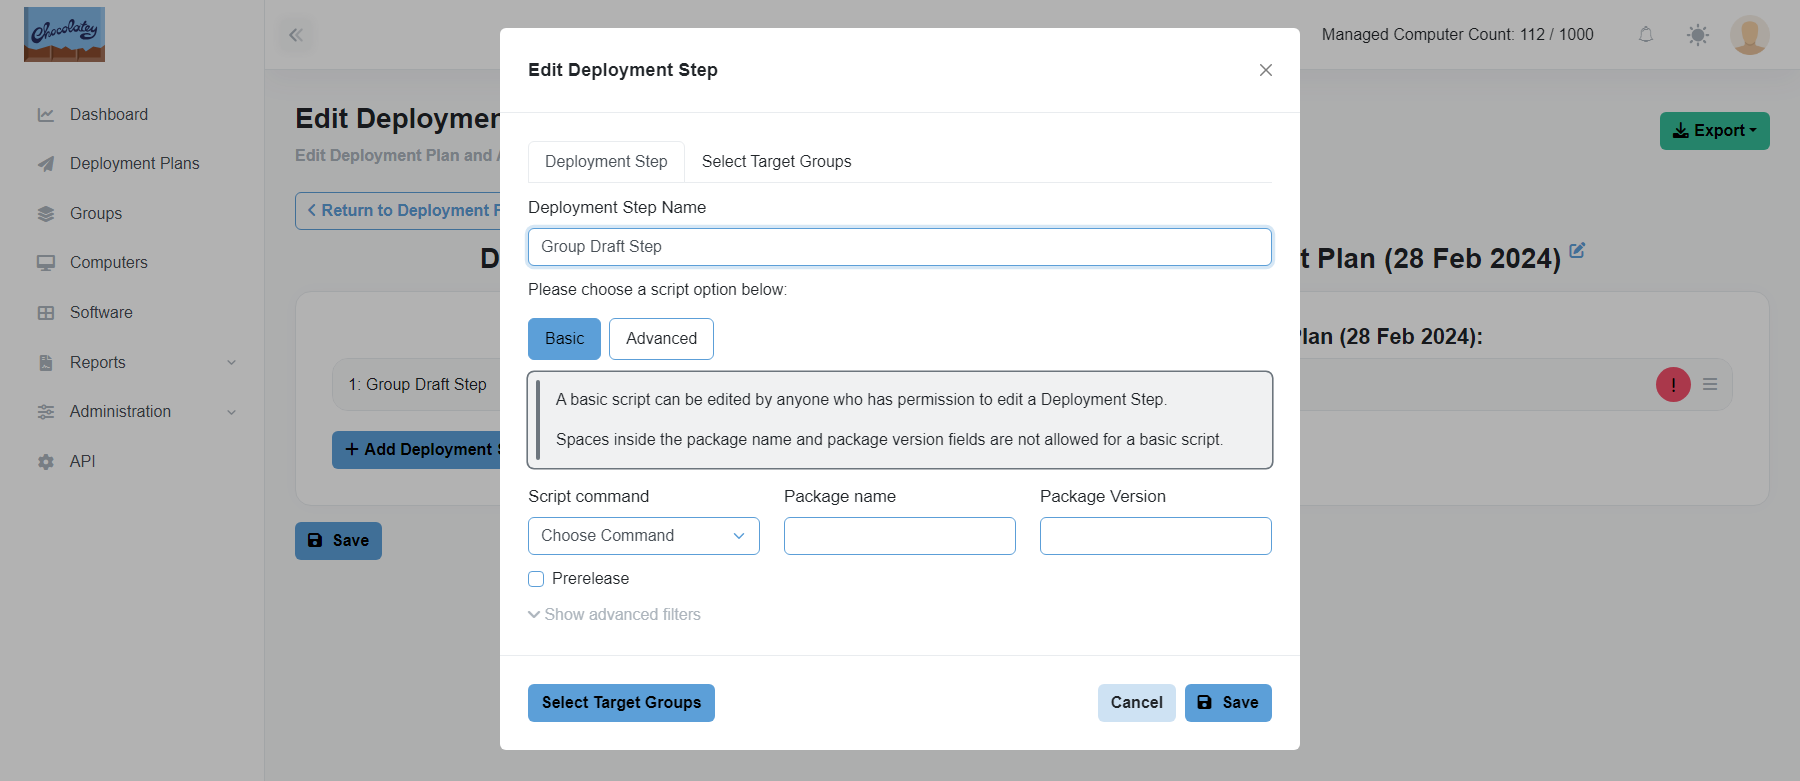
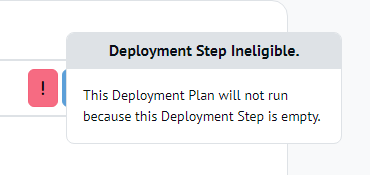
The Deployment Plan can be saved without adding a script command, however it will be ineligible for deployment. A red or yellow warning button will be shown on the Deployment Step, that when clicking will show a message.
After adding a script command to the Deployment Step, the Deployment Plan can be deployed as outlined in the Deployment Plans documentation.
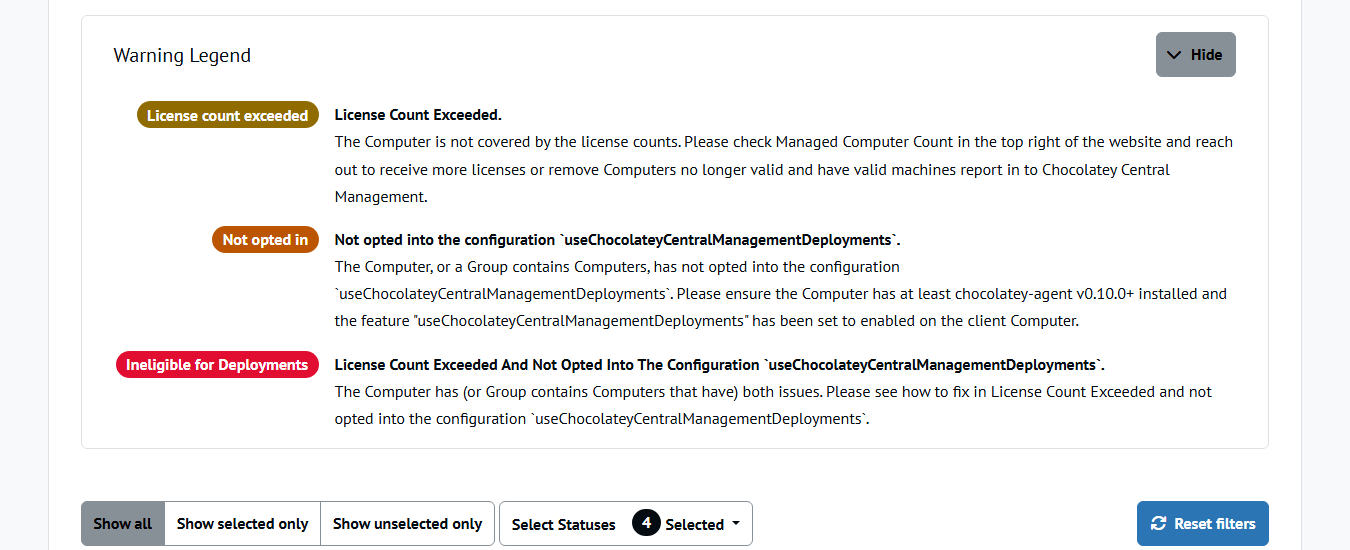
Eligibility for Deployments
The Create / Edit Group pages display Groups or Computers that are ineligible for Deployment Steps in either red or orange, depending on the reason for their ineligibility. All Groups and Computers in a given Group must have their eligibility clear in order for that Group to be used as part of a Deployment Step. If a Deployment Step is targeting ineligible Groups, the Deployment Plan cannot be started until the eligibility status(es) of the affected Computers has been resolved.
FAQ
Why do I see some machines have not opted in for Deployments?
If you are on the Groups screen, you may notice that some machines show up highlighted with a coloring, and one of those colorings is an orange - the legend below it mentions “Not Opted In For Deployments (Configuration)”.
As you can see from the text, it is meant to help you figure out the issue:
The Computer has not opted in, or a Group contains Computers that have not opted in, for deployments by configuration. Please ensure the Computer has at least Chocolatey Agent v0.10.0+ installed and the feature
useChocolateyCentralManagementDeploymentshas been set to enabled on the client Computer.
This is telling you that you need to ensure you set the client to allow for the use of Deployments. As it is a security consideration, it requires an explicit opt-in on client machines. See Client Setup - Features for details on how to set it.
I have plenty of licenses, why do some machines show not opted in for deployments and also exceeds your current license count?
Once you upgrade to at least CCM v0.2.0, every machine will show that until they check in the next time. Once they check in, that will go away. So it’s basically normal to see that until those machines check in again.
Common Errors and Resolutions
A Computer or Group is not showing as available for deployments, but I have plenty of available licenses
Once you upgrade to Central Management v0.3.0+, you have upgraded the Agent on the machine to v0.11.0+, and it has successfully completed a check in, then that messaging should go away. Note that clients do not get a message back that there was a failure as a security feature - you’ll need to consult the Central Management Service logs. You can find that at $env:ChocolateyInstall\logs\ccm-service.log, or if you are on a version of Chocolatey Central Management prior to 0.2.0, the log will be located at $env:ChocolateyInstall\lib\chocolatey-management-service\tools\service\logs\chocolatey.service.host.log.