Computers
Computers
Chocolatey Central Management gives you visibility into what’s installed on a given computer, as well as their last check-in to Central Management and IP Address.
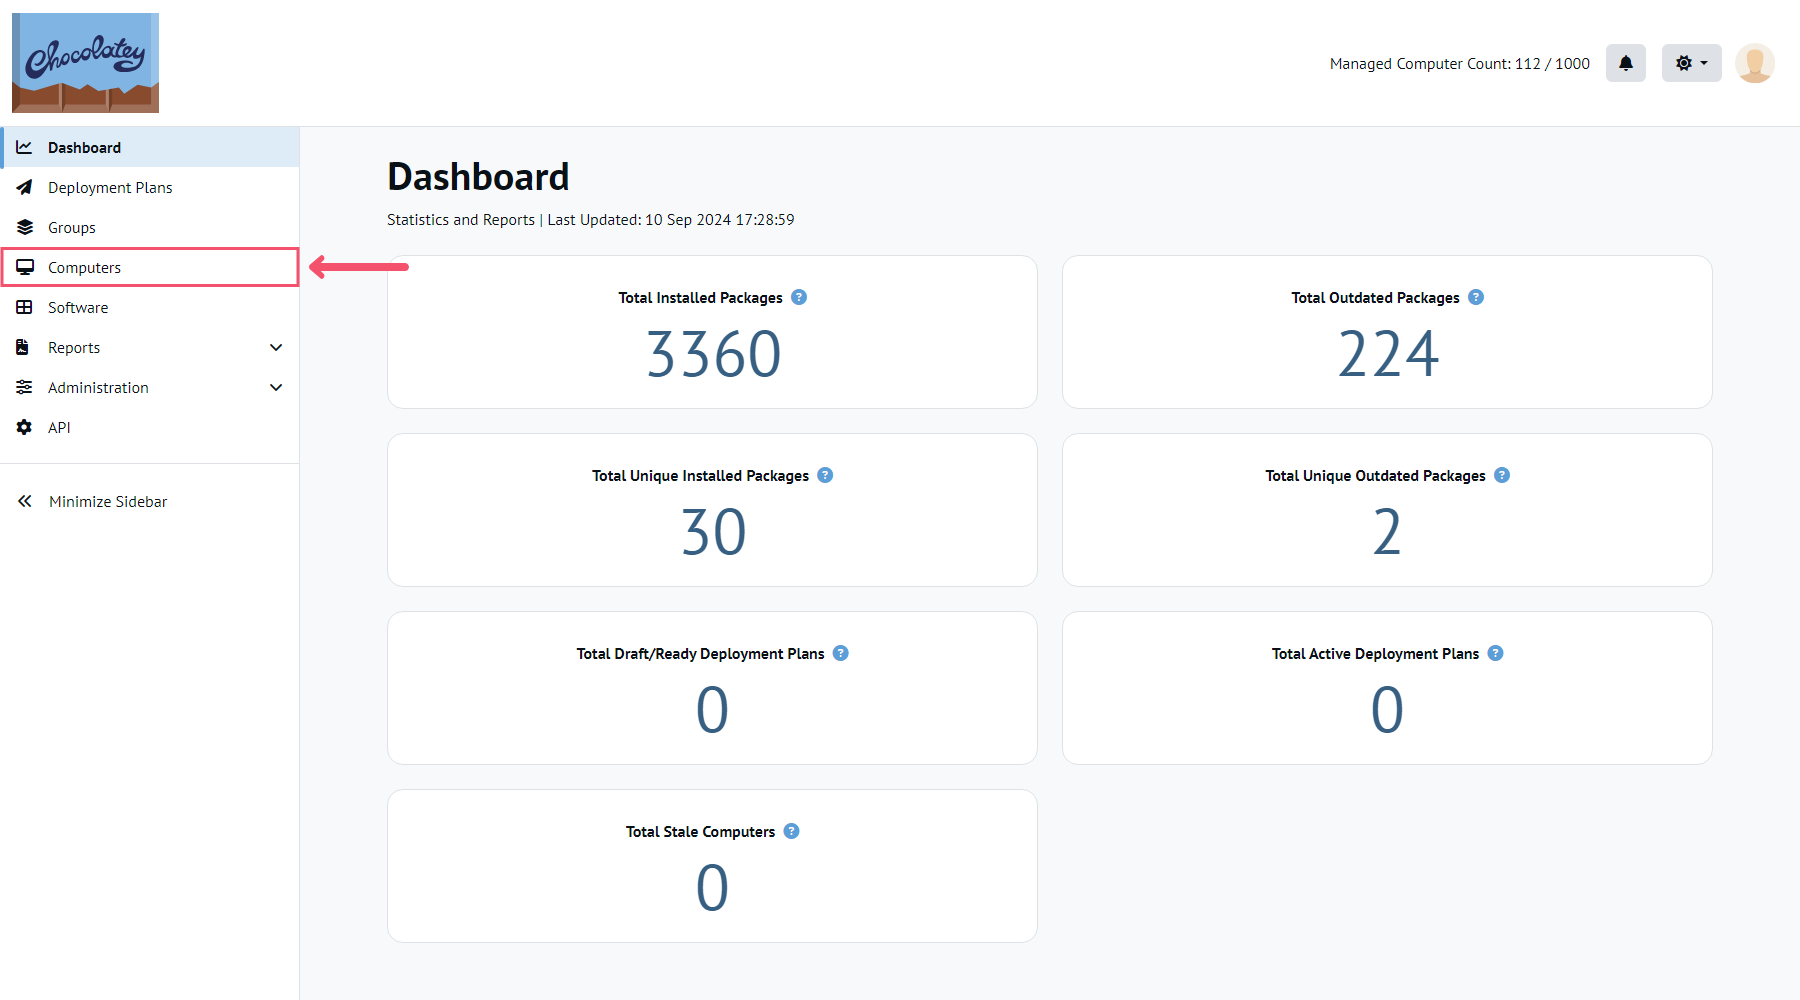
The Computers page can be accessed from the Central Management Dashboard via the menu entry in the left-hand sidebar.
Registering a New Computer
Client computers (agents) will show up in Central Management automatically as long as long as these conditions are met for the client computer:
- The
chocolatey,chocolatey.extension, andchocolatey-agentpackages are installed, alongside a valid Chocolatey for Business license. - The
useChocolateyCentralManagementfeature is enabled. - The
centralManagementServiceUrlis set correctly in the chocolatey configuration file (typically tohttps://<FQDN_to_CCM_service_host>:24020/ChocolateyManagementService) - The client has access to the above URL (this may require opening the port in your firewall, etc.) so that it can resolve the SSL certificate necessary to communicate with the CCM service.
Please see Central Management Client Setup for more details and setup.
Viewing Installed Software on a Computer
NOTE
Starting with Chocolatey Central Management 0.10.0, the groups that a computer is a member of is shown in both the table of all computers, as well as on the computer details pages. By default, this will only show the first 5 group memberships. If there are more group associations:
- The computers table will display a
...link in the Groups column. Upon hovering this link, a tooltip will be shown with all group memberships.- On the computer details page, a
View Morelink will be shown. When clicked, this will cause an expansion to show all group memberships and the link will update to sayView Less. Clicking this link again will show the default previous view.
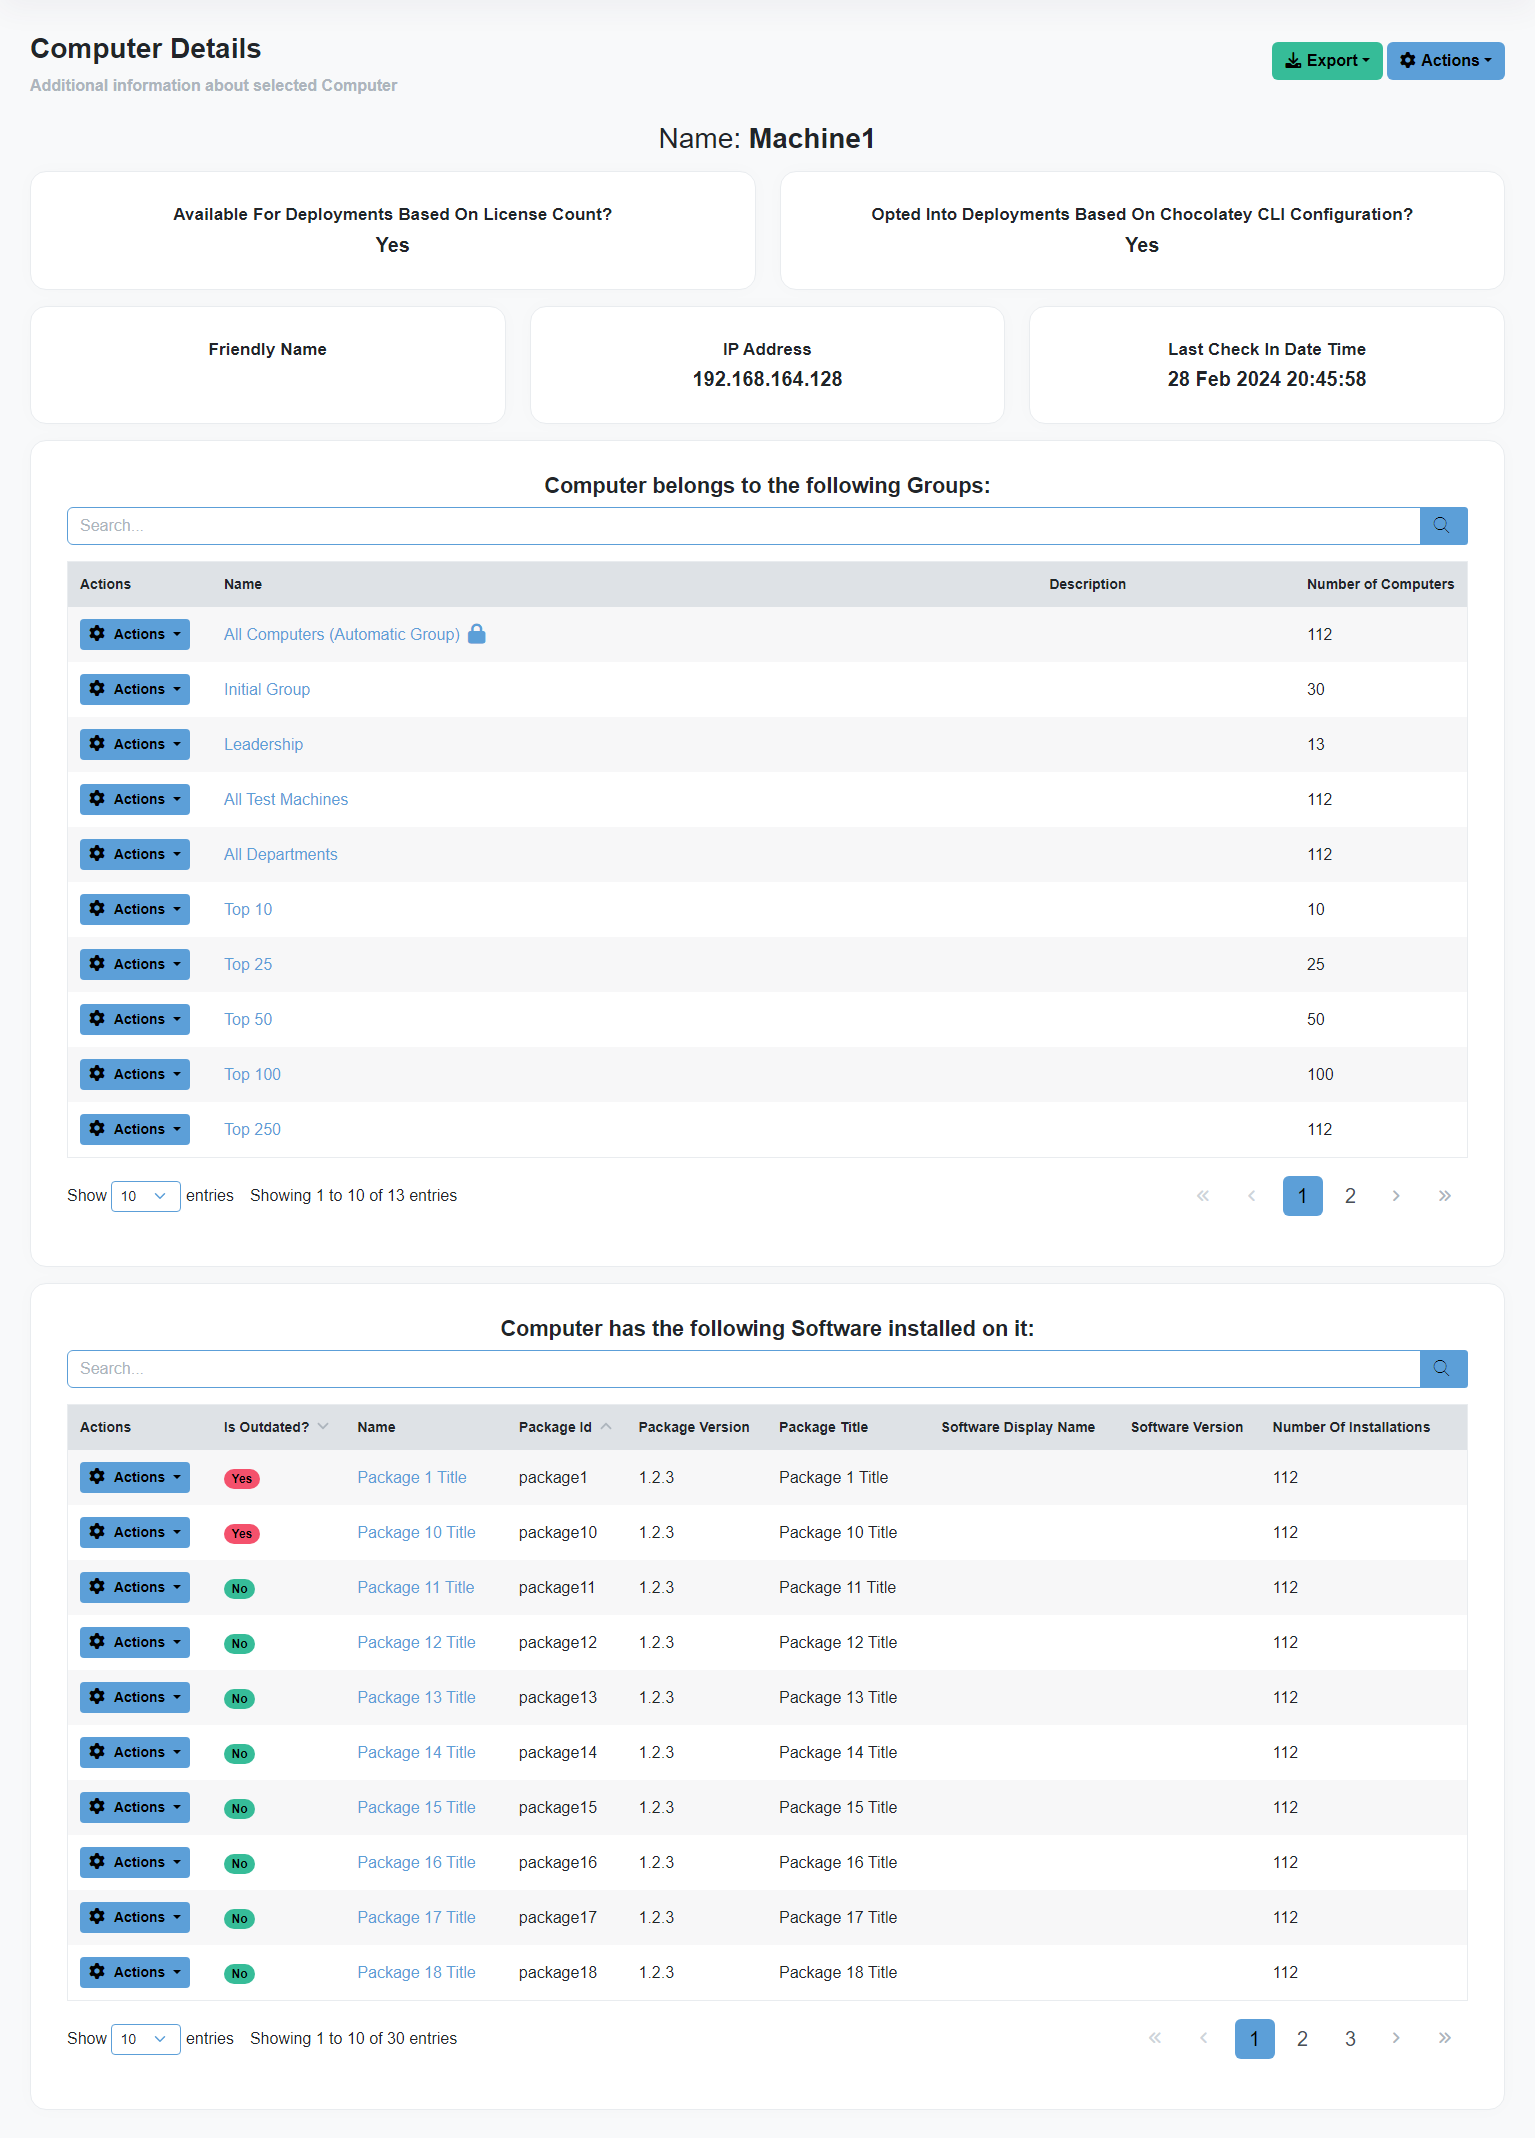
From the main Computers page in Central Management, locate the computer of interest in the list or by providing a search term in the table filter. Select the Actions button in the corresponding left-hand column, and click Details.

You will be presented with a list of the installed software packages for the machine, similar to below.
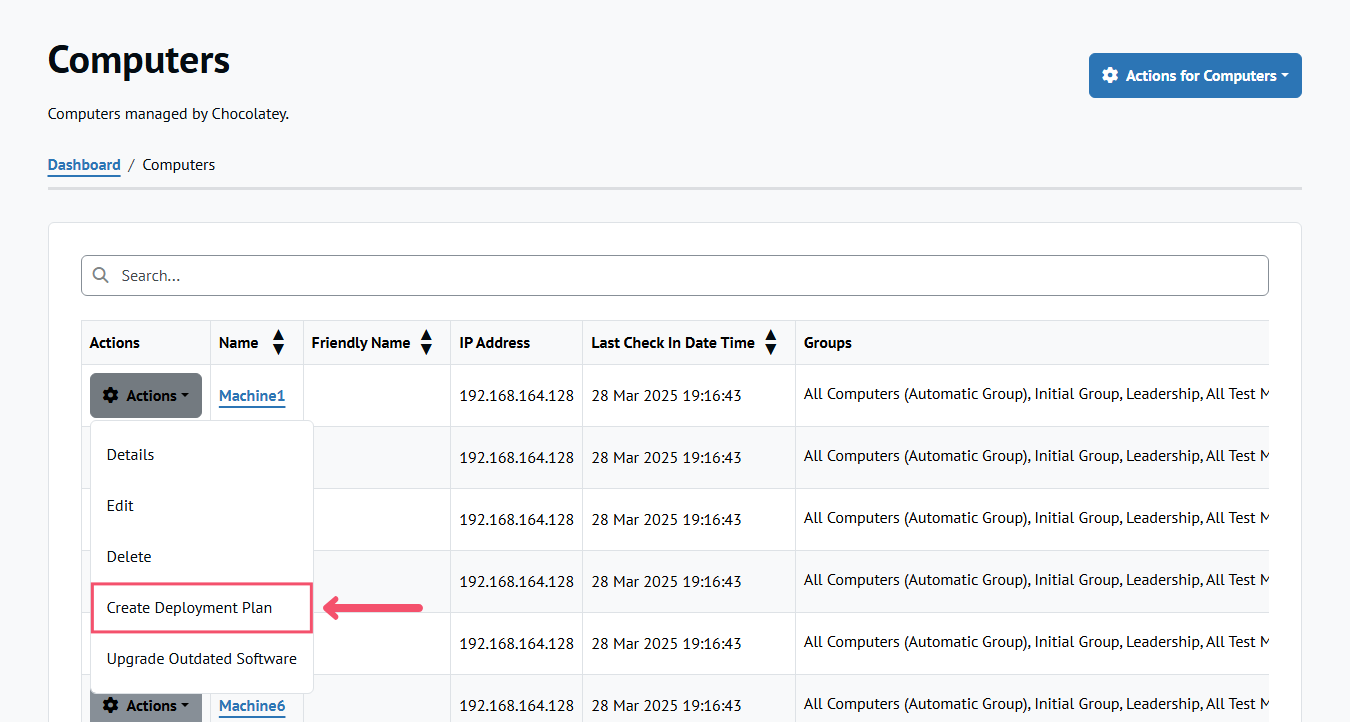
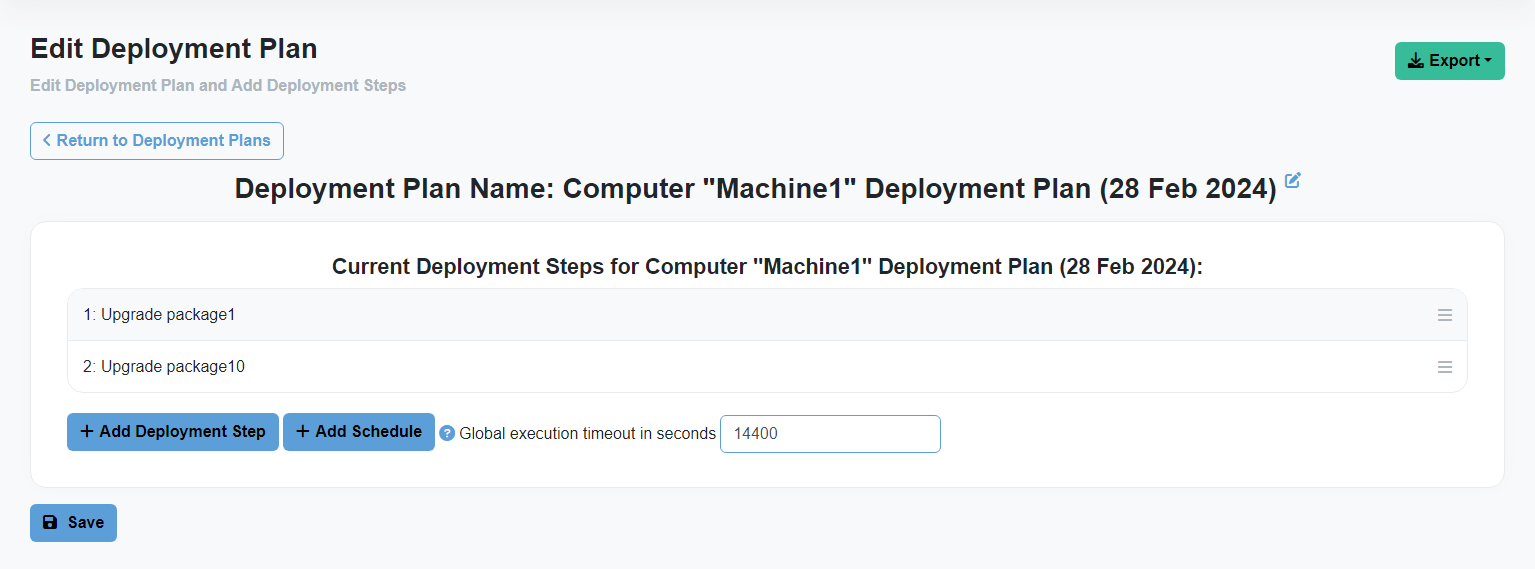
Creating a Draft Deployment Plan for a Computer
Creating a Draft Deployment Plan for a Computer can be done from two pages:
-
In the leftmost column of the Computer table you will find an Actions button which will display a Create Deployment Plan option.
-
From the Computer Details page, click the Actions for Computer button and select the Create Deployment Plan option.
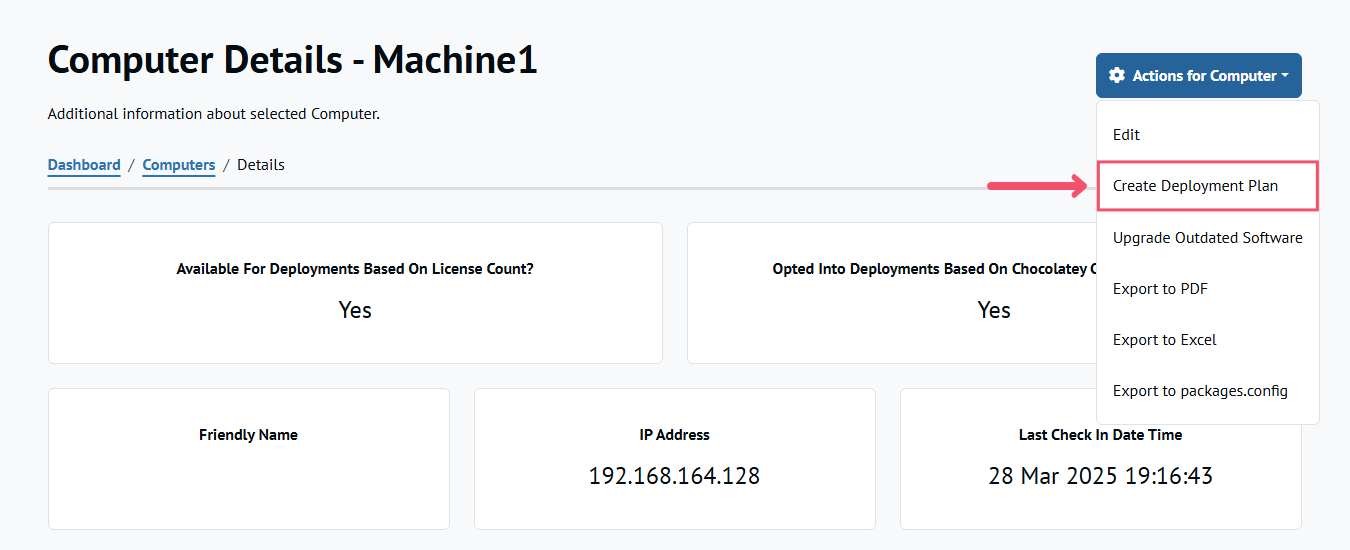
Clicking this option will create a New Deployment Plan. This Deployment Plan will create one Deployment Step with a Temporary Group that contains the Computer selected. Upon arriving on the Edit Deployment Plan screen, this Deployment Step will be opened and ready to add a script command.
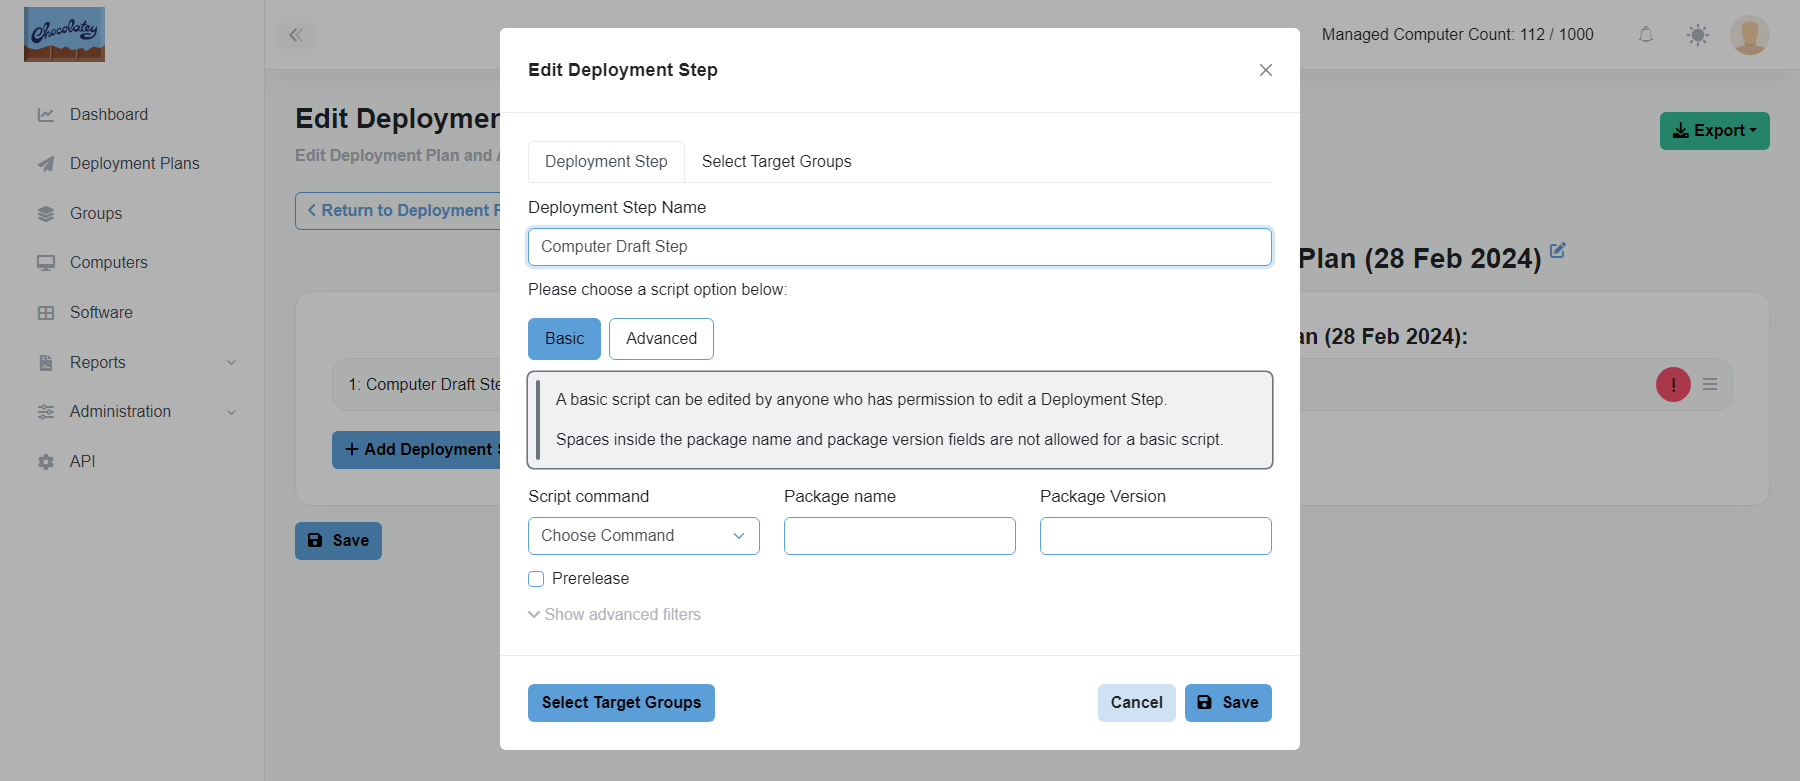
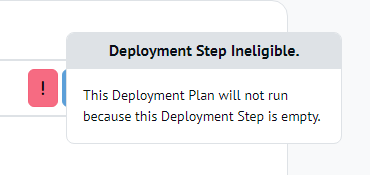
The Deployment Plan can be saved without adding a script command, however it will be ineligible for deployment. A red or yellow warning button will be shown on the Deployment Step, that when clicking will show a message.
After adding a script command to the Deployment Step, the Deployment Plan can be deployed as outlined in the Deployment Plans documentation.
From here, the Deployment Plan can be edited and deployed as outlined in the Deployment Plans documentation.
Upgrading All Outdated Software on a Computer
Upgrading all outdated Software installed on a Computer can be done from two pages:
-
In the leftmost column of the Computer table you will find an Actions button which will display a Upgrade Outdated Software option.
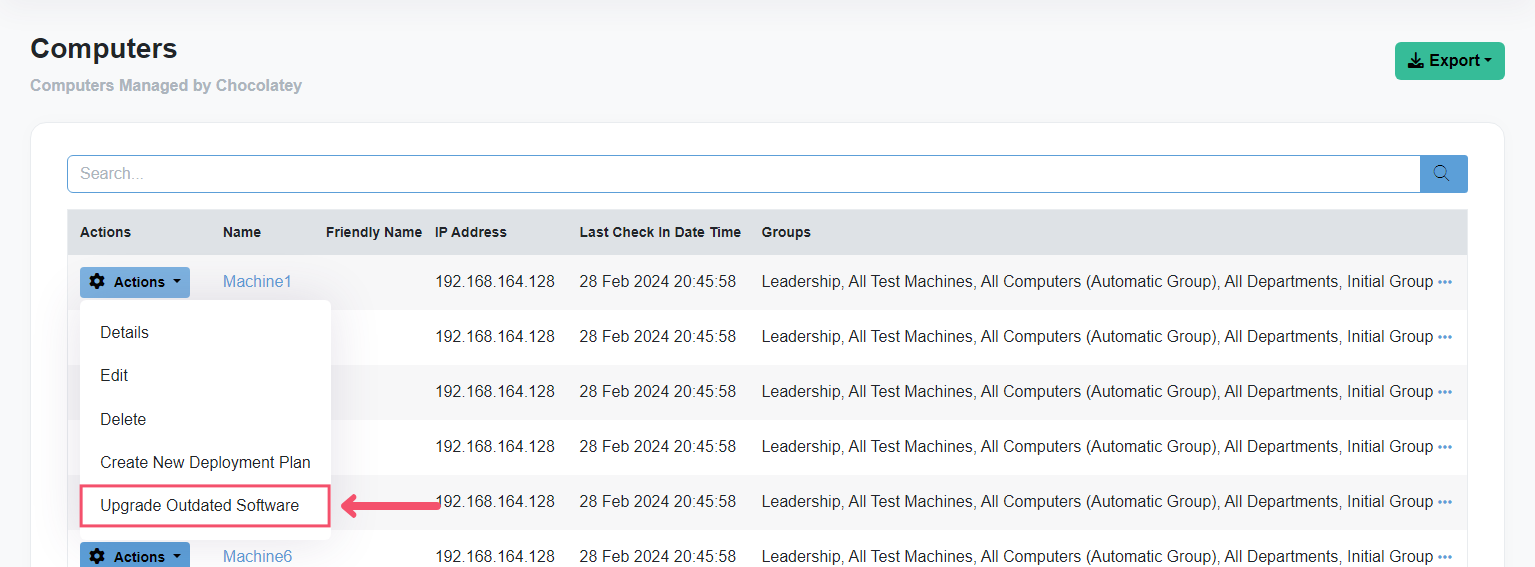
-
From the Computer Details page, click the Actions for Computer button and select the Upgrade Outdated Software option.
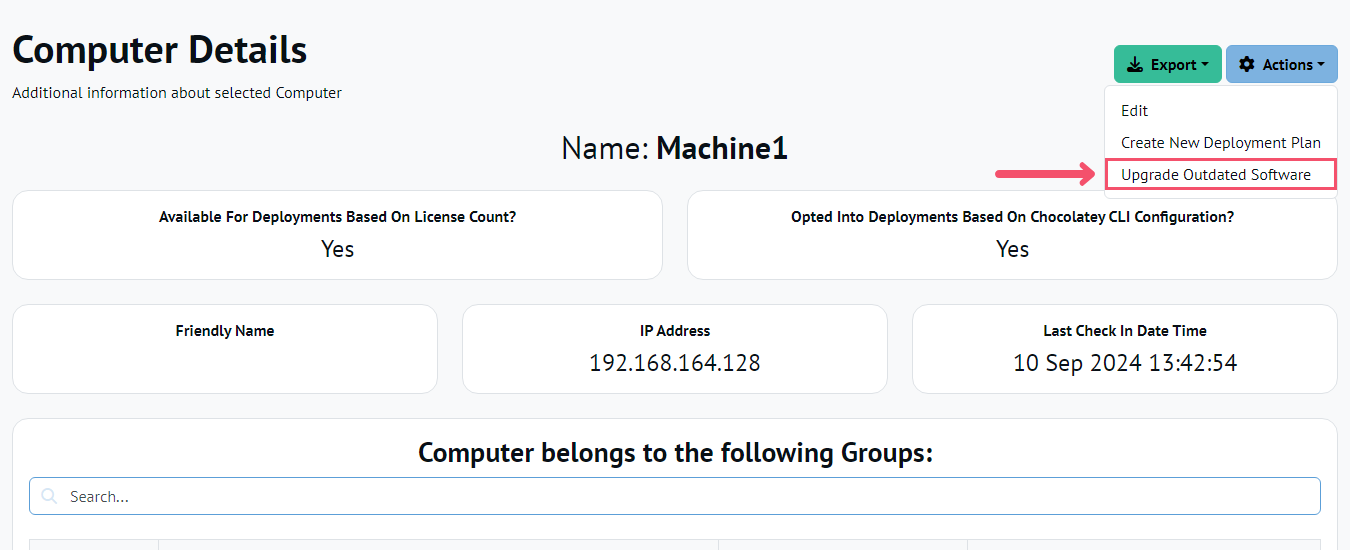
Clicking this option will create a New Deployment Plan. This Deployment Plan will create one Deployment Step per outdated Software.
Each Deployment Step has a Temporary Group selected that contains the Computer, and the script command automatically entered.
From here, the Deployment Plan can be edited and deployed as outlined in the Deployment Plans documentation.
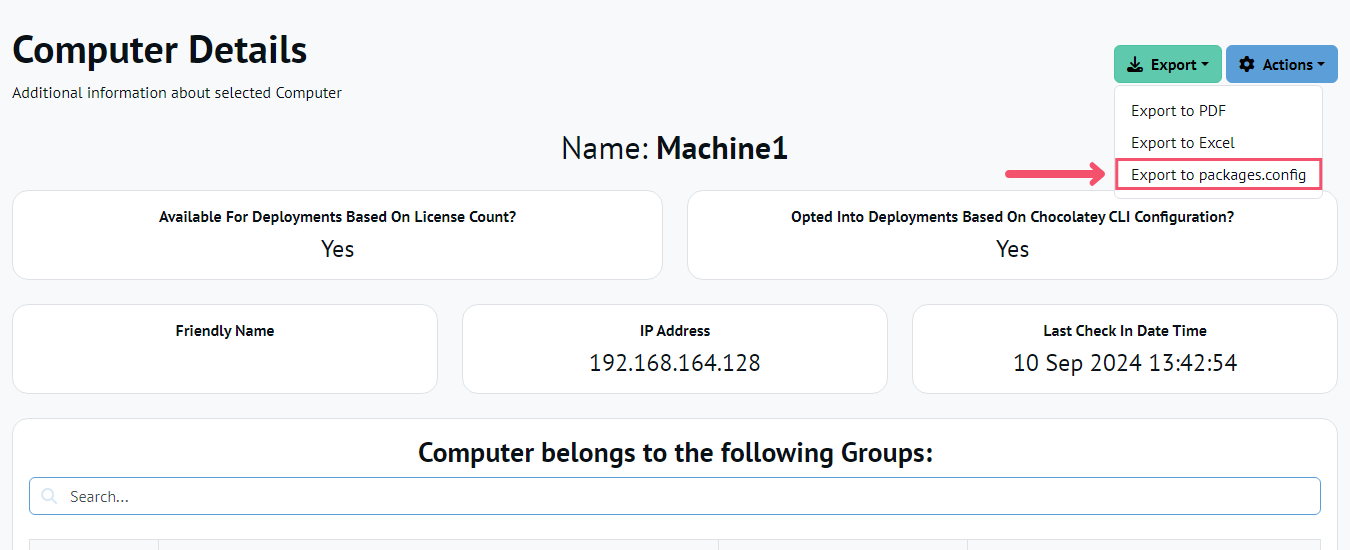
Exporting a packages.config file for a computer
NOTE
Starting with Chocolatey Central Management 0.11.0, the packages installed on a computer can be exported to a
packages.configfile.
From the Computer details page, click the Actions for Computer button and select the Export to packages.config option.
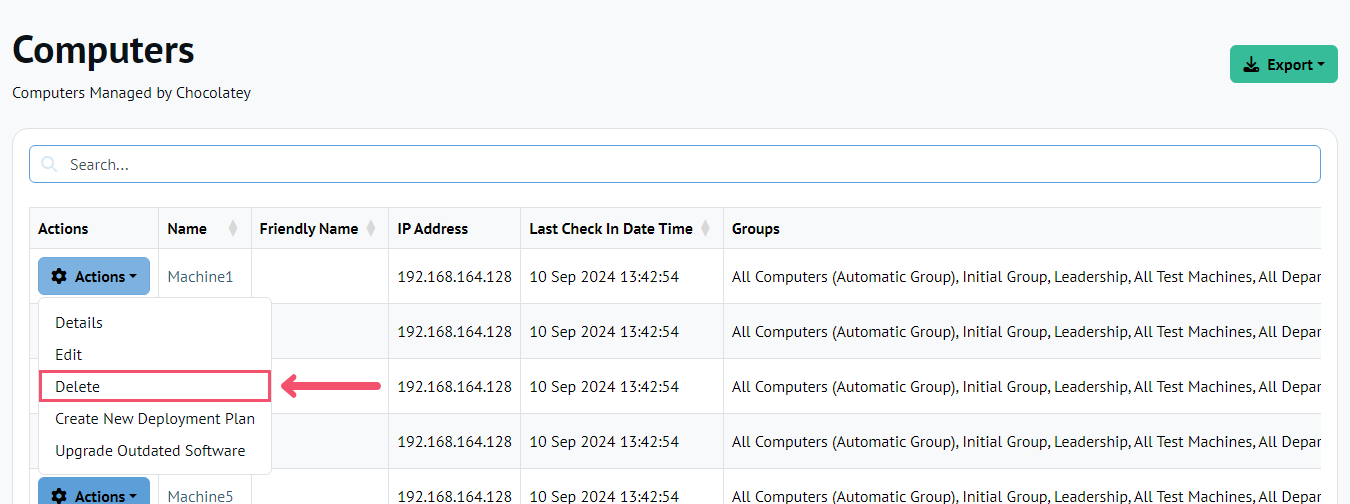
Removing a Computer from Chocolatey Central Management
NOTE
Unless you first uninstall (at minimum) the
chocolatey-agentor disable Central Management by disabling the feature setting, the deleted computer will reappear when the Chocolatey Agent performs its next check-in.
From the main Computers page in Central Management, locate the computer of interest in the list or by providing a search term in the table filter. Select the Actions button in the corresponding left-hand column, and click Delete. You will be prompted to confirm the deletion.
FAQ
What do I do if computers are not showing up in Chocolatey Central Management?
You need to check the CCM service logs. The agent will always report success when it communicates with the service successfully. The service may reject what it receives, but due to security settings, it won’t tell the client about that.
The logs are located at $env:ChocolateyInstall\logs\ccm-service.log. If you are on a version of Chocolatey Central Management prior to 0.2.0, the log will be located at $env:ChocolateyInstall\lib\chocolatey-management-service\tools\service\logs\chocolatey.service.host.log.
For more common errors related to checking in, see the setup section (and component setup sub-sections) as they dive deeper into common errors and resolutions related to things such as this.