Website
Website
This is the Chocolatey Central Management website that gives an API and a web layer to centrally manage information about your environment and manage endpoints with deployment tasks.
WARNING
Unless otherwise noted, please follow these steps in exact order. These steps build on each other and need to be completed in order.
Step 1: Complete Prerequisites
WARNING
The database must be setup and available, along with logins and access.
- High-level Requirements
- PowerShell 5.1
- IIS Set up and available
- dotnet-aspnetcoremodule-v2 version 18.0.24201
- dotnet-8.0-runtime version 8.0.8
- dotnet-8.0-aspnetruntime version 8.0.8
The Chocolatey Central Management Website is built on ASP.Net Core, and as such we need to ensure that it is installed on the server for proper function. Note that the codebase is currently locked to version 6.x.x of these packages, and it is critical that you install these right, otherwise you will encounter errors. At the time of release, the most recent version of these packages was 6.0.5, though we recommend installing the latest versions of these packages.
Script for some prerequisites
choco install IIS-WebServer --source windowsfeatures --no-progress -y
choco install IIS-ApplicationInit --source windowsfeatures --no-progress -y
choco install dotnet-aspnetcoremodule-v2 --version 18.0.24201 --no-progress -y
choco install dotnet-8.0-runtime --version 8.0.8 --no-progress -y
choco install dotnet-8.0-aspnetruntime --version 8.0.8 --no-progress -y
Step 2: Install Chocolatey Central Management Web Package
NOTE
At this time we don’t recommend opening internet access to Chocolatey Central Management web. However, if you choose to, you will want to set up SSL/TLS certificates to ensure communication is encrypted over the internet.
Package Parameters
Note items with “:” mean a value should be provided. Items without are simply switches.
/Username:- Username that the IIS Web Application Pool will run under. Defaults toIIS APPPOOL\ChocolateyCentralManagement. If this is specified, you must also specify either/Passwordor/EnterPassword.NOTE
This may require manual steps after install as well. See Non-Default App Pool User Considerations.
/Password:- Password for the user. Defaults to a Windows autogenerated secure password for the IIS AppPool./EnterPassword- Receive the password at runtime as a secure string. Requires input at runtime whe installing/upgrading the package./ConnectionString:- The SQL Server database connection string to be used to connect to the Chocolatey Central Management database. By default, this value is constructed from the default or explicit values for/SqlServiceInstanceand/Database, and uses Integrated Security (with all default values, this value will look like the following:Server=<LOCAL COMPUTER FQDN NAME>; Database=ChocolateyManagement; Trusted_Connection=True; TrustServerCertificate=True;). The account should havedb_datareader/db_datawriteraccess to the database./SqlServerInstance:- Instance name of the SQL Server database to connect to. Alternative to passing full connection string with/ConnectionString. Uses/Database(below) to build a connection string. Defaults to<LOCAL COMPUTER FQDN NAME>./Database:- Name of the SQL Server database to use. Alternative to passing full connection string with/ConnectionString. Uses/SqlServerInstance(above) to build a connection string. Defaults toChocolateyManagement.
IIS Settings
This package creates the Chocolatey Central Management Website and Application Pool with the following defaults:
- IIS Web Application Pool: ChocolateyCentralManagement
- enable32BitAppOnWin64: True
- managedPipelineMode: Integrated
- managedRuntimeVersion: <blank>
- startMode: AlwaysRunning
- processModel.idleTimeout: 0
- recycling.periodicRestart.schedule: Disabled
- recycling.periodicRestart.time: 0
- Website Name: ChocolateyCentralManagement
- PortBinding: 80
- applicationDefaults.preloadEnabled: True
Non-Default App Pool User Considerations
If you’ve used a specific username for the app pool, specified by /Username: or later added one manually to IIS settings, it’s important to note that the installation procedure as of Chocolatey Central Management v0.3.0 does not currently set the following and they will need to be set manually.
This includes (but may not be limited to):
- User needs to be granted “Logon as batch” in local security policy.
- User needs to be given explicit Read/Execute rights (ACLs) to
c:\tools\chocolatey-management-web. - User needs to be given explicit Modify rights (ACLs) to
c:\tools\chocolatey-management-web\App_Data.
Database Authentication Scenarios
WARNING
As of Chocolatey Central Management v0.13.0, the SQL connection mode has changed to secure-by-default. By default, all connection strings will assume
Encrypt=true;and attempt a connection to the SQL Server over SSL. If you wish to disable this, you must pass a complete connection string to the/ConnectionStringpackage parameter that contains an explicitEncrypt=false;parameter.To accommodate this new default, the package installation will automatically add the
TrustServerCertificate=Trueparameter to the connection string it constructs or receives if the initial connection to the SQL server fails without it.If you would like to ensure a completely secure SQL connection, you must install a trusted SSL Certificate on the SQL Server instance before installing, upgrading, or reinstalling Chocolatey Central Management packages. If you have already installed v0.13.0 or later versions of Chocolatey Central Management, you will need to explicitly pass the SQL connection package parameters when upgrading or reinstalling in order to ensure the connection is established in a fully secure mode.
- Scenario 1 - Windows Authentication to Local SQL Server
- Scenario 2 - Active Directory Authentication to Remote SQL Server
- Scenario 3 - SQL Server Authentication to Local SQL Server
- Scenario 4 - SQL Server Authentication to Remote SQL Server
Windows Authentication to Local SQL Server
Monolithic - you have set up the database to use Windows Authentication (or Mixed Mode Authentication). You wish to use a local Windows account to connect to the local database.
Specify User
choco install chocolatey-management-web -y --package-parameters="'/ConnectionString:Server=<Localhost\SQLEXPRESS>;Database=ChocolateyManagement;Trusted_Connection=True; /Username:<LocalWindowsAccount>'" --package-parameters-sensitive="'/Password:<Local account password>'"
WARNING
Please ensure the user
<LocalWindowsAccount>has been givendb_datareaderanddb_datawriteraccess to the database. See logins and access.
Default User (IIS APPPOOL\ChocolateyCentralManagement)
choco install chocolatey-management-web -y --package-parameters="'/ConnectionString:Server=<Localhost\SQLEXPRESS>;Database=ChocolateyManagement;Trusted_Connection=True;'"
WARNING
Please ensure the user
IIS APPPOOL\ChocolateyCentralManagementhas been givendb_datareaderanddb_datawriteraccess to the database. See logins and access.
NOTE
Note the connection string doesn’t include credentials. That’s because Windows Authentication for SQL Server uses the context of what is running it and why the service itself needs the right user/password. Whatever is running the IIS Application Pool is the user you need to ensure is in the database.
Active Directory Authentication to Local SQL Server
Split - you have set up the database to use Windows Authentication (or Mixed Mode Authentication). You wish to use an Active Directory account to connect to an existing SQL instance.
choco install chocolatey-management-web -y --package-parameters="'/ConnectionString:Server=<RemoteSqlHost>;Database=ChocolateyManagement;Trusted_Connection=True; /Username:<DomainAccount>'" --package-parameters-sensitive="'/Password:<domain account password>'"
NOTE
Note the connection string doesn’t include credentials. That’s because Windows Authentication for SQL Server uses the context of what is running it and why the service itself needs the right user/password. In this case, whatever is running the IIS Application Pool is the user you need to ensure has access to the database.
SQL Server Authentication to Local SQL Server
Monolithic - you are installing the management service on the same machine as a SQL Server Express instance. You likely have a smaller environment where you have up to 1,000 machines. You have set up the database to use Mixed Mode Authentication.
Licensed SQL Server
choco install chocolatey-management-web -y --package-parameters-sensitive="'/ConnectionString:Server=Localhost;Database=ChocolateyManagement;User ID=ChocoUser;Password=Ch0c0R0cks;'"
WARNING
Please ensure the login has been given
db_datareaderanddb_datawriteraccess to the database. See logins and access.
SQL Server Express
choco install chocolatey-management-web -y --package-parameters-sensitive="'/ConnectionString:Server=Localhost\SQLEXPRESS;Database=ChocolateyManagement;User ID=ChocoUser;Password=Ch0c0R0cks;'"
WARNING
Please ensure the login has been given
db_datareaderanddb_datawriteraccess to the database. See logins and access.
SQL Server Authentication to Remote SQL Server
Split - you are installing the management service(s) on a server, and targeting an existing SQL Server instance in your organization. You have set up the database to use Mixed Mode Authentication.
choco install chocolatey-management-web -y --package-parameters-sensitive="'/ConnectionString:Server=<RemoteSqlHost>;Database=ChocolateyManagement;User ID=ChocoUser;Password=Ch0c0R0cks;'"
WARNING
Please ensure the login has been given
db_datareaderanddb_datawriteraccess to the database. See logins and access.
Step 3: Verify Installation
The chocolatey-management-web package is responsible for creating and deploying the Chocolatey Central Management Website within IIS. A successful installation of this package can be verified by:
- Opening an internet browser on the machine to the following address
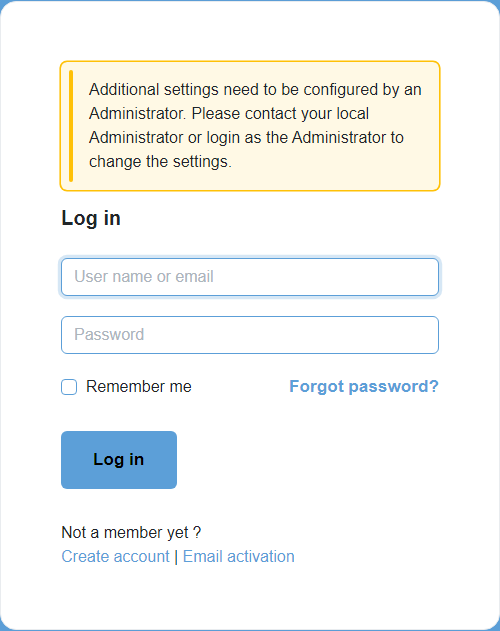
http://localhostwhich should result in the login page for Chocolatey Central Management being displayed. - It should be possible to login to the site using the default credentials mentioned in Step 4 (below).
- The installation folder for
chocolatey-management-webis atc:\tools\chocolatey-management-web(this is configurable by$env:ChocolateyToolsLocation). - Open the website log file located at
c:\tools\chocolatey-management-web\App_Data\Logs\ccm-website.logand verify that there are no recently reported errors. If you are on a version of Chocolatey Central Management prior to 0.2.0, the log will be located atc:\tools\chocolatey-management-web\App_Data\Logs\Logs.txt.
Step 4: Set Up Website
Step 4.1: Login And Change Default Credentials
When you access the Chocolatey Central Management Website you will be prompted to provide a username and password to access the site. By default, the username is ccmadmin and the password is 123qwe. After you input this, you will be prompted to change the password.
Step 4.2: SMTP Configuration
In order to send email from Chocolatey Central Management, you will need to make sure that all necessary settings have been configured.
appsettings.json configuration
NOTE
In version 0.2.0+ of Chocolatey Central Management, this configuration will likely be automatically applied during installation and will use defaults but be encrypted. If the value is incorrect, you can simply set it as shown here as encryption is not necessary for this value.
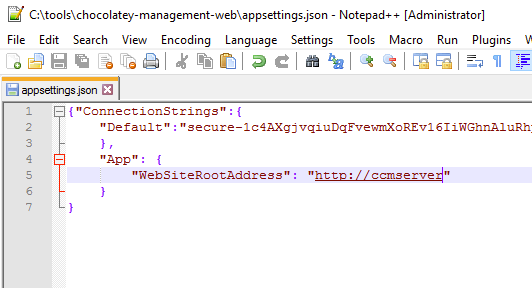
There is a requirement within the Chocolatey Central Management site to send emails to end users of the application when, for example, registering a new user or resetting a password. To ensure that these emails contain a properly clickable link a modification needs to be made to the appsettings.json file which is located in the c:\tools\chocolatey-management-web folder.
Open this file in a text editor, and add the following entry:
    "App": {
        "WebSiteRootAddress": "<URL_to_CCM>"
    }
NOTE
URL_to_CCMshould be the accessible URL to access the Chocolatey Central Management Website. This will typically be the FQDN of the server that is hosting the Chocolatey Central Management Website, but it will depend on your environment’s configuration.- When adding this entry, be sure to include a
,either before or after the entry, depending on where you add it in the file. In other words, the end result needs to be a properly formatted JSON document.
The end result should look something like this:
Once this change has been added, save the file and then run the following to ensure that the process running the Chocolatey Central Management Website is stopped:
# For CCM versions older than v0.6.0
Get-Process -Name "ChocolateySoftware.ChocolateyManagement.Web.Mvc" -ErrorAction SilentlyContinue | Stop-Process -Force

# For CCM version 0.6.0 and 0.6.1
Get-Process -Name "ChocolateySoftware.ChocolateyManagement.Web.Mvc" -ErrorAction SilentlyContinue | Stop-Process -Force
Stop-Website -Name ChocolateyCentralManagement
Restart-WebAppPool -Name ChocolateyCentralManagement
Start-Website -Name ChocolateyCentralManagement

# For CCM v0.6.2 and up
Stop-Website -Name ChocolateyCentralManagement
Restart-WebAppPool -Name ChocolateyCentralManagement
Start-Website -Name ChocolateyCentralManagement
Then try accessing the website again. Any emails that are then sent from Chocolatey Central Management should then contain valid links back to the site.
Step 4.3: LDAP Configuration
You may want to allow authentication against LDAP for users that are logging into the Chocolatey Central Management website.
Step 4.4: Application Settings File
Some application settings will require you to edit the appsettings.json file, which is located in the c:\tools\chocolatey-management-web folder.
Here is a copy of items that can be set. They are not required to be encrypted. Any item that is encrypted can be replaced by a non-encrypted value. During package install/upgrade, Chocolatey will encrypt the settings (even if they were previously plain text).
{
  "ConnectionStrings": {
        "Default": "Server=<HOST_NAME_OF_MACHINE_BEING_INSTALLED_ONTO>; Database=ChocolateyManagement; Trusted_Connection=True; TrustServerCertificate=True;"
  },
  "App": {
    "WebSiteRootAddress": "http://<FQDN_OR_BINDING_HERE>"
  },
  "Recaptcha": {
    "SiteKey": "<INSERT SITE KEY HERE>",
    "SecretKey": "<INSERT SECRET KEY HERE>"
  }
}
WARNING
Recaptcha is likely to require a publicly available Chocolatey Central Management Website, and we currently have a strong recommendation to NOT open up the website to the internet. You likely do not want to set this or turn it on inside the Administration -> Settings section. However, if you do, you will need the items set here in the
appsettings.jsonas well.
Step 4.5: Audit Retention
You may want to configure the automatic deletion of audit logs that are captured by Chocolatey Central Management website.
Step 4.6: Stale Computer Retention
You may want to setup the automatic deletion of computers that are no longer reporting into Chocolatey Central Management.
Step 4.7: Set up Two Factor Login
You may want to setup two factor login for users who are going to be logging into the Chocolatey Central Management website.
FAQ
What is the minimum required configuration for the appsettings.json file?
As of Chocolatey Central Management v0.6.2, the default settings in the appsettings.json for the website package are:
{
  "ConnectionStrings": {
    "Default": "Server=<HOST_NAME_OF_MACHINE_BEING_INSTALLED_ONTO>; Database=ChocolateyManagement; Trusted_Connection=True; TrustServerCertificate=True;"
  },
  "App": {
    "WebSiteRootAddress": "http://<FQDN_OR_BINDING_HERE>"
  }
}
NOTE
This file will usually be condensed into a single line, with the values encrypted.
If these values are removed or incorrect, the Chocolatey Central Management website may fail to start. To correct this, ensure all configuration is present and correct and then restart the Chocolatey Central Management website.
Stop-Website -Name ChocolateyCentralManagement
Restart-WebAppPool -Name ChocolateyCentralManagement
Start-Website -Name ChocolateyCentralManagement
Can I install the Chocolatey Central Management Website under a Virtual Directory in IIS?
Currently, no. The Chocolatey Central Management Website expects to reside at the site level within IIS.
What is the Chocolatey Central Management Component Compatibility Matrix?
Chocolatey Central Management has specific compatibility requirements with quite a few moving parts. It is important to understand that there are some Chocolatey Agent versions that may not be able to communicate with some versions of Chocolatey Central Management and vice versa. Please see the Chocolatey Central Management Component Compatibility Matrix for details.
I entered incorrect database details on install, do I need to reinstall to fix that?
It depends. You can simply go to the appsettings.json file and adjust the connection string to be plaintext. It will remain in plaintext though (at least until upgrade), so if you have actual password details you need to keep secure, you should do a force installation.
- The file is located at
c:\tools\chocolatey-management-web\appsettings.json. - You would open that up in an editor and modify the
"Default"connection string. - It would look something like the following (adjust the connection string as necessary):
{
  "ConnectionStrings": {
    "Default": "Server=<HOST_NAME_OF_MACHINE_BEING_INSTALLED_ONTO>; Database=ChocolateyManagement; Trusted_Connection=True; TrustServerCertificate=True;"
  },
  "App": {
    "WebSiteRootAddress": "http://<FQDN_OR_BINDING_HERE>"
  }
}
-
Then restart the website by running from admin powershell:
# For CCM versions older than v0.6.0
Get-Process -Name "ChocolateySoftware.ChocolateyManagement.Web.Mvc" -ErrorAction SilentlyContinue | Stop-Process -Force

# For CCM version 0.6.0 and 0.6.1
Get-Process -Name "ChocolateySoftware.ChocolateyManagement.Web.Mvc" -ErrorAction SilentlyContinue | Stop-Process -Force
Stop-Website -Name ChocolateyCentralManagement
Restart-WebAppPool -Name ChocolateyCentralManagement
Start-Website -Name ChocolateyCentralManagement

# For CCM v0.6.2 and up
Stop-Website -Name ChocolateyCentralManagement
Restart-WebAppPool -Name ChocolateyCentralManagement
Start-Website -Name ChocolateyCentralManagement
WARNING
Do not put
sec:orsecure-at the start (prefix) of any values that you are adding/modifying directly. That tells Chocolatey components they are encrypted and it will attempt to decrypt them for use. If that is done incorrectly, it will cause things to crash.
Where is the Chocolatey Central Management Website installed?
The default installation folder for chocolatey-management-web is at c:\tools\chocolatey-management-web. However, this is configurable based on $env:ChocolateyToolsLocation. We would not suggest changing that value once you have installed anything that makes use of it as permissions and other things will be pointing to that set of folders.
Common Errors and Resolutions
Chocolatey Central Management Website fails to start, showing “An error occurred while starting the application.”
You may also see the following entry in the Chocolatey Central Management website log file:
System.ArgumentNullException: Value cannot be null. (Parameter 'str')
This indicates some of the required configuration values for the CCM website to function are not present. Ensure all required configuration values are present, then restart the CCM website:
# For CCM versions older than v0.6.0
Get-Process -Name "ChocolateySoftware.ChocolateyManagement.Web.Mvc" -ErrorAction SilentlyContinue | Stop-Process -Force

# For CCM version 0.6.0 and 0.6.1
Get-Process -Name "ChocolateySoftware.ChocolateyManagement.Web.Mvc" -ErrorAction SilentlyContinue | Stop-Process -Force
Stop-Website -Name ChocolateyCentralManagement
Restart-WebAppPool -Name ChocolateyCentralManagement
Start-Website -Name ChocolateyCentralManagement

# For CCM v0.6.2 and up
Stop-Website -Name ChocolateyCentralManagement
Restart-WebAppPool -Name ChocolateyCentralManagement
Start-Website -Name ChocolateyCentralManagement
Chocolatey Central Management Website fails to load with a 500.21 error code.
This error code indicates that IIS failed to start the website due to a misconfiguration.
By default, Chocolatey Central Management uses the AspNetCoreModuleV2 in IIS, however the initial versions of Chocolatey Central Management initially used AspNetCoreModule instead.
Due to how the upgrade logic has worked prior to v0.6.2, this old configuration value may be kept during upgrade.
As of v0.6.0, the IIS webhost can no longer run the website using the AspNetCoreModule as 0.6.x is running on .NET Core 3.1, and the structure of the web.config file has changed.
If you encounter this issue, you will need to update your web.config file to match the new format.
The default web.config file structure as of v0.6.0 is as follows:
<?xml version="1.0" encoding="utf-8"?>
<configuration>
  <location path="." inheritInChildApplications="false">
    <system.webServer>
      <handlers>
        <add name="aspNetCore" path="*" verb="*" modules="AspNetCoreModuleV2" resourceType="Unspecified" />
      </handlers>
      <aspNetCore processPath="dotnet" arguments=".\ChocolateySoftware.ChocolateyManagement.Web.Mvc.dll" stdoutLogEnabled="false" stdoutLogFile=".\App_Data\logs\stdout" hostingModel="inprocess" />
    </system.webServer>
  </location>
</configuration>
As of v0.6.2, the chocolatey-management-website package upgrade process will inform you during upgrade if your web.config file is not usable.
If it is not, the installer will show a large warning message, indicating where the existing web.config file has been backed up to.
After the installation completes, you will need to replicate any customizations you have made to the web.config file into the new file manually.
Configure Chocolatey Central Management alongside WSUS admin site.
If you are running Chocolatey Products, namely Simple Server or Central Management, next to a WSUS admin-site, you need to change some settings in the IIS-Configuration for making the Simple Server/Central Management Web interface work correctly again. This is due to the fact that the WSUS admin-site installation registers two modules in the IIS root configuration, which will be passed down to all other sites running on that IIS instance, including the Simple Server and Central Management sites.
To make things work again, you will need to disable inheritance for these modules in order to remove them from the Chocolatey product site you are working with.
Before making changes to your IIS configuration, read all steps carefully and make sure that you have a backup
You can do this either by PowerShell:
# Import WebAdministration
Import-Module WebAdministration

# Remove locks from modules
Remove-WebConfigurationLock -Filter "system.webServer/modules/add[@name='DynamicCompressionModule']" -PSPath IIS:\
Remove-WebConfigurationLock -Filter "system.webServer/modules/add[@name='StaticCompressionModule']" -PSPath IIS:\

# Remove modules from the Chocolatey Simple Server site
Disable-WebGlobalModule -PSPath 'IIS:\Sites\ChocolateyServer\' -Name DynamicCompressionModule
Disable-WebGlobalModule -PSPath 'IIS:\Sites\ChocolateyServer\' -Name StaticCompressionModule

# Restart website
Stop-Website -Name "ChocolateyServer" #Or ChocolateyCentralManagement
Start-Website -Name "ChocolateyServer" #Or ChocolateyCentralManagement
or manual:
- Open the IIS Management Console
- Click on the server name on the upper left pane
- On the right pane double-click on
Modules. All available modules will show up - Search for
DynamicCompressionModule, right-click it and chooseUnlock - Do the same for
StaticCompressionModule - Under
Siteson the left pane click on the site for your Chocolatey Simple Server, most likelyChocolateyServer - Again, search for
Moduleson the right pane and double-click it - Search for
DynamicCompressionModule, right-click it and chooseRemove - Restart the Chocolatey Simple Server/Central Management site
The website should now be able to handle requests correctly again.
The specified path, file name, or both are too long.
This error can occur when installing the chocolatey-management-web package. Due to the nested folder structure contained within this package, when extracting to the default cache location, the path can become too long. This problem is known is occur in the 0.1.0-beta-20181009 release of this package, and it should be corrected in subsequent releases. As a workaround, adding the following parameters to the install command should allow the installation to complete successfully:
--cache-location="'C:\Temp\choco'"
HTTP Error when trying to access Chocolatey Central Management Website.
When you try to access the Chocolatey Central Management Website (by default, this is hosted on http://localhost), errors messages similar to the following may be returned:
HTTP Error 500.19 - Internal Server Error
These errors happen very early in the application execution, and as a result, are not logged to the standard log location. It is possible to increase the logging that is performed by the ASP.NET Worker Process, so that additional information about the error can be found. Follow these steps to enable that additional logging:
- In Windows Explorer, navigate to the
c:/tools/chocolatey-management-webfolder - Find the
web.configfile and open this in a text editor - Locate the
stdoutLogEnabledattribute, which will be set to false by default - Change this to true, and save the file
- Check to see if there is a running process called
ChocolateySoftware.ChocolateyManagement.Web.Mvc.exe. If there is, stop it. - Restart the CCM app pool and website in IIS.
- Attempt to access the website again. An additional log file will be created in the
App_Data\Logs\stdoutfolder. In Chocolatey Central Management v0.6.0 and v0.6.1, this may be incorrectly located in theLogs\stdoutfolder. - Review this log for additional error information
- Ensure that you set the
stdoutLogEnabledattribute back to false
In these situations, we have found that incorrect database connection strings are typically the root cause of the problem.
Another possible cause for this error is if there are mismatching versions of dotnet-8.0-aspnetruntime and dotnet-aspnetcoremodule-v2. Ensure that both are on the same patch level. Note that dotnet-aspnetcoremodule-v2 package versioning does not directly correspond to the dotnet patch level, so it is recommended to use the versions specified in the prerequisites above.
The term ‘Install-ChocolateyAppSettingsJsonFile’ is not recognized as the name of a cmdlet, function, script file, or operable program.
In the beta version of Chocolatey Licensed Extension, there was a cmdlet named Install-ChocolateyAppSettingsJsonFile and this was used in the 0.1.0-beta-20181009 release of the Chocolatey Central Management components. In the final released version of the Chocolatey Licensed Extension, this was renamed to Install-AppSettingsJsonFile.
As a result, the Chocolatey Central Management beta no longer works with the released version of Chocolatey Licensed Extension. This will be corrected once the next release of the Chocolatey Central Management components is completed.
Cannot process command because of one or more missing mandatory parameters: FilePath.
During the creation of Chocolatey Central Management, some additional PowerShell cmdlets were created, and these are installed as part of the Chocolatey Licensed Extension package. These cmdlets went through a number of iterations, and as a result, different combinations of Chocolatey Central Management packages were incompatible with the Chocolatey Licensed Extension package, resulting in the error:
Cannot process command because of one or more missing mandatory parameters: FilePath
The guidance in this case is either to pin to the specific version of the Chocolatey Extension package required by the version of Chocolatey Central Management being used, or, update to the latest versions of all packages, where the situation should be addressed.
All attempts to send email from Chocolatey Central Management result in an error.
When any attempt is made by Chocolatey Central Management to send an email, an error occurs. This either results in an HTTP 500 errors similar to the following:
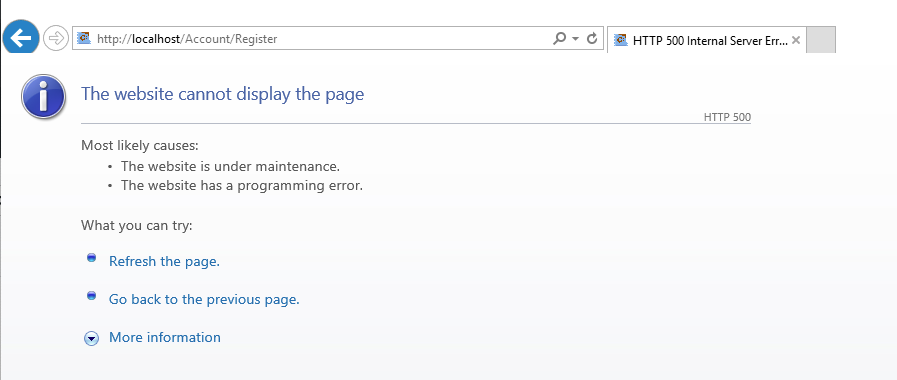
Or an inline error, with text similar to: “Unable to send email, please contact System Administrator to ensure SMTP settings are configured correctly.”.
Checking the log file, an error similar to this is found:
ERROR 2019-06-14 00:54:03,491 [55   ] Microsoft.AspNetCore.Server.Kestrel      - Connection id "0HLNGIPBBV01R", Request id "0HLNGIPBBV01R:00000001": An unhandled exception was thrown by the application.
System.Net.Sockets.SocketException (0x80004005): No connection could be made because the target machine actively refused it 127.0.0.1:25
This is caused due to the default SMTP configuration being used by CCM, which is incompatible with the environment. Chocolatey Central Management, by default, assumes that there is an available SMTP Server available on the current machine, using port 25. To fix this, follow the configuration steps.
Emails sent from Chocolatey Central Management to users have links that contain localhost, rather than the actual Chocolatey Central Management Server name.
There is a requirement within the Chocolatey Central Management site to send emails to end users of the application when, for example, registering a new user or resetting a password. When this happens, the email should contain a link back to the Chocolatey Central Management site, which the user can click on to bring up the site in their browser. However, emails sent from Chocolatey Central Management contain links that contain localhost in the address, which means when clicked on, they fail to open correctly. This can be fixed by making a change to the appsettings.json file which is located in the c:\tools\chocolatey-management-web folder.
Open this file in a text editor, and add the following entry:
    "App": {
        "WebSiteRootAddress": "<URL_to_CCM>"
    }
NOTE
When adding this entry, be sure to include a
,either before or after the entry, depending on where you add it in the file. i.e. the end result needs to be a properly formatted JSON document.
where URL_to_CCM should be the accessible URL to access the Chocolatey Central Management Website. This will typically be the FQDN of the server that is hosting the Chocolatey Central Management Website, but it will depend on your environment’s configuration.
The end result should look something like this:
Once this change has been added, save the file, and then run the following to ensure that the process running the Chocolatey Central Management Website is stopped:
# For CCM versions older than v0.6.0
Get-Process -Name "ChocolateySoftware.ChocolateyManagement.Web.Mvc" -ErrorAction SilentlyContinue | Stop-Process -Force

# For CCM version 0.6.0 and 0.6.1
Get-Process -Name "ChocolateySoftware.ChocolateyManagement.Web.Mvc" -ErrorAction SilentlyContinue | Stop-Process -Force
Stop-Website -Name ChocolateyCentralManagement
Restart-WebAppPool -Name ChocolateyCentralManagement
Start-Website -Name ChocolateyCentralManagement

# For CCM v0.6.2 and up
Stop-Website -Name ChocolateyCentralManagement
Restart-WebAppPool -Name ChocolateyCentralManagement
Start-Website -Name ChocolateyCentralManagement
And then try accessing the website again. Any emails that are then sent from Chocolatey Central Management should then contain valid links back to the site.
The updated license file is not being picked up in the website.
You need to restart the web executable currently. We are looking to have it automatically picked up in future releases. Here’s a script to handle that:
# For CCM versions older than v0.6.0
Get-Process -Name "ChocolateySoftware.ChocolateyManagement.Web.Mvc" -ErrorAction SilentlyContinue | Stop-Process -Force

# For CCM version 0.6.0 and 0.6.1
Get-Process -Name "ChocolateySoftware.ChocolateyManagement.Web.Mvc" -ErrorAction SilentlyContinue | Stop-Process -Force
Stop-Website -Name ChocolateyCentralManagement
Restart-WebAppPool -Name ChocolateyCentralManagement
Start-Website -Name ChocolateyCentralManagement

# For CCM v0.6.2 and up
Stop-Website -Name ChocolateyCentralManagement
Restart-WebAppPool -Name ChocolateyCentralManagement
Start-Website -Name ChocolateyCentralManagement

# Restart Chocolatey Agent and/or CCM service (all versions)
Get-Service chocolatey-* | Restart-Service
A computer or group is not showing as available for deployments but I have plenty of available licenses.
Once you upgrade to Chocolatey Central Management v0.3.0+, you have upgraded the Agent on the machine to v0.11.0+, and it has successfully completed a check in, then that messaging should go away. Note that clients do not get a message back that there was a failure as a security feature - you’ll need to consult the Chocolatey Central Management Service logs. You can find that at $env:ChocolateyInstall\logs\ccm-service.log, or if you are on a version of Chocolatey Central Management prior to 0.2.0, the log will be located at $env:ChocolateyInstall\lib\chocolatey-management-service\tools\service\logs\chocolatey.service.host.log.
Failed to generate a user instance of SQL Server due to failure in retrieving the user’s local application data path.
You may see the following: “System.Data.SqlClient.SqlException (0x80131904): Failed to generate a user instance of SQL Server due to failure in retrieving the user’s local application data path. Please make sure the user has a local user profile on the computer. The connection will be closed.”
This means you are attempting to attach a Local DB file as part of your connection. This is an invalid scenario.
The website app pool shuts down almost as soon as it is started.
If you see the app pool shutting down immediately when you start it.
- Check the event log first. It’s very helpful in seeing what the actual issues are
- Turn on stdout logging in the config at
c:\tools\chocolatey-management-web\web.configif it is not already on. The attribute is namedstdoutLogEnabled(set it to true). This will allow logging toc:\tools\chocolatey-management-web\App_Data\Logs. Permissions will play a role in this so ensure the user has the right access. - Check for Non-Default App Pool User Considerations.
Errors when attempting to communicate with SignalR.
Within the Chocolatey Central Management Website, SignalR is used to enable real time communications for notifications. It has been found that the following errors can be shown within the Developer Tools sections of some browsers:
- Error: Connection disconnected with error ‘Error: Cannot send until the transport is connected’
- The connection to … was interrupted while the page was loading. Error: Connection disconnected with error ‘Error: Error occurred’
- Error: failed to start the connection: Error: Unable to connect to the server with any of the available transports. ServerSentEvents failed: Error: ‘ServerSentEvents’ is disabled by the client. LongPolling failed: Error: ‘LongPolling’ is disabled by the client.
In all of these cases, we haven’t seen any drop in functionality for the notifications that are sent from the Chocolatey Central Management application. Our suspicion is that there is a timing issue when attempting to make the connection to the SignalR Hub, which is almost immediately rectified. Due to the fact that SignalR is a 3rd party integration, we do not believe that there is anything that can be done to resolve this problem, and since the functionality continues to work as expected, these errors in the JavaScript console can safely be ignored.
Central Management Setup | Chocolatey Central Management
Current user did not login to the application!
After upgrading to v0.6.0/0.6.1/0.6.2 of the Chocolatey Central Management Website, you may see the error message:
Current user did not login to the application!
When you attempt to login to the application, and you will be immediately logged out again.
Full details of this problem can be found in the GitHub issue, including a workaround for the problem.
This issue has been addressed in v0.6.3.