Client Setup
Client Setup
Summary
Once you have your Chocolatey for Business Azure Environment deployed, you’ll need to get clients talking to it. To do that, you’ll need to do the following on the clients:
- Setup DNS to allow access to the environment.
- Install the SSL/TLS certificate, if self-signed, so clients can access HTTPS components.
- Install Chocolatey components and configure the client for Chocolatey for Business (C4B) deployments.
DNS
Ensure that you have configured DNS to direct clients to your deployed environment.
Once you’ve added the required CNAME record, clients should be able to access it.
SSL Certificate
NOTE
If you used an SSL certificate from an external Certificate Authority (CA), or internally trusted PKI CA, your clients will automatically trust it and you can skip this section.
If you used a self-signed certificate to deploy your Chocolatey for Business Azure Environment, you will need to import this certificate to the Trusted Root Certification Authorities store on the clients.
-
Open the Microsoft Management Console (
MMC.msc) -
Select File -> Add/Remove Snap-in…
-
Select Certificates and click Add >
-
Choose Computer account and click Next, Finish, then OK
-
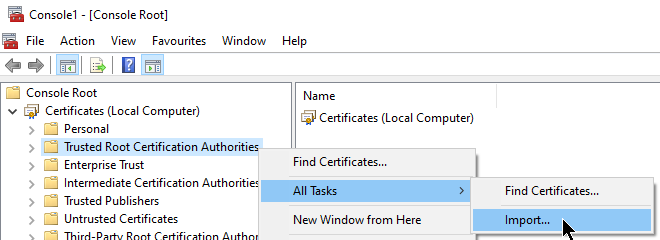
Expand Certificates (Local Computer)
-
Right-click Trusted Root Certification Authorities, and select All Tasks -> Import
-
Click Next
-
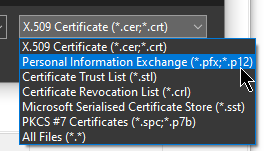
Browse to the self-signed certificate file
- You may need to adjust the filetype so that you can see
.pfxfiles
- You may need to adjust the filetype so that you can see
-
Click Next
-
Enter the password supplied when creating the certificate
-
Click Next, Next, then Finish
-
Close the Microsoft Management Console
Client Setup Script
To on-board clients, you run the ClientSetup.ps1 script provided with your Chocolatey for Business Azure Environment.
You will need the following values ready when running this script:
FQDN: The fully qualified domain name used to access your environment.ccmClientCommunicationSalt: This is the client-side salt additive. More information about this can be found in the C4B Config Settings docs.ccmServiceCommunicationSalt: This is the server-side salt additive. More information about this can be found in the C4B Config Settings docs.ChocoUserPassword: The password for thechocouseraccount which is used by the client to access your environments’ Sonatype Nexus Repository service.
Except for the FQDN, all of these values are available in your deployed environment’s Azure Key Vault.
See Accessing Services for more information about retrieving values from the Vault.
When you’re ready, run the following on the client from an elevated (Run as Administrator) PowerShell session:
[CmdletBinding(HelpUri = 'https://docs.chocolatey.org/en-us/c4b-environments/quick-start-environment/advanced-client-configuration/')]
param(
    # The DNS name of the server that hosts your repository, Jenkins, and Chocolatey Central Management
    [String]$Fqdn = '{{ Replace with the FQDN for your Chocolatey for Business Azure Environment }}',

    # Client salt value used to populate the centralManagementClientCommunicationSaltAdditivePassword value in the Chocolatey config file
    [String]$ClientCommunicationSalt = '{{ Replace with ccmClientCommunicationSalt (This value is in your Azure KeyVault) }}',

    # Server salt value used to populate the centralManagementServiceCommunicationSaltAdditivePassword value in the Chocolatey config file
    [String]$ServiceCommunicationSalt = '{{ Replace with ccmServiceCommunicationSalt (This value is in your Azure KeyVault) }}',

    # The credential for accessing your Nexus repository, e.g. for 'chocouser'
    $RepositoryCredential = [System.Net.NetworkCredential]@{
        'userName' = 'chocouser'
        'password' = '{{ Replace with ChocoUserPassword (This value is in your Azure KeyVault) }}'
    },

    # The URL of a proxy server to use for connecting to the repository.
    [String]$ProxyUrl,

    # The credentials, if required, to connect to the proxy server.
    [PSCredential]$ProxyCredential,

    # Install the Chocolatey Licensed Extension with right-click context menus available
    [Switch]$IncludePackageTools,

    # Allows for the application of user-defined configuration that is applied after the base configuration.
    # Can override base configuration with this parameter
    [Hashtable]$AdditionalConfiguration,

    # Allows for the toggling of additional features that is applied after the base configuration.
    # Can override base configuration with this parameter
    [Hashtable]$AdditionalFeatures,

    # Allows for the installation of additional packages after the system base packages have been installed.
    [Hashtable[]]$AdditionalPackages,

    # Allows for the addition of alternative sources after the base configuration  has been applied.
    # Can override base configuration with this parameter
    [Hashtable[]]$AdditionalSources
)
$RepositoryCredential = [PSCredential]::new($RepositoryCredential.UserName, $RepositoryCredential.SecurePassword)
$params = $PSBoundParameters
$PSCmdlet.MyInvocation.MyCommand.Parameters.Keys.Where{
    $_ -notin [System.Management.Automation.PSCmdlet]::CommonParameters + "FQDN" -and -not $params.ContainsKey($_)
}.ForEach{ $params[$_] = (Get-Variable -Name $_ -Scope 0 -ErrorAction SilentlyContinue).Value }
$params.RepositoryUrl = "https://$($fqdn)/nexus/repository/ChocolateyInternal/index.json"

$downloader = [System.Net.WebClient]::new()
$downloader.Credentials = $RepositoryCredential

$script = $downloader.DownloadString("https://$($FQDN)/nexus/repository/choco-install/ClientSetup.ps1")

& ([scriptblock]::Create($script)) @params
This script will accomplish the following on your client:
- Install Chocolatey CLI from the installation script hosted in your internal raw Sonatype Nexus Repository.
- Add the
ChocolateyInternalsource, and enable it for self-service - Disable the default
chocolateysource. - Install your Chocolatey license using the
chocolatey-licensepackage. - Install the Chocolatey Licensed Extension (without context menus for Package Builder).
- Install the
ChocolateyGUIpackage on the endpoint, for self-service support. - Install the
chocolatey-agentpackage, which supports self-service and Chocolatey Central Management communication. - Enable and disable features related to configuring self-service access on the endpoint.
- Setup the communication channel between the endpoint and Chocolatey Central Management, using the correct URL and salts.
- Enable Chocolatey Central Management Deployments.
For further details on how you can customize your install using this script, please refer to the Advanced Client Configuration article.